
For me, even if a Unit is going to be transport [or off-board artillery, or a command post, or in a rear AO, etc] it can still be interesting and engaging on the table. Also, it allows me to double-down on the mini sometimes, using it as not just its most obvious use [transport - Armored Personnel Carrier [APC] in this case] but I could use it as an IFV if I'm short on vehicles for a big scenario.
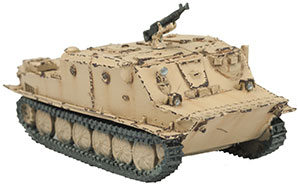
First, I did some research to make sure that the BTR-50 was in fact used periodically with additional weapons. As I figured, it often has a crew MG, not just the transported crewed HMG that this GHQ model came with [pictured riding the back of the left vic below]:

http://www.ghqmodels.com/store/w21.html
I like how this is mounted, but didn't want to create the forward support for this pintle.

http://www.military-today.com/apc/btr_50.jpg
The vehicles came with a sprue of 3 HMG and 4 Mortars, so there was a bit to get started with, and the mount for these MGs is pretty heavy looking and in a supported spot:
https://www.flamesofwar.com/hobby.aspx?art_id=4199
Below the mount is a bit obscured, but it does show how the hatch works!

http://acemodel.com.ua/pages/models/72146/btr50.jpg
Started with cutting off the old hatch. I tried to save it, but it popped across the room somewhere! So to make a round hatch, a round sprue cut fine will do. Then I cut the legs off a GHQ Infantryman who was running with an assault rifle [ouch! But for a good cause]:

Side view of both bits after I trimmed off the assault rifle and glued them on.

He looks like he's interested in where he's going, perhaps shouting at the driver? I then glue the mortars on the other two APCs, tricky to cut them from the sprue without bending them, I had to use an X-acto knife bracing the mortar against a hard surface:

I glue on the three HMGs by drilling a new hole - they come with a small peg on the bottom. Had to hold them with tweezers while I filed the pegs a little! After doing the platoon commander, it was pretty easy to cut another running soldier in half, trim off his backback and gun, and position his hands on one of the HMGs.So the gunner's sitting in place, but...

...have to see how the hatches open! With this question answered by the below...[which has a super-cool Russian camo scheme, I may add]...

http://www.tanks-encyclopedia.com/coldwar/USSR/soviet_BTR-50.php
I cut a fine piece of plasticard for the doors, then put a line of super glue along the hinge line, with a small bit of flak laying on the table to prop open the hatch as in above pic, then glue the card atop it...

...and voila! I have the right angle with very little effort.

Below, the three vehicles with their guns and one gunner.

And below, a much more interesting platoon than what I started with! The priming stage will hide most of imperfections immediately [e.g. dried glue lines]. The holes where there is no HMG will be covered with boxes or camo nets [made from cheesecloth] or a tarp.

So the final effect is an APC platoon of two sections, one is the commander's vic, two are mortar carriers, and three are APCs or HMG team carriers of some sort.
As these are going to be used primarily for my "Syria 2020" campaign, they don't have to be completely imitating a past use or style. There's nothing to say that future HMG teams won't mount their HMG farther forward on the hull so they can use it in a surprise firefight - very likely in a civil war with counter-insurgency and asymmetric ops going on, especially in convoys.
This all took a couple of hours. Half of it was figuring out how to do it with something so small, as I'm learning this scale. I'm going for a bit of realism, a bit of eye-pop, making something that is sturdy, and trying to think in game terms also [maybe I'll need some Mortar team or HMG transports?]. It is easier and faster than 15mm since stuff is smaller and you are going for a more general effect rather than details [that are invisible in 1/285!].
I could definitely use more crew figures. CinC have a bunch of boring looking infantry who are just standing up, and they'd do well for a variety of crew roles. Come to think of it, there's a bunch of stuff I could use from CinC...uh-oh.
;)
Very nice!
ReplyDelete