Thursday, December 21, 2023

Rezolution: More Figures!

The Goody Box arrives...

Below is the fluffy padding that my 35 figures came in...
....under which was the figs.  Very resilient, so no damage.

For the CSO: 2 more troopers, an Engineer, a Medic and Medibot, Marshal Renton, and the double-pack of 2 Rangers - one is another "Not Deckard" and one is a cool old-school looking woman [sorta Sean Young, actually...] with a gun behind her back.  They'll all add something to my game plan.


The APAC figures are kind of scrawny and look like models, and therefore make great Androids and human sympathizers.  So, on to them...

Added the APAC enforcer with shotgun - could be loaded with non-lethal rounds, including gas.  The enforcer Lieutenant will be a great human sympathizer, he looks less like the APAC Enforcers, and has a blade and pistol. The Numb Sisters could be people or androids.  They are very interesting characters and will be fun to paint up. The Ninja...well, she could go either way, human or android, dynamic figure either way.

The figure selection is largely shaped by the scenarios and "conflict level" I want to play, which is *just* at the level where shots may be fired.  So all the APAC perps are thinking that they may or may not resist, depending on how much trouble they may get into.  The Marshals are only resorting to violence as a last resort if their questioning doesn't work out. Uncertain how well that will play out using the Rezolution rules as-is.

But, this fits nicely in with the Sketch System, in that it is easy to manage non-violent or verbal conflict.  This makes it perfect for the Bladerunner future in that the overcoat guys can be Bladerunners and the CSO goon squad is their "Backup Bulls" if needed.  The Androids and their human sympathizers are more interested in survival and staying out of jail, while at the same time they may be engaging in illegal activities like animal stealing or swindling [androids lack empathy and don't care about animals or the human fascination with them].

Working with the APAC figs
Overall, the APAC are easy sculpts - few parts, just some mold lines to clean up.  Anyone should be able to handle them. As they are a bit on the scrawny side overall, they are easy to re-position limbs, etc, if you want.

The Numb Sisters are interesting figs, with lots of small details and very characterful poses and expressions. There was a mold line running around them both, but they cleaned up pretty easily. Excited to paint these, SO many possibilities for the painting schemes!

Female Ninja - dynamic, looks like a dance move. She is a bit flat, but maybe she's walking a ledge to sneak in and assassinate someone...?

APAC enforcer with shotgun, and Lieutenant. The shotgun is a cool future sculpt, looks like spare rounds up top. The Lt. was also a bit flat, so I repositioned his arms farther forward.  Both have great facial expressions, I like the Lt's smirk - it's funnier because he's holding a grenade!

Here's the APAC crew cleaned and primed, along with some animals to be fought over, perhaps stolen. The animals are just hard plastics I got somewhere or other.


Working with the CSO figs
I wanted to expand the CSO and have more options for larger games, so two teams at least to make up a full squad. This involved two additional Troopers, the Field Medic and Medibot, and the CSO Engineer.

These were a lot tougher to work with, and I'd only recommend them for an experienced modeler [if you want easy, definitely go for the APAC, they were a quick clean-up]. 

Part way through, this is what it all looks like - lots of clamps, lots of partially assembled models leaning in the best position and waiting for the glue to dry.

The Medic was the easiest of the three.  The Engineer was also pretty easy - the only part I was uncertain about was a tiny little.. thingy [indicated by the file].  This required looking at the Rezolution Store [CLICK] to see if I could figure it out.
Turns out, it is a small widget on the end of the scanner thing [Remote Board? XTec Beamer??] the Engineer is holding out in front of him, so perhaps antennae? Looks like he has a flamethrower and a scanning device to me, anyway.

Finished Field Medic and Engineer. Again, I repositioned a few limbs, heads, arms, to get a bit more "depth" to the poses.

Altho the Field Medic was easy, he was more than made up for by the Medibot, which had 13 pieces, 12 of which were very small. I had to go to the store pic again to see what to do:
Altho fiddly and small, the pieces add a lot of details and dynamics to the sculpt, so it was worth all the time to pin the legs, and carefully place the various lenses.
Halfway there!
Overall, the end results look cool, which is what matters.  I find working with the models relaxing, in general, so it doesn't bother me that they aren't a couple of snips and filings away from primer ready.

Below are the two additional CSO troopers, I wanted to make certain they did not copy my other sculpt's poses. The one guy seems to be on routing patrol, shouting instructions over his shoulder.  The other guy is on the move: "Contact Left!" and indicating to Get Down with his left hand. Good poses!


And below, the full CSO squad of 10 models. The two teams will give me a lot more options for scenarios, and of course the technicians always add something to the narrative and mission parameters, so I'm glad I got them all. 


Next task is to get priming them - this will be a bit weather dependent, but December has some mild days usually, so hoping that I'll be able to do that soon regardless of the fact that winter is coming...

Wednesday, November 29, 2023

"Fire Team" Campaign #2

The trick is to stay alive for the whole operation...
That's about the size of it!

For the follow-on Mission, I drew "Uplink" which is a pretty complex mission requiring players to secure both objectives C or A in order to use B or D [respectively] to uplink data for 3VPs a pop. It's not easy to fulfill all the requirements under fire. The spread-out setup positions are also interesting.

Necrons drew these Target of Opportunity cards. The key is "Total Annihilation" which is quite possible as there's only 5 SMs opposing them, and it's worth 4 VP!

The SM drew three solid ones, but "Maintain Your Position" is probly the best, since they can usually do it for 2VPs.
The SM have these bonus cards - a Battle Honor that gives +1d6 damage to SGT Gideon's chainsword, the Restoratives gives 1d6 Wounds back [nice!] but the 2nd Special Op card gives +2 wounds to all Necron models!  The Warriors will have 10 and the Scarab Swarms will have 12.  Not a big difference, but occasionally it may be important - we'll see.

SM win Initiative and after they have alternated all their models in setup, their first 5 - and the Necron's first 5 - look like the below. SM plan is to seize and uplink the closer top objective while contesting the lower one with Fire, perhaps close assault if necessary.
The Necrons then get to place their 5 remaining Warriors and the 3 Scarab Swarms.  Their plan is to contest both objectives while eliminating the SM's and getting +4VPs!

SM have Initiative, and play "Maintain Your Position" while Necrons put down "Clean Kill" which is obvious, since NO SM models have any Wounds at this point, anyway...duh.

For Strategic Ploys in the first Turning Point, SM use "My Faith is My Shield" to give SGT Gideon +1 Defense die. Necrons go with "Advanced Combat Protocols Upload" on a warrior with Gauss Reapper, which will give him two Attacks at Range 5 and 5 dice each.  They screen him for the right moment to unleash him later in the turn.

First move, SM boldly advance SGT Gideon into Cover - he now gets a guaranteed Save, plus 3 Defense Dice.
But after a couple of Turns, the Necrons shoot and bite him down, thanks to some hot dice and bad rolls by Gideon!  This has not started off well...previously this ploy worked great, with some SMs lasting the whole game!

Next, Red SM advances, and puts some hurt on a Scarab Swarm. The Necrons were able to just kill him, however, so he used the Restoratives card to go down to 6 Wounds!
The Necrons next unleash the Warrior with Advanced Combat Protocols and shoot Red twice - he dies after being finished off by munching Scarabs!

SM Yellow then puts the hurt on a Scarab Swarm, but it only ends up with 11 Hits, and it now has 12 [instead of 10]!
Green SM has occupied key Cover in mid-board area.

Play progresses down the board a bit. The Necrons engage SM Grey with devastating fire, but he rolls amazing Saves!  Note that the Scarabs have deprived him of key Cover near an objective - pesky little blighters...

As Turning Point 1 ends, the board is looking bad for the SM. They lost two SM to carefully planned fire followed up by Scarab Swarm assaults, are only holding one key piece of Cover, and haven't taken any objectives having been forced to use their Action Points to shoot at Necrons. 
Meanwhile, the Necrons are advancing on objectives at the south end of the board!

Necrons winning 1-0 as they got a Clean Kill.

As the fighting continues through Turning Point 2, the Necrons manage to carefully unveil fire while slowly advancing at the North end.  They kill Green SM along the way!
Turning Point 2 ends with the SM gaining 1 VP for Spread Out and the Necrons a second for "Take the High Ground".

Turning Point 3 is looking grim, with one SM contesting each objective, and unable to support each other.
But the SM win Initiative again, and have a chance to dent the Necron Warriors a bit. But they only have a few Attacks...

On their first Turn, Yellow SM attacks the Scarab Swarm twice, rolls badly and achieves nothing. Scarabs attack back, get a buncha Hits, and despite two saves the SM goes down!

At the south end, Grey SM takes out the Scarabs but concentrated fire brings him down.

Turning Point 3 ends with an 8-2 Necron win, as they get "Total Annihilation" for 4VP and took two objectives.

Well, that was a brutal massacre!  I've actually played this scenario two times previously, and they were both very close but I made some errors with VPs and cards.  This time, I thought I had the perfect strategy for the SM and instead they got their teeth kicked in.  I've also learned how to maximise every shot by the Necrons, and use the Scarab Swarms better as obstacles and to deprive the SM of Cover.

Very much enjoying the game, so was motivated to clean and assemble Assault Intercessor Team Gideon, and boy are they large models! Bulkier and 4-5 mm taller or so. They are in dynamic poses, not standing straight up, but definitely large.
The SM is a standard-sized guy from "Labyrinth of the Necrons [like the Green, Red, Yellow and Grey SM]. The Necron is from 3rd edition, and is true 28mm with a 25mm base.

"Here we come Undead Pariah's of the Galaxy!"
Great models, the poses are almost TOO dynamic and will probably knock other models over, but these games don't involve many models, so it'll be OK.

With the SM defeat, the Necrons are now up to advance to a Special Operation, so stay tuned!

Monday, November 20, 2023

More Space Marine Adventures: "Fire Team"

Grab your team and live the dream!
"The Game" of Tactical Squad Combat?  We'll see!

GW has been making a very sensible venture into self-contained board games in the 40K universe, using various models, including a few unique ones, but generally always involving Space Marines. They have all been satisfactory introductions to the game. 

A few of the games are very basic e.g. "Doomsday Countdown" and "Rise of the Orks". These may be tweaked to be more tactically challenging for advanced players by simply introducing a few additional *rules* which do not affect the cards or the original stats.  The Arena combat games appear to be a bit more complex and also make for good multi-player games.  All provide a modest amount of modeling and painting, generally 5-10 models or so, and are great introductions to the hobby skills side.

"Labyrinth of the Necrons" is still available [clickI posted on it in this thread [click].  "Doomsday Countdown", the two older Combat Arena games [click] are floating around at the usual second-hand sites and the latest is on sale at Barnes and Noble.  Some are even at Amazon or Walmart on-line.  Plenty of info is available about them at www.BoardgameGeek.com also.  Finally, there's the new exclusive to Target game, "Space Marine Board Game" [click].

If you want to get your kids or a newcomer introduced to tabletop games, these are far more suitable than full blown 40K or even the supposedly stripped down "Battle Companies", and the easily over-complicated "Kill Team" [itself supposedly an intro to the game].  It's as though GW has two design teams that don't talk to each other: one can't make anything simple, the other gets the mission of "introductory game"  

The premier 40K boardgame I've found is this one, "Fire Team", which has plenty on it on line [click] and excellent reviews in YouTube [click]. This is essentially "Kill Team Lite" and much more manageable and it costs a fraction as much.  I grabbed my copy a year or so ago, and read it but didn't have time to crack it open until now.

Motivated by reading my latest Caiaphus Caine omnibus, I grabbed the game again from the shelf. With only a dozen pages of rules, I reviewed and then managed to squeak in a game with long-time gaming pal grognard Ken, who has been willing to try anything [a virtue!].

He pulled the Mission "Critical Escalation" from the dozen cards fanned out in my hand. This is an interesting scenario, as there are 6 objectives, but 2 are removed in the 2nd and 3rd Turning Points [aka "Turns"] so at the end only 2 are left, and their points value increases each Turning Point [TP].  In Turn 1, they are worth 1VP each, Turn 2, the last four are 2 VP each, and Turn 5 the last two are 5 VP each.  So a high-pressure scenario - exciting!

In the above pic, the blue forces [Space Marines] may set up in the blue spaces, and the Necrons in the silver spaces.  We diced for Initiative and alternated set-up, and ended with the below starting positions:
Worth noting are that the 10 Necron Warriors have the same number of Wounds as the 5 Space Marines [SM]in total [80] but the Necrons each shoot as well as a SM. The Scarab swarms add an additional 30 Wounds but have relatively minor attacking ability - but they can fly around and annoy the SM. Overall, a small advantage to the Necron side, and they activate with the first three Necron Warriors each turn.  Til they're dead of course...

First shot of the game, Necrons roll 4 Hits, 3 Critical!
SM saves two, not bad, but he takes 10 Wounds.
Scarabs munch on him for 3 more Hits.
Next Necron to activate, finishes him off.

But revenge comes swiftly - Dimension Corridor traveling Necron gets wacked right off the bat.

In just a few more go-arounds, the Necrons are still marching, thanks to their "Reanimation Protocols" which brought back a few dead Necron Warriors. Also the SM haven't knocked out any Scarab swarms, which gives the Necrons - in essence - 2 Activations for the price of 1 for the first three Activations.

Finally, the last SM is taken down.  The Necrons have achieved most of their Targets of Opportunity, and secured most of the board.  What went wrong?  Hard to tell, as we were muddling thru the tactics most of the time.

Quick thoughts: As the game is alternating by model activation, it does help to win Initiative and get the first shot, but the other side can quickly redress the balance unless they are a very small force.  

The Necrons may only Move and Shoot each turn, while the Space Marines may repeat actions and shoot twice, for example, or move twice. This means that in any given turn, the SM can put forward the same firepower on an equal number of Wounds, but the sequence of events and the quality of the dice rolls really matters.

It helps to be able to take out a figure that has NOT activated yet, as it deprives the enemy of a future activation.  It can also be less than good to kill a fig that has already activated, depending on the situation.

This was a pretty tense game but a solid win for the steel monsters!

     *     *     *

Well, I had to play solo on the first chance I could get, a day later.  This time, the same forces, same Mission:
Necrons draw some great Targets of Opportunity cards. Two are pretty easy, "It's all up to you" and "Maintain your position". But they add 3 VPs to the possibilities.  The last, "Total Annihilation" is a great card for the Necrons, as they have lots of bodies and may wipe out the SM's - for 4 VPs!

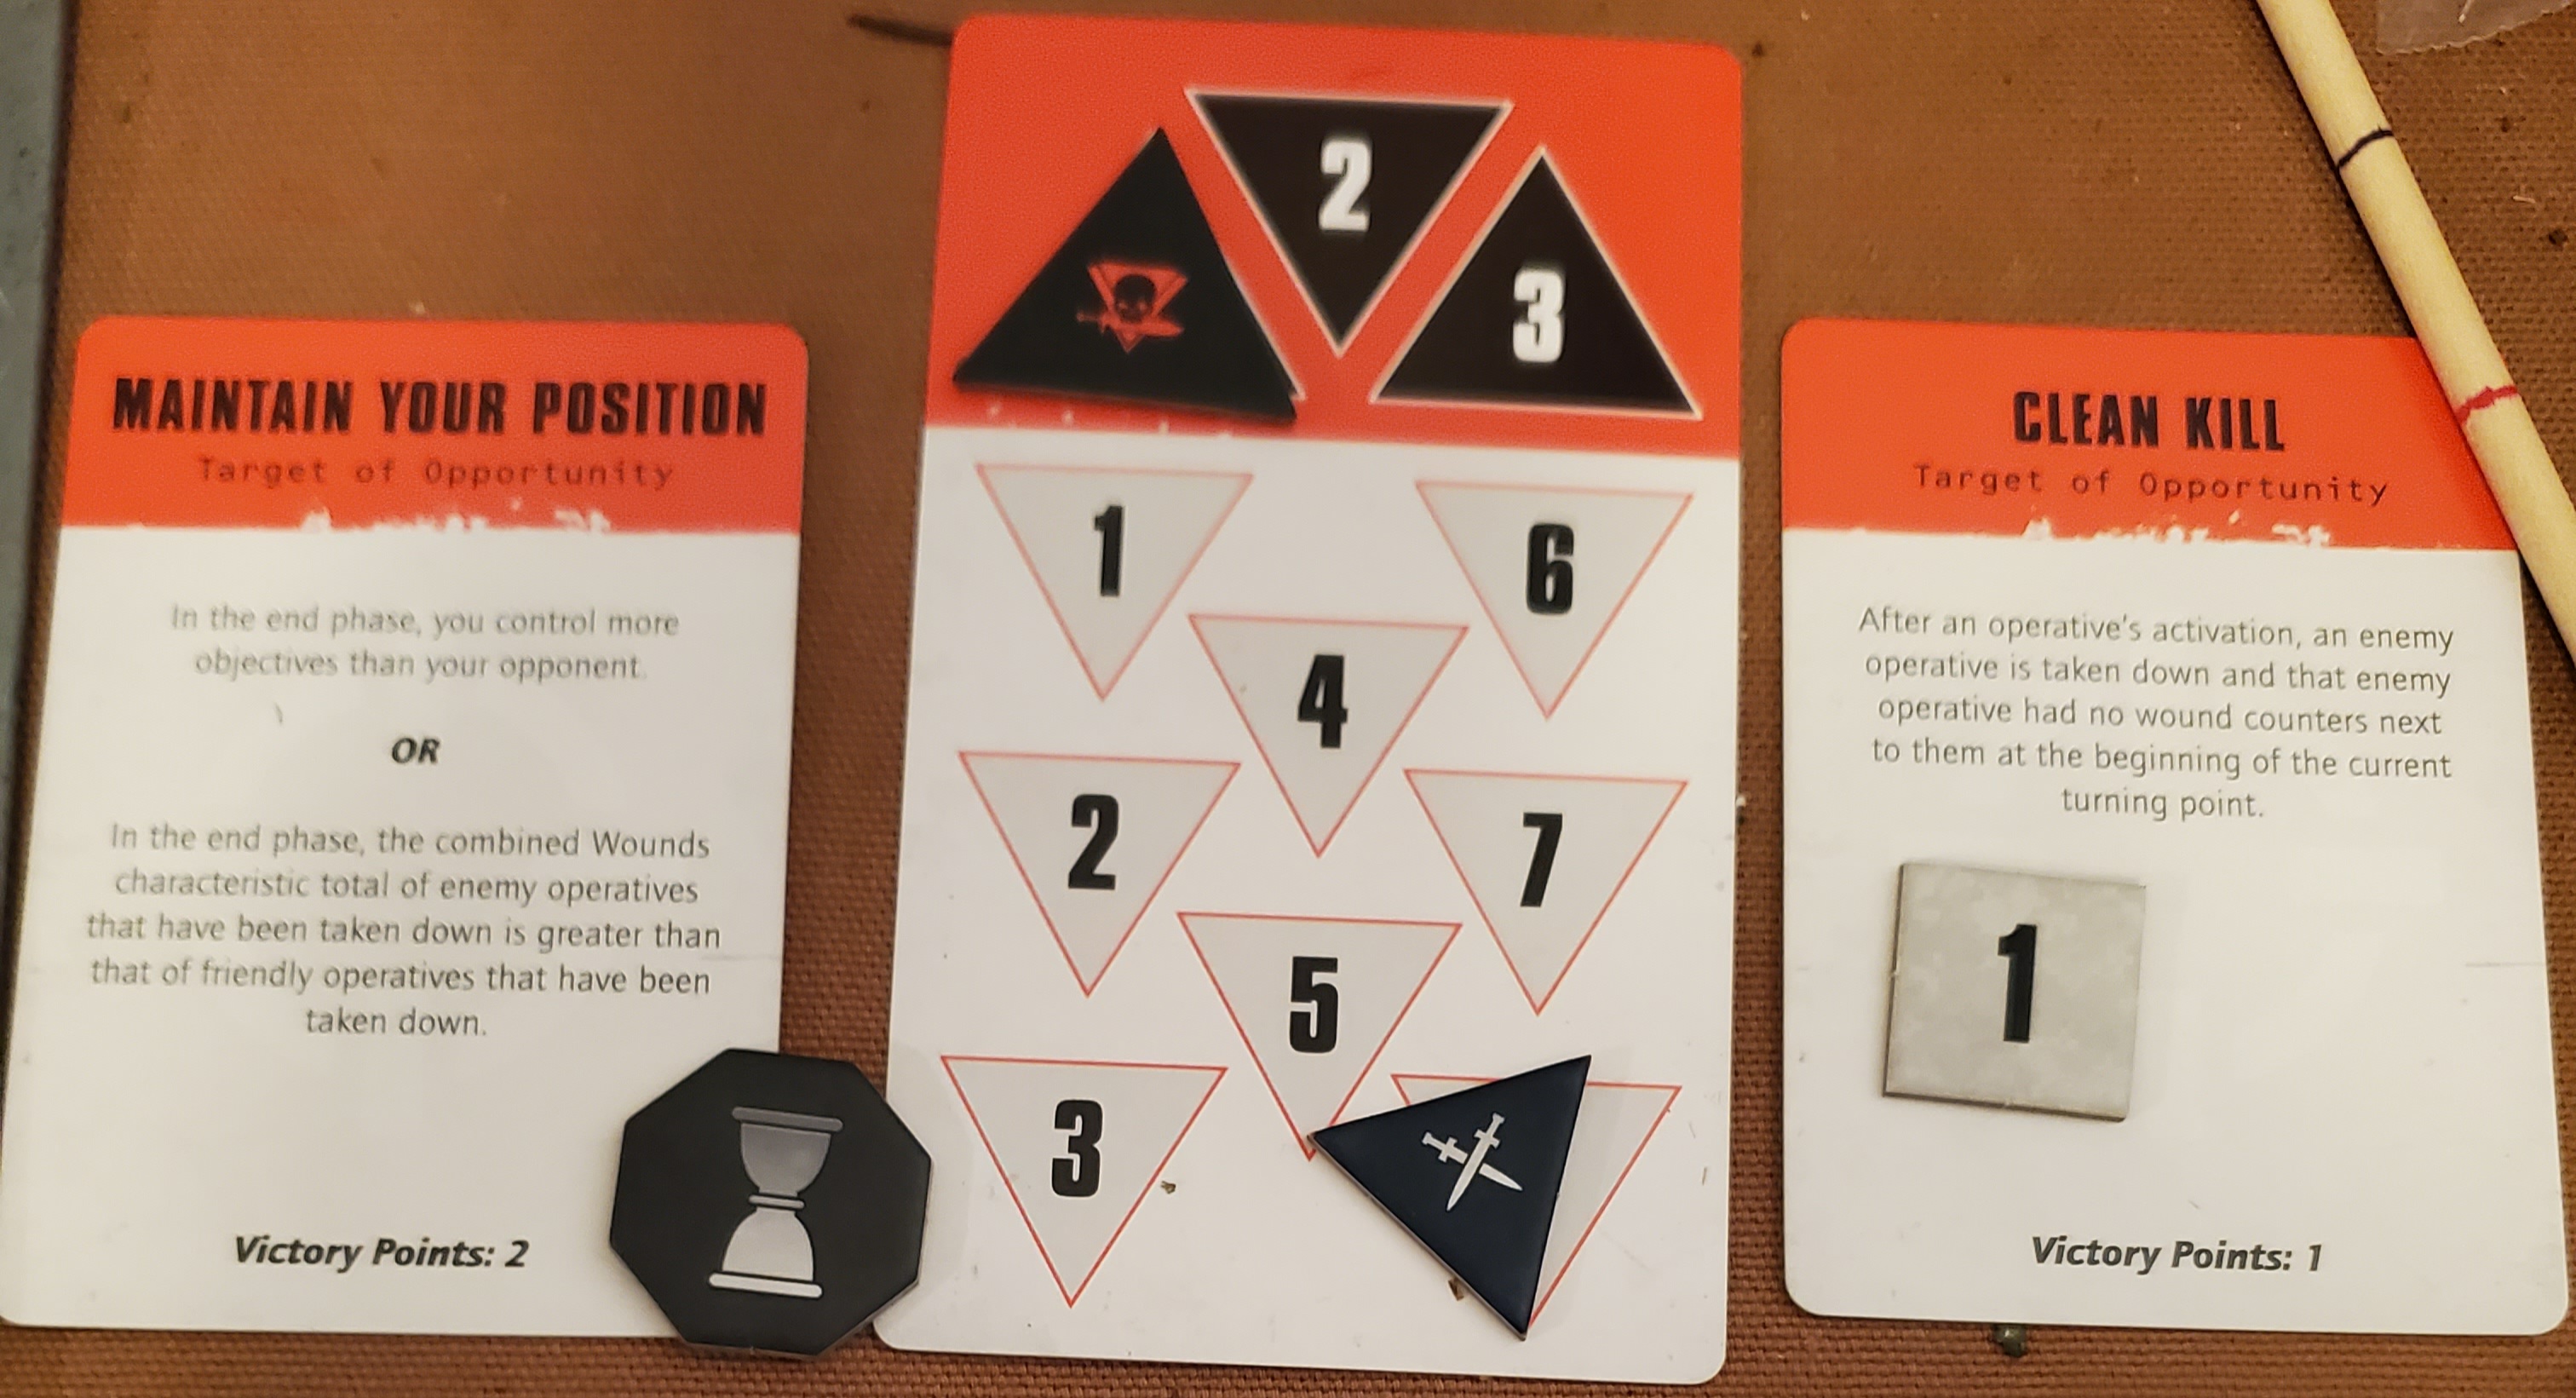
The Space Marines [SMs] draw three OK cards:
While each is only worth 1 VP, they are relatively easy to accomplish - for SM anyway.  But they will NEED to accomplish all three for the 3 VPs, due to the Necron threat of an additional 7 VPs!

Yes, it is Critical Escalation again... this is a complex mission!

The Good Guys - they are actually from the Necron Labyrinth game, and are great models...playing them as Assault SMs.

Strategic Ploys - I think the "My Faith is My Shield" is great, adding a defensive buff. "Combat Doctrine" lowers the attack from a 3+ to a 2+ to hit, which I wouldn't think I'd need, BUT...
"For the Emperor" allows you to weight a contested Objective.  Sure, that's OK, and "might" be useful.

For the Necrons, they have "Reanimation Protocols" which can return to them any of their dead they roll a natural '6' for...and the "Advanced Combat Protocols Upload" allows them to repeat an Action, so "Move-Move" or "Shoot-Shoot" [most likely COA of course]
The "Dimensional Corridor" allows them to move one Warrior anywhere on the board, which could secure an objective towards end of a Turning Point.

After a bunch of fussing, I finally get both setups correct...I decide to fill the front with SM altho the Necrons have the Initiative and will get the first shot... still, they die pretty easily and with a bit of luck each SM can kill 2 a turn if they are in range.  We'll see....
For the Chromed Forces of Evil, I put their assault rifles up front with all three Scarab swarms. It's a bit hard to remember that each activates SECOND after the first THREE Necron Warriors, and plan that accordingly, but... I think I got it.

Each side buffs a figure...the Necrons use Advanced Combat Protocols to be able to shoot twice, enhancing their Initiative Threat on first Activation. The SM's buff the Grey Wolf SM for one bonus defensive die - the = of being in Cover.

Soooo... first Turning Point is a point-blank massacree, with two SM, 3 Necron Warriors and a Scarab swarm dying.

At the end, the SM have an edge, 4-2 in VP's. They were able to secure three Objectives and achieve their "Spread Out" Target of Opportunity. The Necrons struggled a bit.

For Turning Point 2, the SM choose left card, Necrons right:
Both seem pretty doable...

Necrons are acheiving their Targets of Opportunity...
...and in a great series of rolls, whack the SM Sergeant!

Overall, the game is pretty frustrating, as the SM seem to be able to find 2-3  lousy rolls in every set of 4-5 dice, as in a 1 or 2, which causes them to miss a shot or saving roll. I actually considered giving them a bonus die each roll, they were rolling that badly that consistently...

Anyway, with 3 SM down, the Sergeant down, the last Sole Survivor is forced to act aggressively. He advances and whacks a Necron Warrior...
With some additional oomph, he engages the one of the last two Necrons. The Necrons are staring a win in the face, and the warrior shoots, but only gets one Hit which does 3 Wounds. In return, the SM gets 3 hits, and the Necron only saves 2, so goes down.

There is one final Necron left... and one final SM left!

I had to look at the VP's... it's down to the wire...
SM behind, 6-9, but the last contested Objective is worth 5VPs, so anyone can win.  Wild Card is that if the Necrons kill the last SM, they will win 6-13.

3rd Turning Point, I did the math, calculated the possibilities, and the Space Marines MUST advance and get shot at, so they can secure the Objective for 5 Pts.

Each side is now limited to 1 action point each, alternating [so Move, OR Shoot].  The Necron shoots, get two Hits, one Critical!  The SM MUST MUST save at least one Hit, or the game is very very over.  And he does!
Still, the SM has 13 Wounds out of 16 gone!

For His shot, he hits 4 for 4!  SM saves one Hit, goes down dead [or out of commission, or TERMINATED or whatever...].

The above supposes the Necrons sit tight on their win, so I re-calibrated and had the Necrons move more aggressively earlier, on Turn 4.

In the end, the double-threat of the SM advance on the objective REQUIRES the Necrons to advance into Close Combat to contest the objective, still giving the SM player a chance to kill the last Necron, but a *better* chance, with 5 dice attacking instead of 4.

With the +5 for securing the Objective on the last turn, the SM win 11-9, coming back from 6-9.

Overall, I am uncertain how fair and balanced the game is. First time, Necrons won a solid victory by rolling well and probably playing smart [for robots].  But I think if Ken had shot more sooner, more Necrons would've died faster, and the Necrons may have lost.

This second game the SM were more aggressive, and took [and gave] casualties in the first Turning Point that seemed ruinous.  But, they managed to maneuver and claw their way back despite a really solid defense by the Necrons, a layered shooting gallery with plenty of threats.

In any event, the game came down to the last rolls, and was tight for most of the game, and was very tense.

Using 18 models and a nice board, I can't complain about the visuals or the tactical possibilities or the challenges presented to both sides, who play very very differently.

Overall, I'm mystified by the complainers, and see both the Fire Teams in the box as real contenders based upon two plays of a scenario.  The game is physically pleasing, comes with plenty of figures, has numerous tactical possibilities fought out in tense rounds where every decision and every roll matters, and I found it challenging [with 42 years of table top gaming experience...!!!] so giving this a thumbs-up!

Clearly, we can't be satisfied with that, so will have to do a...
CAMPAIGN!

Stay tuned...