Showing posts with label 6mm 1/285 1/300 Micro Armor. Show all posts

Friday, January 24, 2025

"Up the Blue!" 3 Playtests

Somewhere on a Hill in 1940...
...the fate of France is being determined.

For the same reasons as ever - a playable set of WWII rules that easily accommodate my - and everyone else's - Flames of War armies, I'm now playtesting "Up the Blue!" WWII with an assortment of grognards I've accumulated over the years. Some I've known for 40+ years, some for less.  But all have one thing in common... they have the WWII armies, but they don't have a set of rules they want to play, so they collect dust in storage bins.

We quit FoW III when we realized that we were never going to get the rules down, even after lots of effort.  It was also exhausting to play, and took too long for a full game.  Also, there were plenty of things I disliked about them, especially the unrealistic micro-managing of Units two levels or more below the command level. There was also a lot of false differentiation, or unneeded differentiation, redundancy of factors [that often cancelled each other out], and over-engineering of, well, just about everything.  All of which caused the groups playing it to give up eventually. I don't know anyone who regularly plays v.4, and I refuse to buy more rules and all those cards for what they claim is a streamlined game.

Anyway, among the senior grognards, I found some willing playtesters. The incentive was one fellow discussing selling off his [FoW] WWII armies, as he just wasn't using them.  I said I was interested, BUT why not try my rules first?  If they suited, he'd have a set of rules that played painlessly enough to provide lots of enjoyment in small time spaces using "One-Hour Wargames" which he said he had [somewhere]. He agreed, and we conned another fellow into trying out "Up the Blue!" as well, since he has an even large collection that don't get used.

To get the ball rolling, I used an old favorite, Scenario #4 "Take the High Ground". Having played / run it at least 30 times, I appreciate the multitude of decisions it presents player with, using only one hill and one woods as key terrain. With the mechanics of UtB! as designed, a simple scenario becomes rich with possibilities, altho the enemy always gets a vote! Our host put down the small amount of terrain necessary, I marked out the board edges [the table was a lot bigger] and he chose French v. Germans from his extensive collection - so it was off to fall, 1940 we went!

Below, is around Turn 3. Attacking French are pushing hard against the objective, threatening both flanks. Dug-in Germans are outnumbered 3-2, which isn't really enough except that there are Mortars, ATGs and Tanks adding a few casualties here and there. ATGs are also on overwatch against the Road.
French have moved left platoon into Close Combat range, and the casualties will significantly increase.
View from the French Mortars [which are really 75s]. Their support will be essential to "Take That Hill!"  In the distance, German Infantry hasten to reinforce the objective - but will they make it in time to contest it?  The French must have "exclusive occupation of the hill" to win.

The battle develops. Turn 5, the German reinforcements are playing hide'n seek around the woods. The Tanks are clearly nervous in the service about the significant AT assets on the other side, the French Tank Unit and the ATG Unit. French Mortars and ATGs are supporting the objective with Fire while an Infantry platoon moves to reinforce it. French Spotter has a choice - call the Mortars on the objective, or against the reinforcing Infantry moving in the open?


This fight progressed nicely, with both sides feeling out the scenario and the rules. There were plenty of opportunities to discuss choices, like the Germans deployed on the back of the hill in defilade to reduce the amount of Direct Fire they took and reduce the effectiveness of the Indirect Fire.  But that's not the only way to do it.

As the game plays pretty quickly, and we had time, we played again, keeping the same sides as both wanted to try a different plan. This time, the Germans deployed in two layers, Dug-in, with both  Infantry platoons on the front side of the hill, with line of sight to the approaching French. This time, the French put their tanks up close to the action, on the left. The Mortars supported from the woods [you can see their template paper on the Germans] and the ATGs interdicted the road.

The Germans opted to similarly deploy their ATGs and Mortars, and sent both the reinforcing Infantry and Tanks to support the hill.  As the Germans have already lost the front Infantry platoon, this is a good idea! Being in defilade reduces your firepower forward, but preserves your troops - the opposing infantry can't engage you across the military crest until you are in Close Combat Range.

German Tanks take a loss from the supporting French Tanks [yellow marker]. French Infantry are executing their company attack with closely supported platoons on a narrow frontage. This is only possible because the German Mortars can't get effective IF raining down upon them. That would require re-positioning. It appears their Spotter was lost with the front Infantry platoon.

Playtests went well, both players were engaged with making decisions and not with looking things up on charts. They liked that. While there are plenty of decisions to be made, and it takes experience to know when and how to execute key parts of your plan, it never gets bogged down in minutiae - players feel like company commanders, and not like team leaders.

A week or two later, we met up again. This time the Italians defended against the British. Players had switched sides. Defender liked being in defilade, and started with an Infantry platoon and the ATGs on the hill - the Spotter appears to be with the ATGs. 

Attacker concentrated heavily on the left, out of Line of Sight of most of the Italians, and pressured them heavily with Close Combat on each side supported by Tanks, ATGs and the mortars.
The British Spotter is with the ATGs, so has limited vision of the battlefield. Italians are racing two Infantry platoons and the Tanks towards the hill. Their Mortars are behind them, getting set up for some IF support. 

After the Italian ATGs were taken out by an Infantry platoon in Close Combat, that platoon was lost to Italian supporting fire. The Tanks then engaged the Italians in Close Combat, driving them from the field [no pun intended].

Ultimately, this cost the British Tanks some losses, and the Italian Tanks also knocked out a few, it appears. The British were left with their weakened Tank platoon and ATG platoon facing a fresh Italian Tank platoon, Infantry Platoon, and a weakened platoon Dug-in on the hill, not enough to take it.
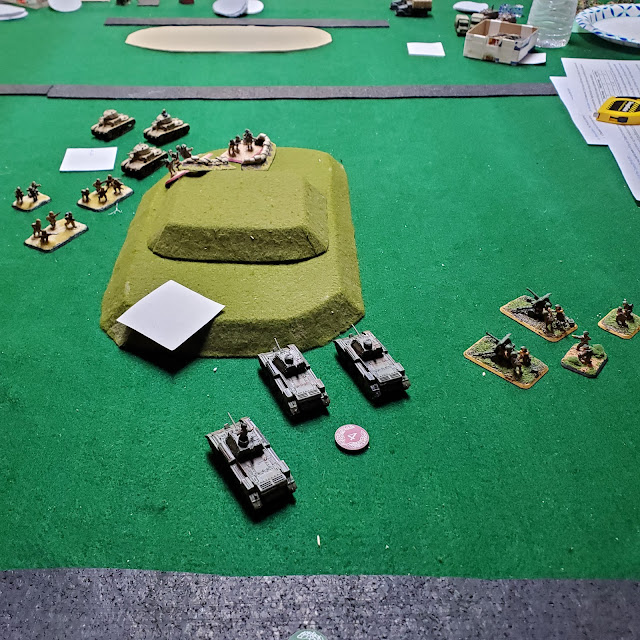
Below appears to be the end of the game, Italians are holding part of the hill.  Either that, or we played a second game, with both sides using a similar plan as first time around.

These playtests went well. Both sides picked up the rules quickly and enjoyed focusing on their plan and their decisions. While die-rolling is always a factor, neither player rolled particularly hot or cold, altho there were a few rolls that beat the average, both ways.

From these two runs, I got more confidence to clean and streamline a few more mechanics and explanations, as well as keep a few mechanics the same [that I was wondering about changing].  What to keep in and what to drop are always the most difficult final decisions with a game design, I find.  I console myself with putting some nifty mechanics [that complicate things a bit] into an "advanced or optional rule" section, while I try to stay focused on delivering the most important aspects of combined arms WWII tactics into the table.

A few weeks later, I was invited to throw a playtest with some pretty experienced gamers with whom I had never played. This is always an exciting opportunity, as one tends to get some unexpected input with a "cold" playtest.

The table was set up for Eastern Front WWII micro-armor, and the host had a nice snow cloth with the Germans defending a ridgeline against an advancing Russian horde, while the German Fire Brigade units raced to reinforce them. Below, the Russians are developing their attack. With little in the center, they essentially have two independent commands with limited ability to support each other, besides some long-range gun fire and the Mortars.
The Germans on the right are set up in the town and woods. The "X" marks the spot - the objective - the Russkies are trying to seize.

On the left, the Russians race forwards, and take some powerful hits from the defending Germans, who are Dug-in and Ready to receive them. They are still contesting the town, even though T-34s burn at the top of the pic.  But their Commissar is "encouraging" them to keep moving forwards.

On the right, the Russians establish a strong base of fire, and begin grinding down the German defenders. Things aren't looking good, so the Germans shift their Infantry from the woods to the town, but take some Mortar fire along the way, dashing down the road in the open between the woods and town.
Above, the Russians put a lot of pressure on the Germans, and destroyed an Infantry platoon. They closed in, but at just the decisive moment, a German tank platoon arrived and began knocking out their Tanks! The Germans and Russians were locked in a see-saw scrap that was uncertain when the game was called.

The 88 ATG that showed up did not do a lot in the center, and was knocked out by mortar fire. The Russians in the center contested that objective, but Germans were pressing them hard, and it was hard to tell what might happen.

On the left, the Germans are held their own. The Russians settled in, however, and laid a lot of fire down on them. Eventually, the casualties the Russians took racing forwards told against them, and when the German reinforcements arrive they are stalled outside the town, unable to contest the objective.

This was an interesting playtest to watch. I didn't have to explain a lot once they got going. A couple of the guys picked up the rules quickly and helped me explain mechanics periodically.  The scenario was similar to #4 and #8, but they were not identical. It's always hard to get play balance just right. However, the general concession was that the Russians could have won with a different plan, most likely the two forces fighting for the center and one flank objective.

I left it with the host that we could try again in the future if he wished, and offered to bring my 15mm desert forces.  Some more incentive to get the last of the British mounted and the tank decals on!

This all went very well.  I feel like there was substantial progress made with me understanding the strengths of "Up the Blue!" with new and experienced players alike. Generally, those who "get it" really like it, and that's good to see.

Now, to get some more figures done!

Thursday, September 16, 2021

Ogre 6th Edition: unboxing & playthru

Ogre 6th Edition: hard game board and 3D Ogres - what's not to like!?
Well, getting your CP squashed by a massive cybernetic monster, I guess...

I'll have to exert myself not to fawn and gush over this lovely game.  In terms of play, it is an updated set of 6th Ed. rules from 2019 with options to use the traditional Ramming or updated Overrun rules, as well as options for some of the newer units: Mobile CP, for example.  There's a lot on the internet about this boxed 6th edition of the original pocket game, and it is still in print.

Below, the counters punch out easily, are high quality, thick, sturdy, and nicely done, as you can see.  The board is the wasteland with molten craters and is a hard board old school style, not just folded glossy paper.
Speaking of folded glossy paper, you can see the large hex GEV board that came with the miniatures box set under this game getting flattened out.  Both board and the relative size of the pieces and ogres is about 6mm / 1:285 or 1:300 or so.  One could easily use microarmor on these boards, and even more easily 3mm miniatures which are growing in popularity.

Close up of the Mobile CP, CP and Mk III Ogre.  Paneuro is blue, Combine red.

You can add craters or ridgelines, OR hide craters and ridgelines, to give the board more variety - both impede movement of various vehicles so you can also use it as a handicap for either side. The small counters for ridgelines blend in well!


Above, now you see them....
Below, now you don't, and the landscape is quite different!

Below, the assembled Mobile CP and immobile CP - stand up and stand out!

Ogres in all their glory.  Large Mk V and two small MkIIIs [small...relative to Mk V]. There is a grey cardboard edge to the assembled cardboard "miniatures" but that can be hidden with a sharpie.

Closeup of Mk IIIs - nice details. Winchell Chung would approve, I believe.

Mark V - looks like it's generously weaponized.

So, how smooth does the updated 6th ed. rules play out?  Must see!  So grabbed Mr. Winkie and put him at the end of the table with me, playing against the Ogre.  The Mk III Ogre was sort of computerized, in that when it had a choice of options I just diced for them, 50-50 or 1/3-1/3-1/3 with a d6.  Our setup is below:
Ogre is salivating [dripping oily fluids] on a fairly direct route to the CP.

Below, Paneuros are looking at the approaching tower sticking out of the dust cloud. Some GEVs at the front with a missile tank and infantry, and behind a mix of heavy tanks, infantry, one howitzer and the CP.

Closeup, the counters look good. There are equal numbers of infantry figs as there are squads, so if you see three Infantry there's three squads.
above, the second line of defense - heavy tanks and infantry to get close, and a missile tank and a howitzer to strike from afar.

Below, three GEVs and a missile tank, and some infantry in the forward line.

The Ogre enters the board after dicing for which column it should enter. The GEVs dash out to harass it, hoping not to get smeared on the counter-punch.

A few turns in, the second line is engaging, and most of the first line is destroyed [at top right]. The Ogre hasn't taken much damage yet...

Finally, the moment to pounce!  Paneuros close in and hit hard on Turn 5. The Ogre rolls poorly to ram a missile tank and shoot a heavy, both are only disabled...

Turn 6, despite a bunch of firepower, the Ogre is still running full steam - the howitzer has missed every shot at the treads.  While the Ogre has lots its main gun, it still has some secondaries and all the anti-personnel guns.

Turn 7, the Ogre is starting to outrun the pursuit!  Paneuro defenders failed to slow it to two hexes of movement. You REALLY need to roll average numbers of 5s and 6s to fight an Ogre!

Turn 8, the Ogre is slowed, but it is too late...

Mr. Winkie and his unhappy face.  Our CP is destroyed by Fire.  Just to have a little more fun, we played out the Ogre's retreat back to home base.  Of course NOW our shooting starts to get hot!

"The only GOOD ogre is a DEAD ogre!"   The last of Ogre's treads are destroyed, and it will be nuked to oblivion by the missile tanks from outside of its range, but the sector's CP is down and the wetbar was nuked.  Sadness everywhere...
Sad to say, there's not a lot of good ogres around in 2080...

Well, we had a great time on a lovely board with great looking physical components.  The game is just as much fun as ever and if you make a couple of errors or roll badly the Ogre will win.  

I like that it takes a bit of finesse to make the Paneuro combined arms company work well.  I think the easiest weapon is the missile tank, especially once the Ogre has only 2MP.  The Ogre should have spent its missiles towards the beginning, and lost its main gun, so should be easily outranged.  Then it is all about slowing it down.  In this game, we failed critical rolls with heavy tanks, the howitzer, and most of the missile tanks, and then got 1:1 Hits with the infantry and GEVs, which didn't damage the treads fast enough due to their weak attack strength.

The game is a classic, and I can highly recommend the value of the latest rules, the optional rules, the lovely components and the lovely terrain as giving the game lots of replay.  I've seen it for $40 or so, and think it is well worth it.

This has me stoked to continue developing some modern rules that are fast and easy to play.  I think the basic decisions are easy to see in Ogre, a solid design, and kudos to Steve Jackson for designing and developing a classic that has people playing lots of games and thinking tactically over and over and over!

Sunday, December 9, 2018

Micro Armor Work part 6a: Painting Syrian Infantry

It's about time to do a test run of the woodland camo / BDU uniform I'm looking for with these "Syrian" infantry. Let's remember, they are 1/285 and will therefore substitute for other similar armies as well, so it doesn't pay to nit pick! Presently, this is where I am with them:
So how did this come about?

I want a look that will be different from the US new camo, OCP. The below pattern should be discernibly different at a distance, and seems common with Syrian government forces now, and has been used by Iraq and others [probably from US stocks, whether aid or sales].
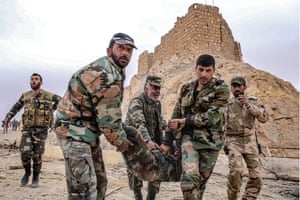
Syria's General Fahd Jassem al-Freij (C), Deputy Commander-in-Chief of the Army and the Armed Forces and Minister of Defense allegedly visiting troops in the northern Syrian city of Aleppo. (File)


Another image below - I want the effect of the middle guy with the large brown splotches. i want distinct patterns even if they are similar. But with 6mm or 1/285, I may need to color code the bases, also.


Syrian government army soldiers assist a fellow soldier who was injured in an explosion near Fakhr al-Din al-Maani Citadel


First attempt. Going for something that looks good at about 1-2 feet. So farther away than this. Two on the right have the full test, the rest have the green and the brown / rust.

Bit closer - again the two on the right. I think the black splotches are a bit large.
It has to be remembered that all scaled down painting has to be brighter than the original color. So even if one obtained the exact shade of paint for a ship, tank, whatever, it would still need to be brightened.


That doesn't even go into the lighting conditions of the typical - indoor - wargaming event, which are either poor or mostly white / neon light in large venues like a convention. A very few wargamers have good natural indirect lighting, but they are few and far between.

Bit farther along, below, with the tan splotches. Overall, I'm just using small 3/0 and 5/0 brushes to paint little dots on them. I spread them out a bit, and if the area is a little too dark or bright I hit it accordingly. If a splotch looks too big, the next color is an opportunity to put a spot on the part that's too big. By partially covering previous "dots" of color, you can make it smaller while still progressing with the camo coverage. One should never need to go back and redo a color using this system!
 

This is the whole line of them with the green, brown and buff painted on. Black is next, using the Micron Pen 1.0 but will wait for them to dry overnight.


Below the finish test run for the figures, with the guns painted also. 


To get a better feel, I also painted some brown and sand onto the bases as they'll need to blend in with the basing approach eventually. The dark green spray is a little smooth on the metal, and coverage isn't great, but I got enough on to let me see what the figs will look like. 

They still need the black boots, and a few other touches, but don't consider that to be part of testing the camo! The black is a micron pen - remember to let them dry for a day or so before using the pen, it'll work better.

Overall, very pleased with them.

Brushes - these look a bit worn, but when wet they are OK. Just to show the relationship between fig size and brush size. 3/0, 5/0, 10/0, 0 range are all useful.


Paint choices - note how bright the colors are!

At left, Model Master rust and GW Bestial Brown for the brown. Armory Sniper Green and Dun/Buckskin for the green and tan splotches. Polly-S "USSR Topside Green" for the web gear and backpack - sort of a light olive color. The gun metal is GW Boltgun Metal, and the ammo belt is GW Shining Gold.

Below, two Vallejo colors: Orange Brown and Dark Sand look useful for flesh and the bases.

These figures are pretty quick and the effect is cool. I can easily see that it won't be too long to do the whole batch of a 125.

Tuesday, February 27, 2018

Micro Armor Work part 5: New Gear, Detailing BMP-2, T-74

Hooray for gear! Everything arrived about 2 weeks after order being placed. I can proceed with my detailing of the OPFOR micro armor, as well as move forward on some terrain.

GAZ 66 trucks, BRDM Spandrel TOW in center, AAMGs to right.


GAZ 66 and US infantry - lt. AA, AT, TOW. Metal is quality, crisp, clean. Infantry are a bit smaller than GHQ, but that will help them fit better onto the vehicles, actually. They're fragile. Wasn't expecting the GAZ to be pieces, but it makes them more detailed.


US .50 cal AAMGs. All this stuff is nicely detailed but fragile.


Heads up! US guided munitions to left, Russian AAMGs to right. Nice!

Compared to the GHQ Russky AAMGs [right], I think I prefer the  CinC [left]. Lots of spares now! However, if a barrel broke, I'd almost certainly just glue a small piece of piano wire in place and leave it at that. They may be different MG models, but the CinC looks more like the pics I'm seeing on the 'web.


Bridge is excellent - crisp detail, nearly no cleaning.


WORKING ON THE BMP-2's
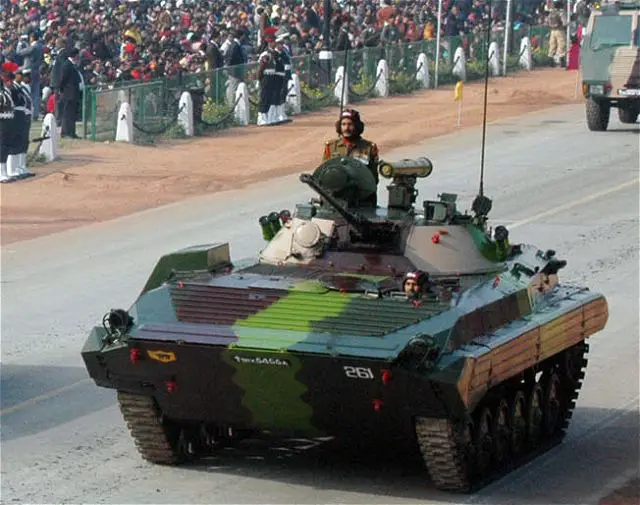
Good view of BMP-2 hatches: Commander opens forward [for protection, one presumes] and driver rotates to side, around the three periscope vision apertures. Want to have the hatches open right, right? Shows how thin the top armor is, too...funky camo scheme...
The Indian Army will upgrade its entire Boyevaya Mashina Pekhoty-2 (BMP-2)/2K armoured infantry combat vehicle (AIFV) fleet in an effort to enhance their capability to address operational requirements, the country's defence minister AK Antony has announced.
https://www.armyrecognition.com/may_2013_news_defence_army_military_industry_uk/indian_army_will_upgrade_entire_fleet_of_russian-made_bmp-2_sarath_infantry_fighting_vehicle_1305133.html

Another great pic - you can see how the driver's hatch flips over to open up then lays flat.

BMP-2 military parade rehearsal.jpg
By Фальшивомонетчик (original picture) SuperTank17 (crop) - Crop of File:Rep parad4.jpg, Public Domain, https://commons.wikimedia.org/w/index.php?curid=7576920

Jeweler's saw - a must if you want to work with metal or plastic - gives a close cut and only removes a little of the material. Also, it's pretty cheap and will last forever, basically.


The blade is flexible, and you can tilt a bit to shift the angle of the cut - not much, a little goes a long way with this technique! You can see how perfect the cut on the driver's hatch is! May replace periscope glass - it's so tiny it'll be easy as any bit of debris will suit.


Commander's hatch is sticking up vertically atop the turret [it opens forwards] silhouetted against the green clothes pin holding the craft stick on which the mini is mounted.

And with the crew member added, here's the command BMP-2. The crew member is actually firing an M-72 LAW but it sort of looks like a laser sight, so I may leave it as-is.


WORK ON THE T-74s
Need to figure out a few things, like where the AAMG will go and how the hatches open, plus crew and how to set them down.

Hatch opens forward - nice pose! Little bits of red for lights will help model pop.
http://www.wwpd.net/2017/01/tighten-down-those-turrets.html


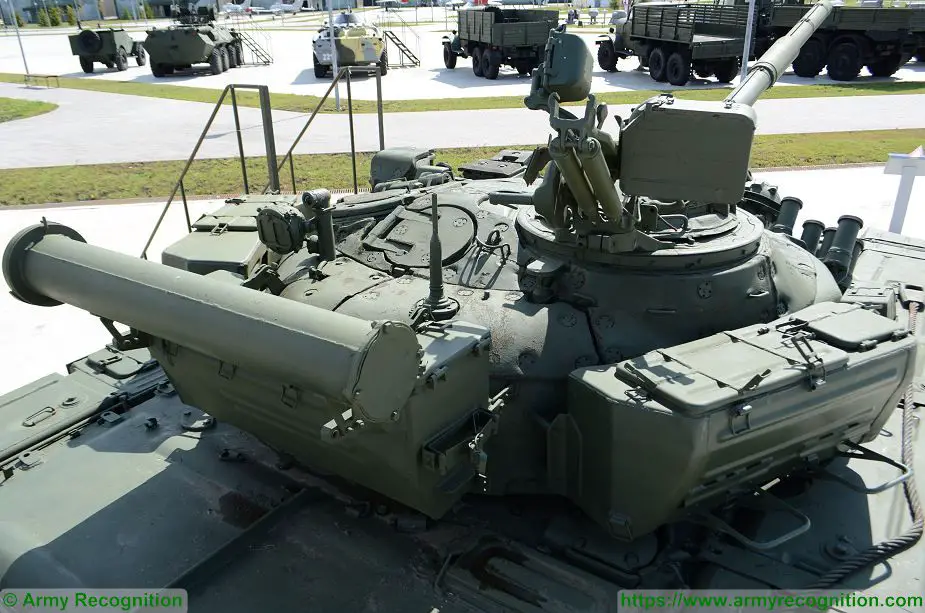
Below shows the AAMG mount fwd, with spotlight back. Apparently the ring rotates.

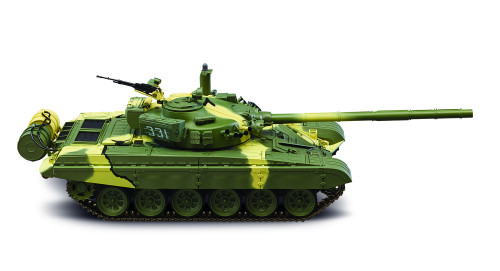
Polish T72M1M
http://www.tanks-encyclopedia.com/coldwar/USSR/soviet_T-72.php

Another great close-up of turret AAMG mount [ammo can to right].T 72A MBT Main Battle Tank Russia Russian army defense industry military equipment details 925 005
https://www.armyrecognition.com/russia_russian_army_tank_heavy_armoured_vehicles_u/t-72a_t-72_a_main_battle_tank_technical_data_sheet_specifications_information_description_pictures.html

Model kits can be great sources of info - they aren't 100% reliable, but they help.
Build T-72 Russian Tank
https://www.model-space.com/gb/build-the-russian-tank-t72-full-kit.html

This is not only a great shot, but this is an exceptional website! 
Note how the commander has turned around the AAMG for use, putting the spotlight and the hatch to the back.


https://thesovietarmourblog.blogspot.com/2015/05/t-72-soviet-progeny.html

OK, so I've learned a few things from the web, and now it's time to get these tanks assembled.


First, I use the jewelers saw to make vertical cuts where the hatch folds up, then cut horizontally across the tank [tilted on the craft stick to the verticle...much easier to cut] until the hatch is just about to come off. Then I used a new X-acto blade to gently pull it off.

Left tank has hatch removed, two others have the vertical cuts.


Below, hatch removed - shiny spot at 7 o'clock on turret to left is where removed from.


Some crew members - US LAW shooters. the Stiff position and slender build makes them perfect as crew, if not great for infantry on the table!


I pre-position them first, then cut to fit where I want them. They're fiddly, so I use a clamp to handle them [the kind that reflexively closes on the held object].


And here they are - two sort of crouched down behind the open hatch, one standing.


I then attach the AAMGs. I started the hole with a very sharp, new X-acto blade, and gently made a small guide hole, then used a very small Dremel drill bit to drill the holes for the peg on the AAMG. I also run a little superglue on the gun itself, hoping to keep the barrel from breaking as easily [doubt it will work if roughly handled, but...here's to trying!].


Note that from this angle you can see the ammo can I glued to the right side of the gun. It didn't come with one, but I cut a little box shape off the sprues. It may sound crazy, but without it the gun looks quite narrow and loses a lot of bulk, so I felt obliged.


This only leaves the GAZ-66 trucks and the Spandrel BRDMs to assemble and crew, and then I'm ready to finish priming this batch!