Showing posts with label Hobby Skills. Show all posts

Sunday, May 24, 2026

Rezolution: CSO Teams head to finish

Last time, I did all the blue highlighting, by brush stroke [CLICK]. It's time consuming but the effect is worth it for small skirmish units where every model has some individual character. Then the holidays got very busy, and I always find it difficult to get the model's past the halfway point - they don't look that great, and what to hit next requires some thoughts, so they stalled for a few months as I felt the scheme was a bit bland. Finally, I just decided to go ahead and paint the guns and faces and see if there was enough to catch the eye for a satisfying model - glad I did!

With a bit of building up, all the faces popped really well, full of character as well as expressions that said a lot about who they are and what they're doing...
...rushing, concentrating, and 'talking on the phone'...
...leading - "Let's go, people!", running and shooting, inching forward into danger...
...another leader, "Get Some!" and "Oh s--t!!" clearly seeing a monster...

Next up, what to do about those huge assault rifles?  The ARs are over-sized and definitely take up eye space, so I wanted to give them some sort of contrast. Below, basic black, light grey, and off-white.


I had trouble deciding and posted a bit on Fb. I did get a few comments, and in the end I went with a contrast color for the weapon but based on the 'fluff'.  

I figure beat cops don't usually carry ARs since it it too aggressive.  So these weapons are taken from the holding locker shared with the Peacekeepers.  That force uses a grey color scheme, so these weapons went with grey. 


The hand protectors I made orange which is a color-wheel opposite from the blue [and also a sorta 70s vibe]. Was having problems with the Vallejo orange...took it apart and a large dried plug was found.

The orange was a bit thin, but the layering of it onto the grey looked good!
...gave the weapons a quick covering of Nuln Oil, also.

Along the way, was inspired to work on the optics. They look terrible up close, but the red one is dark red, Polish Crimson, then a white spot. The yellow has a touch of brown and a white spot.

Quite pleased with the results!

Had some trouble with the eyes, which I had to do a couple of times to get the white dots adequate.

some more detail work on optics...
and computer gadgets, the medic's cross, Technicians hand computer...
Got motivated to do most of the work on Marshal Renton, who really came up nicely over halfway through. He looks older and more weathered painted than in bare metal! This is block painted, dry brushed, and a few details picked out and brought up. I went with a white shirt to brighten him a bit, plus he seems like a guy who takes off his tie and throws on a field jacket and gets away from his desk at the drop of a [Stetson] hat!
The 5-pointed star was a bit of a PITA, and took several attempts using a tiny brush and yellow, then black. The hiking shoes were pretty easy, as was the "CSO" on his back.

At just a few more inches away, he is looking good.

Very pleased with how the CSO force is coming out, so will get them across the finish soon!

Monday, July 29, 2024

"Space Marine: the Boardgame" - Assembling 'Nids

A daunting sight! 

And they aren't a chittering horde attacking you yet!

First, some thoughts:
- it can be tough to look at the pile of sprues and get started...
- you have to eat the elephaunt one bite at a time!
- figure out how long a "unit" takes, and go a unit per session.

The Termagants are very nicely done, IMHO.
- amazing sculpting results in easy to assemble push-fits,
- no mold lines, or they are hidden by the sculpting on the edges,
- assembly still takes as long or longer than metals that need to be cleaned of mold lines, etc, like Old Glory.

Time: I can assemble about 8 Termagants an hour. I do them in their matched pairs. This allows me to see where I cut them from the sprue if I am having trouble finding and cleaning off the nub.
This means a total time of 2.5 hours to assemble 22 of them.

Removal from sprue: choice - clippers v. X-acto blade?
- with clippers, there was a lot of "nub" from the sprue connection left, that then had to be cut off with the X-acto anyway.
- I found a precise cut with an X-acto blade resulted in nearly nothing left to clean up about 50% of the time. The other 50% I just had to make a quick cut / scrape with the X-acto blade. Overall, I found the X-acto blade better. 
remember to use a cutting board or similar!

Generally, the pieces are closer or past one side of the sprue than the other. This means that you have to flip the sprue over once to cut each piece as close to the cutting board as possible, or else you will get some "bounce" or the piece will fly away, or even - possibly - break. Below, I have the sprue flipped to the side where that claw is almost on the cutting board. Flipped the other way, it is almost 8mm off the board, or a 1/4" or so.
 
Note how the arm is high off the cutting board, and the barrel is just near it. 
Cut the barrel then... 
...flip the sprue over to cut the arm.

Assembly: 
- I trimmed the pegs shorter and found the pieces fit together more easily.
- I used medium to thick cyanoacrylate = 10-25 second cure on a few joints and the pegs.

Basing:
I do not glue them to the bases until after I prime them. I'm going with a "winter" coloration scheme to fight my "Not-Valhallans" so I will prime the 'Nids white. My bases will be a brown to match my table, so I'll spray them separately. 

Here we are, the last four Termagants!

And this is the end: 20 Termagants and 2 Ripper Swarms, about 2.5 hours. Took me three days to get the time to do it, but it is pretty mindless work.

I hope this gives you some forward momentum to start your own batch of scuttling horrors, and a better idea how and how long it takes!

Next up: assembling and priming Titus


Sunday, May 29, 2022

Space Marine Adventures: Painting Progress

"Ultramar Treetrimmers - The Best in the Multiverse!"
At a couple bucks a pop, these figs are a great deal - plus there's a game included!

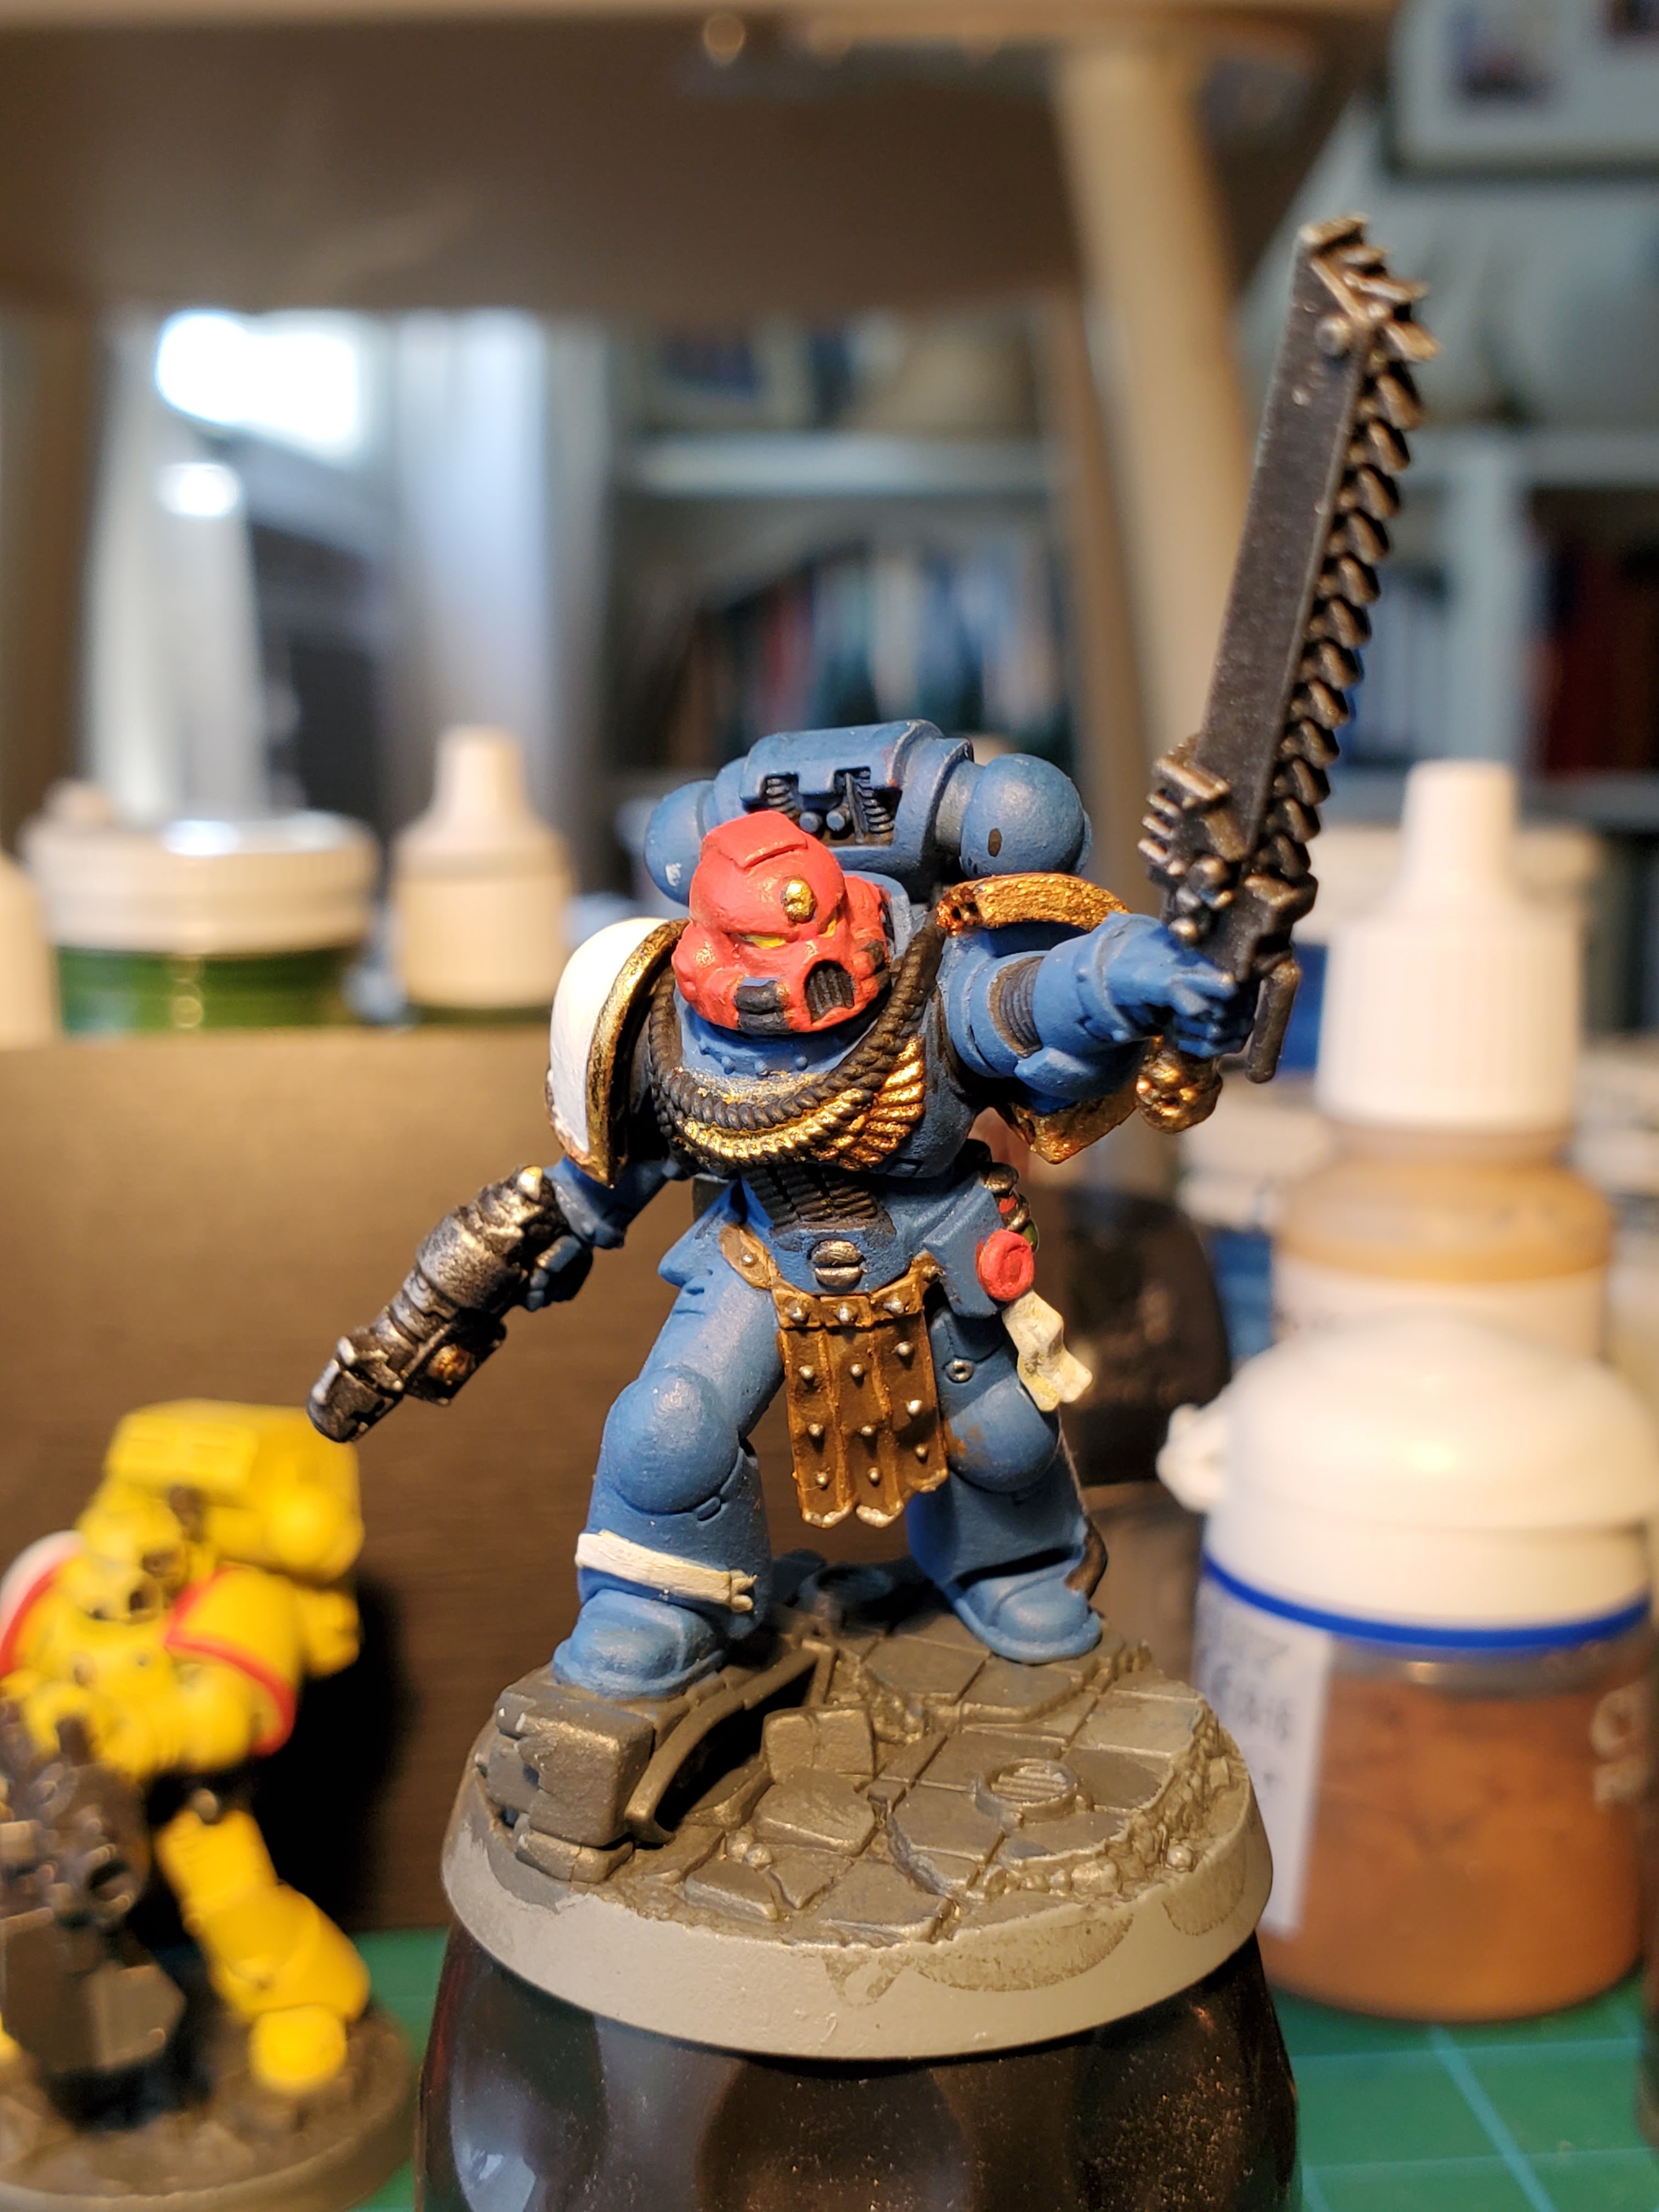
So, the painting funk has been officially broken - yay! I am enjoying painting the five different Space Marines in five different schemes and learning some new techniques. Here is where they are with straight-up block painting and some drybrushing:
From left, for those who care: Space Wolves, Salamanders, Blood Angels, Imperial Fists, and Ultramarines are all represented. The white pauldron is going to be for a decal that they will all have, to denote their special detached status to other Imperial forces they should encounter along the way.

Front view - this would be what the Necrons may face!

Sgt. Cassius of Ultramarines. Chain sword and...laspistol? Hard to tell, doesn't match any in the codex I have. Lots of details, worth spending some time painting up. The leather apron took longer than I thought it would, but I am happy with the wear and tear look it has. The chainsword needs an eye-catching look - it is so prominently displayed. May go with the yellow "danger stripes" that are so common.

Brother Frostclaw of the Space Wolves. the green eyes are coming along ok. The warm golds are to offset the cool grey of the armor. His combat knife definitely needs an "energized look" as a regular knife isn't going to cut it [no pun intended].

Brother Infernus of the Salamanders Chapter. His back has a little "temple" on his pack, and the flamer cannister, frag and krak grenades came out fine - they don't pop exactly, but right now they are "realistic" and I'll highlight them later.

Bro. Gabriel of the Blood Angels. The red is looking pretty good with a drybrushing. I would like to get depth with a wash and then bring it up with highlighting.

Bro. Grimm of the Imperial Fists has been the biggest challenge - yellow! But his heavy bolter is a nice centerpiece to the model. I'm thinking to match the ammo cannister in the same green as the clips on the hoses, or perhaps something brighter. I don't plan on a lot of yellow models, but enjoying learning this one.
You can just see the contrast between the ochre on the right half of Grimm's pack below, with the yellow that's been applied.

Below, the Gold Standard! Imperial Fists painted by staff at FLGW store. The staffer spent a while talking painting techniques with me and then ran me through a Kill Team demo. I bought a few paints and washes I wanted to try out immediately.


While I don't think KT is for my 12yo son at this point, the game demo showed me the basic mechanics which appear to not only sound, but pretty easily grasped and even intuitive and realistic - unusual for GW rules, but "blind squirrel finds nut"!
We played his lovely tyranids against a SM Assault Team, and it we an interesting assymetric matchup. I wiped out all the hormagaunts but his big fella synapse critter was a beast, and easily dismembered one of my assault squad before we wrapped it up - the guy had work to do.  

As you can see, the game board and terrain are quite amazing - what skirmish gaming is all about, visually. Plan to try this out with an experienced gamer pal soon.

Meanwhile, as I wrap up the painting of the SMs, we will be trying the Labyrinth of the Necrons again, but this time the Necrons will fight back!

Friday, May 20, 2022

Busting Thru Painting Funk with Space Marine Adventures

Peace Returns to the Painting Table

Been struggling with Deep Blue Painting Funk for 20 months now - my last effort at painting was enjoyable time with 54mm Armies in Plastic Brits [CLICK]...
...but suddenly and unexplainably languished. I blame the Army and our crazy OPTEMPO for leaving me too drained to appreciate artistic endeavors. I considered getting moving on it all numerous times, but the sight of my painting table left me discouraged and aghast...

...clearly some action was required.  Main thing got me thinking is that I haven't played a game with Mr. Winkie in a long while.  But the Terminator board game takes a while to set up and needs the dining room table which the Wife has been occupying with her own photography project. 

I decided I needed a quick to set up, easy to play in under an hour, but fun and interesting game that was very self-contained and had just a few miniatures. These requirements left out my:
- unpainted Space Hulk 2nd ed. game, 
- the new Gale Force 9 "Aliens - Another Glorious Day in the Corps" game, 
- "Firefly: Brigands and Browncoats" 
- and painting up my Terminator minis.   
Checking around at BGG, I stumbled onto the perfect solution:
"Space Marine Adventures: Labyrinth of the Necrons" [CLICK
...which met ALL the requirements, and was $25 at numerous retailers since it is a gateway game. As a dungeon crawl with three levels AND an advanced deck, AND several team combinations of 4 of the 5 included Space Marines, I'm seeing at least a dozen possible plays of the game. Hoping it recreates the success I had with the OGRE: Objective 218 card game that Mr. Winkie enjoys.

Well, couldn't get motivated to work with figures for myself, but...for Mr. Winkie?  Yeah sure!  The miniatures are very nice plastics, which did fit together pretty well.  I did a little filing and such and then used Plastruct Bonder with brush-on cap to attemble them with modest effort - maybe an hour for everything.
There are mold lines that are very visible at certain light angles. This annoys me.
So I file them down, which took about 30 minutes. I'm OK with the rough texture, as I think it will disappear under primer and painting. Also, I'm looking for a "battered around in combat" look for the armor.
I have to clean the minis again with soap and warm water to get rid of the powder.
Below, the clean, assembled, mold-line-free miniatures. The five colors gives a sort of Parcheesi feel to them as playing pieces. If you gave them a Miracle Dip wash and then painted a few important pieces [like the guns, black] they would be perfectly fine game pieces for a new hobbyist with limited skills.

As an internal set of 5 miniatures, I want them to have a consistent painted style and be as good as my Necrons, whom they will inevitably fight on the board game.

And below, a few comparison shots, against:
- Armies in Plastic 54mm blue Zouave
- Airfix 8th Army Brit
- Old Glory "Pershing Expedition to Mexico" 25mm
A lower angle, showing the relative height better: The SM are not only taller, but considerably more bulky than the Old Glory. They rival the larger plastics.

I decided to paint them in their respective color schemes exactly as on the box [so they will be a perfect fit for the game].  The base primer for SM armor [in my mind] is a sort of grey, so I grabbed a likely color from my IJN 1:2400 naval project:
Despite getting excellent coverage with a perfect day for spray painting [warm, low humidity] several coats, you can see a bit of yellow, red and green plastic in the crevices.  This will require some wet and sloppy painting, which I refuse to do on my gaming table which is covered with my favorite table cloth...this means it is time to face the disastrous wreck of my painting table.

My initial effort was to clean up all the paints and store them back in their drawers, shaking as necessary and throwing out several that had dried out [and were, like 10-30 years old so no surprise there!]. The dust was an indictment of inactivity:
But it felt good to get it cleaned and sorted out. In the end, I only need to replace a few paints, which oddly includes all the yellows.

To be interesting from the artistry perspective, I decided to try my new wet palette with a wet painting style, building up the colors in layers to show the multiple layers that - in "real life" - would undoubtedly be on the SM armor as they repair it post-action and for Saturday Morning Parade [or its equivalent 40,000 years in the future]. I found likely colors in my collection, except for the dead yellows.
I started with the Salamander, as the greens looked the most promising.

Below, the initial coats of the Blood Angel, the Imperial Fist, the Salamander, the Space Wolf, and the Ultramarine. Hoping that the wet palette will continue to provide color transitions tomorrow.
Below, closeups of the five, showing their base coats, all of which are a bit darker than the end coat will be. PP Skorne Red and Moldy Ochre, Vallejo Flat Green, Vallejo grey mixed with an unknown Polly-S grey, and an Armory Blue-08 were used, thinned about 50% with water and a drop of Vallejo Thinner Medium.
I'm satisfied with the results, and enjoyed getting back onto the painting saddle, now that my hands got the brush moving and my painting mojo working!

To summarize, my solution to the painting doldrums:
  1. Pick an inexpensive, limited project: $25 and 5 models in this case.
  2. Pick something that is about "the kid" since I wasn't motivated to paint for me and my projects.
  3. Pick something that dovetails neatly into past and future endeavors: in this case, Warhammer minis I already have; Steel Legion infantry; two lovely commissars; a mostly-complete Necron army. These 5 kill team SM can fight the Necron miniatures on the game board instead of using the [nicely printed] counters.
  4. Commit to cleaning and organizing the painting area, which had to be done someday, anyway.
  5. Try a new technique to give the minis a unified style, while getting my crafty brain engaged in an outcome.
Hope these ideas help you now or someday in the future.

We had a storm whirl through the neighborhood - a bit scary with high winds. But after, lovely rainbow out back. Worth remembering that it is God's promise not to wipe out humanity despite our evils. Back then, it was thanks to one faithful and obedient fellow, Noah [Genesis 9:8-16]. Now it is thanks to one perfectly obedient fellow, Jesus.

Things are looking up in the creative realms, and some good games with Mr. Winkie will be played in the future - stay tuned!