Showing posts with label 15mm. Show all posts

Friday, April 4, 2025

Review: Alternative Armies 15mm Sci-fi

REVIEW


An Alternative to... high prices and bad service? Yes!

In my time looking around for odds'n ends, bits and bobs, I stumbled across AA's website [CLICK], and seriously considered getting some items.  So when they had a "Battle of Pavia 20% off sale" that was advertised at the [quite good] "15mm Sci-Fi Gaming" Fb page, I bopped over to check it out once again - glad I did!

I should mention that I have no affiliation with AA and this was my first order / interaction with any of the people involved as well. Don't get to bonnie Scotland very much anymore...!

BLUF:
- HUGE range of figures, vics, walkers, 'bots and buildings in mostly 15mm, but also other scales like "Fleet", 6mm, and 28mm.  
- Prices on many of the lines is low, remind me of the 1990s.
- Sales occur periodically and stack with discounts!
- Service is excellent and  cheerful.
- Website is well organized - essential since it has LOTS of offerings. Lots of pics.
- Ordering is relatively painless - the website was above average easy.  

Summary: 
A visit to AA is Strongly Recommended!  
You may find some perfect additions to your ongoing project, 
or you may find a brand new project.

At first, I was a bit overwhelmed as I looked through *just* the 15mm sci-fi offerings. There are several major categories, and in some of them dozens of products. But it was also kinda fun, as nearly all the miniatures have good pictures of very solid paint jobs, so there was an "eye candy" aspect to it all.

Eventually, I decided that paying $6-8 for full-sized [40mm x 80mm or so] resin vehicles was too good a price to pass up. I got a squadron / company of those with infantry. Also grabbed a bunch of other items that flesh out some needs, like crew-served weapons, useful "jeep" type vehicles [but anti-grav], and a pack of 20 Laserburn low-tech mercenary infantry. 

Overall, the order was nearly $400 total, and I saved over $80 from various sales and discounts. It went pretty fast and arrived safely:
Placed Order Feb 27 --> Shipped March 3 --> Delivered March 12
Only hiccup was my credit card security measures jumped on the transaction.
This was promptly handled by...

Gavin Syme, Creative Manager at Alternative Armies.
Gavin was helpful and polite, and even interested in how I came to order from them.  I was impressed that he was interested in how I found out about them and their sale. Catch him on Fb [LINK] or the AA Blog [LINK].

So, that was all a positive experience.  Now, on to the products!  
Note: all prices are with the 20% off sale and sometimes other discounts that stack.

These are modern size, 15mm foot-to-eye. From left, Laserburn Officer, RAFM Traveller TL15 Imperial Infantry, Martian Metal Imperial Marine [old 15mm, foot-to-head], Brigade Models / GZG Hammer's Slammers Gunner [18mm] and AA resin sprue Security Force Alpha [20mm - more below]

Laserburn Officer w'Pistol [500], Merc w'Assault Rifle [501], Merc w'Rifle [502],  

Laserburn Merc w'Jump Pack and Laser [504], Merc w'SMG [503], [504 again]

Mercenary Dreadnought [506] Could also be a big guy with armor, carrying a disassembled mortar [which is what I thought it was at first...!]

Don't know if intentional or not... the pack comes to four identical teams, so two squads, each with a squad leader and a mortar team [back]. This Section of two squads has one Section Leader.  Your organization may vary!

Posing in a slammer APC. If I used them for this, I'd cut the bases down and make them shorter.

V006a Support Bolt Cannon, and V006b Light Mortar
6a looks a lot like a recoiless rifle, and can easily be futuristic weapon type or a traditional CPR weapon or rocket firing bazooka. The stand can be shaped easily, which I've done on the left.


With RAFM and Martial Metal "crew" for xomparison

Shaped the platform to make it more of a tripod - looks a bit better.

HOF153 Grey Alien Portable Weapon Platform with 5 Weapon Options [barrels] is top left and center.  The hole takes any of the barrels. Variety is nice, from funky zap rays and hair dryers to a traditional CPR gun looking thing.

To top Right is HOF45 Robot Scout Drone which I couldn't resist. Looks like it has lenses, I might mount it on smaller piano wire so it "floats" better.
V006b Light Mortar [bottom].  Nice model - different but still obviously a "mortar".

Some bonus bits. Lion with huge pole axe thing on a grav cycle, and a space plant monster in resin, both very nice. The left would make nice Aslanni for Traveller.

V005 Heavy Laser Cannon Artillery Laserburn Artillery Piece [CPR]

Cannon in its pieces. You can see that the barrel has a peg, goes into the hole on the platform, and the shield is mounted with two pegs - makes for easy assembly, so "nicely done!" far as I'm concerned. Gunner goes on seat at lower side of platform.
And assembled, below.

Gunner, below - not much to him.

The gun assembled. I like that the main gun is set back and more portable. This differentiates it from modern pieces. I see it folding up quite compactly.

But, if you wanted a more traditional look, no reason you can't mount it forward.

Below, some anti-grav utility vics, aka "sci-fi jeeps", a ground worm monster, and body bags [I am likely to use them as casualty markers]. These are all nicely done, inexpensive and will be useful either as "scatter terrain" or as actual vics with rules [I like to have rules and victory conditions about evacuating wounded].

HOFA01 Security Force Alpha (Core Army Set) This included two of Maginot Turret, 75 resin sprue infantry, and 6 Mark II Hover Charger APCs. All for about $82, so a nice deal.  The full-sized vics work out to around $6.40 each. You can't beat that with a stick!  So a no-brainer, long as you like the style.

To flesh out a full squadron, I got 6 more Charger Mk II's and 3 Scrofer Hover AFV. Each vic somes with the sprue for a closed hatch, commander, large closed hatch or turret.  I think the AFV looks a bit "undergunned" and will likely buy larger turrets for them.
The Scrofa [left] is one main piece, super easy to deal with. The Charger is two pieces and will require a bit of cleaning and shaping to assemble, not a lot. View from the back [below] shows the higher AFV on right with large rear ramp.

Infantry sprues. There are 5 of the guys with a support rocket, and 10 of the bottom infantry. Lovely figs, just way too big for my collection. A bit disappointing and I wish that the description included sizing as they are nowhere near 15mm, more like 18mm and quite bulky as well.  They will look great on someone else's table.

Maginot Turret is a nice model, very clean.

Door is more of a hatch, a bit small, and suits the armored pedestal of the model.

I couldn't resist getting a light flyer to act as an artillery spotter / command flyer.  Below, what comes in the pack, a lot of heavy metal - will need a substantial base to hold it in the air. Obviously, this would make a great resin kit, reduce weight and cost.

And below what it looks like painted [from the AA website].  Had to show it off, nice job!

Hope you not only got something out of these looks at some of the models, but also that you can see the relative price points.  
- A bunch of these resin vehicles are around half the market price [they are older], and using the various sales and deals infantry can go to 50 cents apiece.  
- Full price, the resin Security Force Alpha 20mm figs are around 80 cents each. 

My only caution / critique is that you should carefully check descriptions and ask any questions of Gavin regarding figure size / scale.  They have three in the 15mm sci-fi offerings [old 15mm, new 15mm, and super-sized contemporary size-creep 18mm] and the vic seating sometime looks a tad small. Your concern with this may vary.  I am fine with the overall "look" of a model and crew unto itself, and rarely have the figures alongside one another anyway [disperse = survival in modern combat, and in the future as well, I say!].

But taking into account the entire experience, including great communication, service, and stacking discounts / sales, I think Alternative Armies is worth checking out!

Monday, March 17, 2025

Striker 1e Playtest #6

Battered copy, but the review is still spot-on! 


So, after a lot of work to find a good balance of Firepower, Morale, and Damage [casualties] in the rules [playtests 1-5, check older posts], I took my modifications to the tabletop again.

My Changes:
  1. The rules had some detailed mechanics regarding individuals that emphasized the RPG aspects, like firing and taking casualties as individual figures.  In other areas, it streamlined things by teams or made a mechanic automatic [like Leaders rallying Routing teams].  I divided all the mechanics between two types: RPG style, and Wargame Style - the latter are more streamlined and use the Team as the basic "Unit" for quality, capabilities, etc.
  2. I reversed Morale Check values so that rolling high is always good, and rolling low is always bad [I hated that it switched around].
  3. I divided the Command and Panic Phases; now each Side has a Player Turn that is identical to the other.
  4. I added a Friendly Fire Phase 1 before the Friendly Move Phase.  Now you can blast things with preparatory fire and then Move. It doesn't increase the amount of Fire Units get - that's still once per player Turn, max - but it increases options for "when" you can Fire.
  5. I clarified the Leader rules for Rallying.
  6. I modified the Personnel Wound Table to make low-value results a morale check instead of it wounding a figure on a 3+ [nearly always], and clarified both the top [11+] and bottom [2-] ends. I added an "Obviously Dead" on a natural '12' [cuz...it happens...sometimes].
  7. Morale Check results were a bit confusing - I cleaned them up a bit into two categories, Suppressed [Fall Back], and [Forced Back] Rout, and made it clearer how far a failing Team moves.
  8. I cleaned up a few of the move rules, including Dis/Mounting vics.
  9. I made a '1' mod to Spot Low IN teams more easily, and harder to spot High IN Teams [recruits are notorious for not taking hiding seriously].
  10. I added a couple of mods for Hits in DF, including -1 for "Suppressed Target" and +1 for Target Ran. I also switched Burst Size to Diameter instead of a "box centered on the team", so one can radius [1/2 Burst Diameter] which is easier to measure.
  11. My main complaint - the Armor Combination Table makes no sense according to Newtonian Physics as I understand it.  So now I simply take 1/2 the smaller AV and add it to the Larger AV.  If you have a Combat Environment Suit AV6, and you're behind a Wall AV4, your total is therefore AV 8.  In the Raw, it would be...13!  I am open to a smarter person explaining why it makes sense as-is, but until then...!
Overall, I made combat results more Morale-driven, and less Wound-driven.  That is on the basis of my reading of modern war, especially from the last 20 years, where most small arms fire is suppressing, and not even attempting to aim and hit you.  This worked nicely because the forces on the table for this batrep are...TL9!  So just a few years in the future, but they are mostly using weapons from 20 years ago our timeline.

Given this changes, I was excited to see how they played out.

***   Scenario Intro   ***  

For the two sides, I had 30 Conscript Zhodani figures, local militia, trying to interdict the advance guard of a Long-Service Mercenary Striker force of 20.

The Z's have 5.5mm Assault Rifles [M16s] and 4cm RAM Grenade Launchers [GL, 1 per Team]. They are Armor Value [AV] 4 with a combo cloth armor / helmet. The Platoon Leader PL has Image-Enhancing Goggles.

The Striker's have 7mm Assault Rifles [AK47], 7mm Auto Rifles [BAR, BREN, 1 per Team], and 4cm RAM Rifle Grenades [RG].  AV is 5 and they have the same Image-Enhancing Goggles for their PL.

The prices came out to 600K in personnel, and 55K in gear apiece, with only 55 pts difference.

The main difference in tactics is that the Strikers can volley RG's by Team, while the Z's have 1 per Team, 6 for the force [these could have been consolidated, but they would then have been more vulnerable].  Both sides have the same ammo limit, 6 mags [12 Fire phases, 6 Fire Phases using full Auto].

In terms of Scenario Design, the Strikers have a +1 advantage in Direct Fire [DF] due to higher quality. Their Auto Rifles also have a '+1' advantage to Hit and to Penetrate. Both sides have Cover from the hill crests they are on, and Concealment from the brush that covers the entire area. Also, both sides have carefully taken up positions with camouflage, the attacking Strikers setting up in the cover of the dark just before the dawn.

I'm using scenario #7 Flank Attack from "One-Hour Wargames", which is a straight forward flanking effort. Were this a Traveller 1e session, it would have gone down like this: "The Strikers [the PCs] won the roll for Surprise in Foothills, chose an engagement range of 200m for their flanking force [which puts them in effective Rifle Grenade range] and the defenders did not choose to attempt an Escape."

With all this in mind, let's see what happened!

***   Scenario with Story   ***

   It's the sort of ticket you love; a TL9 world that has border incursions often enough to keep the locals on their toes, and a fanana republic with enough money to buy a little insurance - your company of Mercenary Strikers. The shooting war is under way, and you are taking the fight to the neighboring Zhodani colony. 
   While anything could get you killed, you're confident in your people and their skills. You jumped on this because you were short on cash and long on experience; besides, the money was too good to pass up! So now you find yourself leading the tip of the spear, a Section of long-serving professionals, clearing the main road ahead of the advance. While your other section is off to the left on a parallel trail, you doubt you'll need them. Besides, they won't be able to show up in time with all this heavy bush, anyway.
   There are 20 men in your section, including yourself and your Section Sergeant. All of them have been in several firefights, and the two squad leaders are also solid. Intel has reported a Zhodani blocking force on a hill overlooking the road, and tasked you to maneuver in the early hours to drive them off. Your Section Sergeant [SSG] leads one squad to engage them frontally in a firefight. While they pin them down, you'll lead 2nd Squad against their left flank - they carelessly left a small wood unguarded, and it will be your initial attack position. After achieving Fire Superiority, you plan to smash the defense with a classic hammer and anvil!
   "Tiger 2, Tiger 1 - we are in position. One Z-Team spotted on hill corner. Ready to kick off when you are."
   "Tiger 1, ACK. Spotted a Team near that corner. I'm sure there's more near it. Opening Fire."  They start laying down long bursts at full Auto to shock and awe the defense.  You give the closest Team Leader a 3-2-1 finger count, and they open up as well - the firefight is on! 

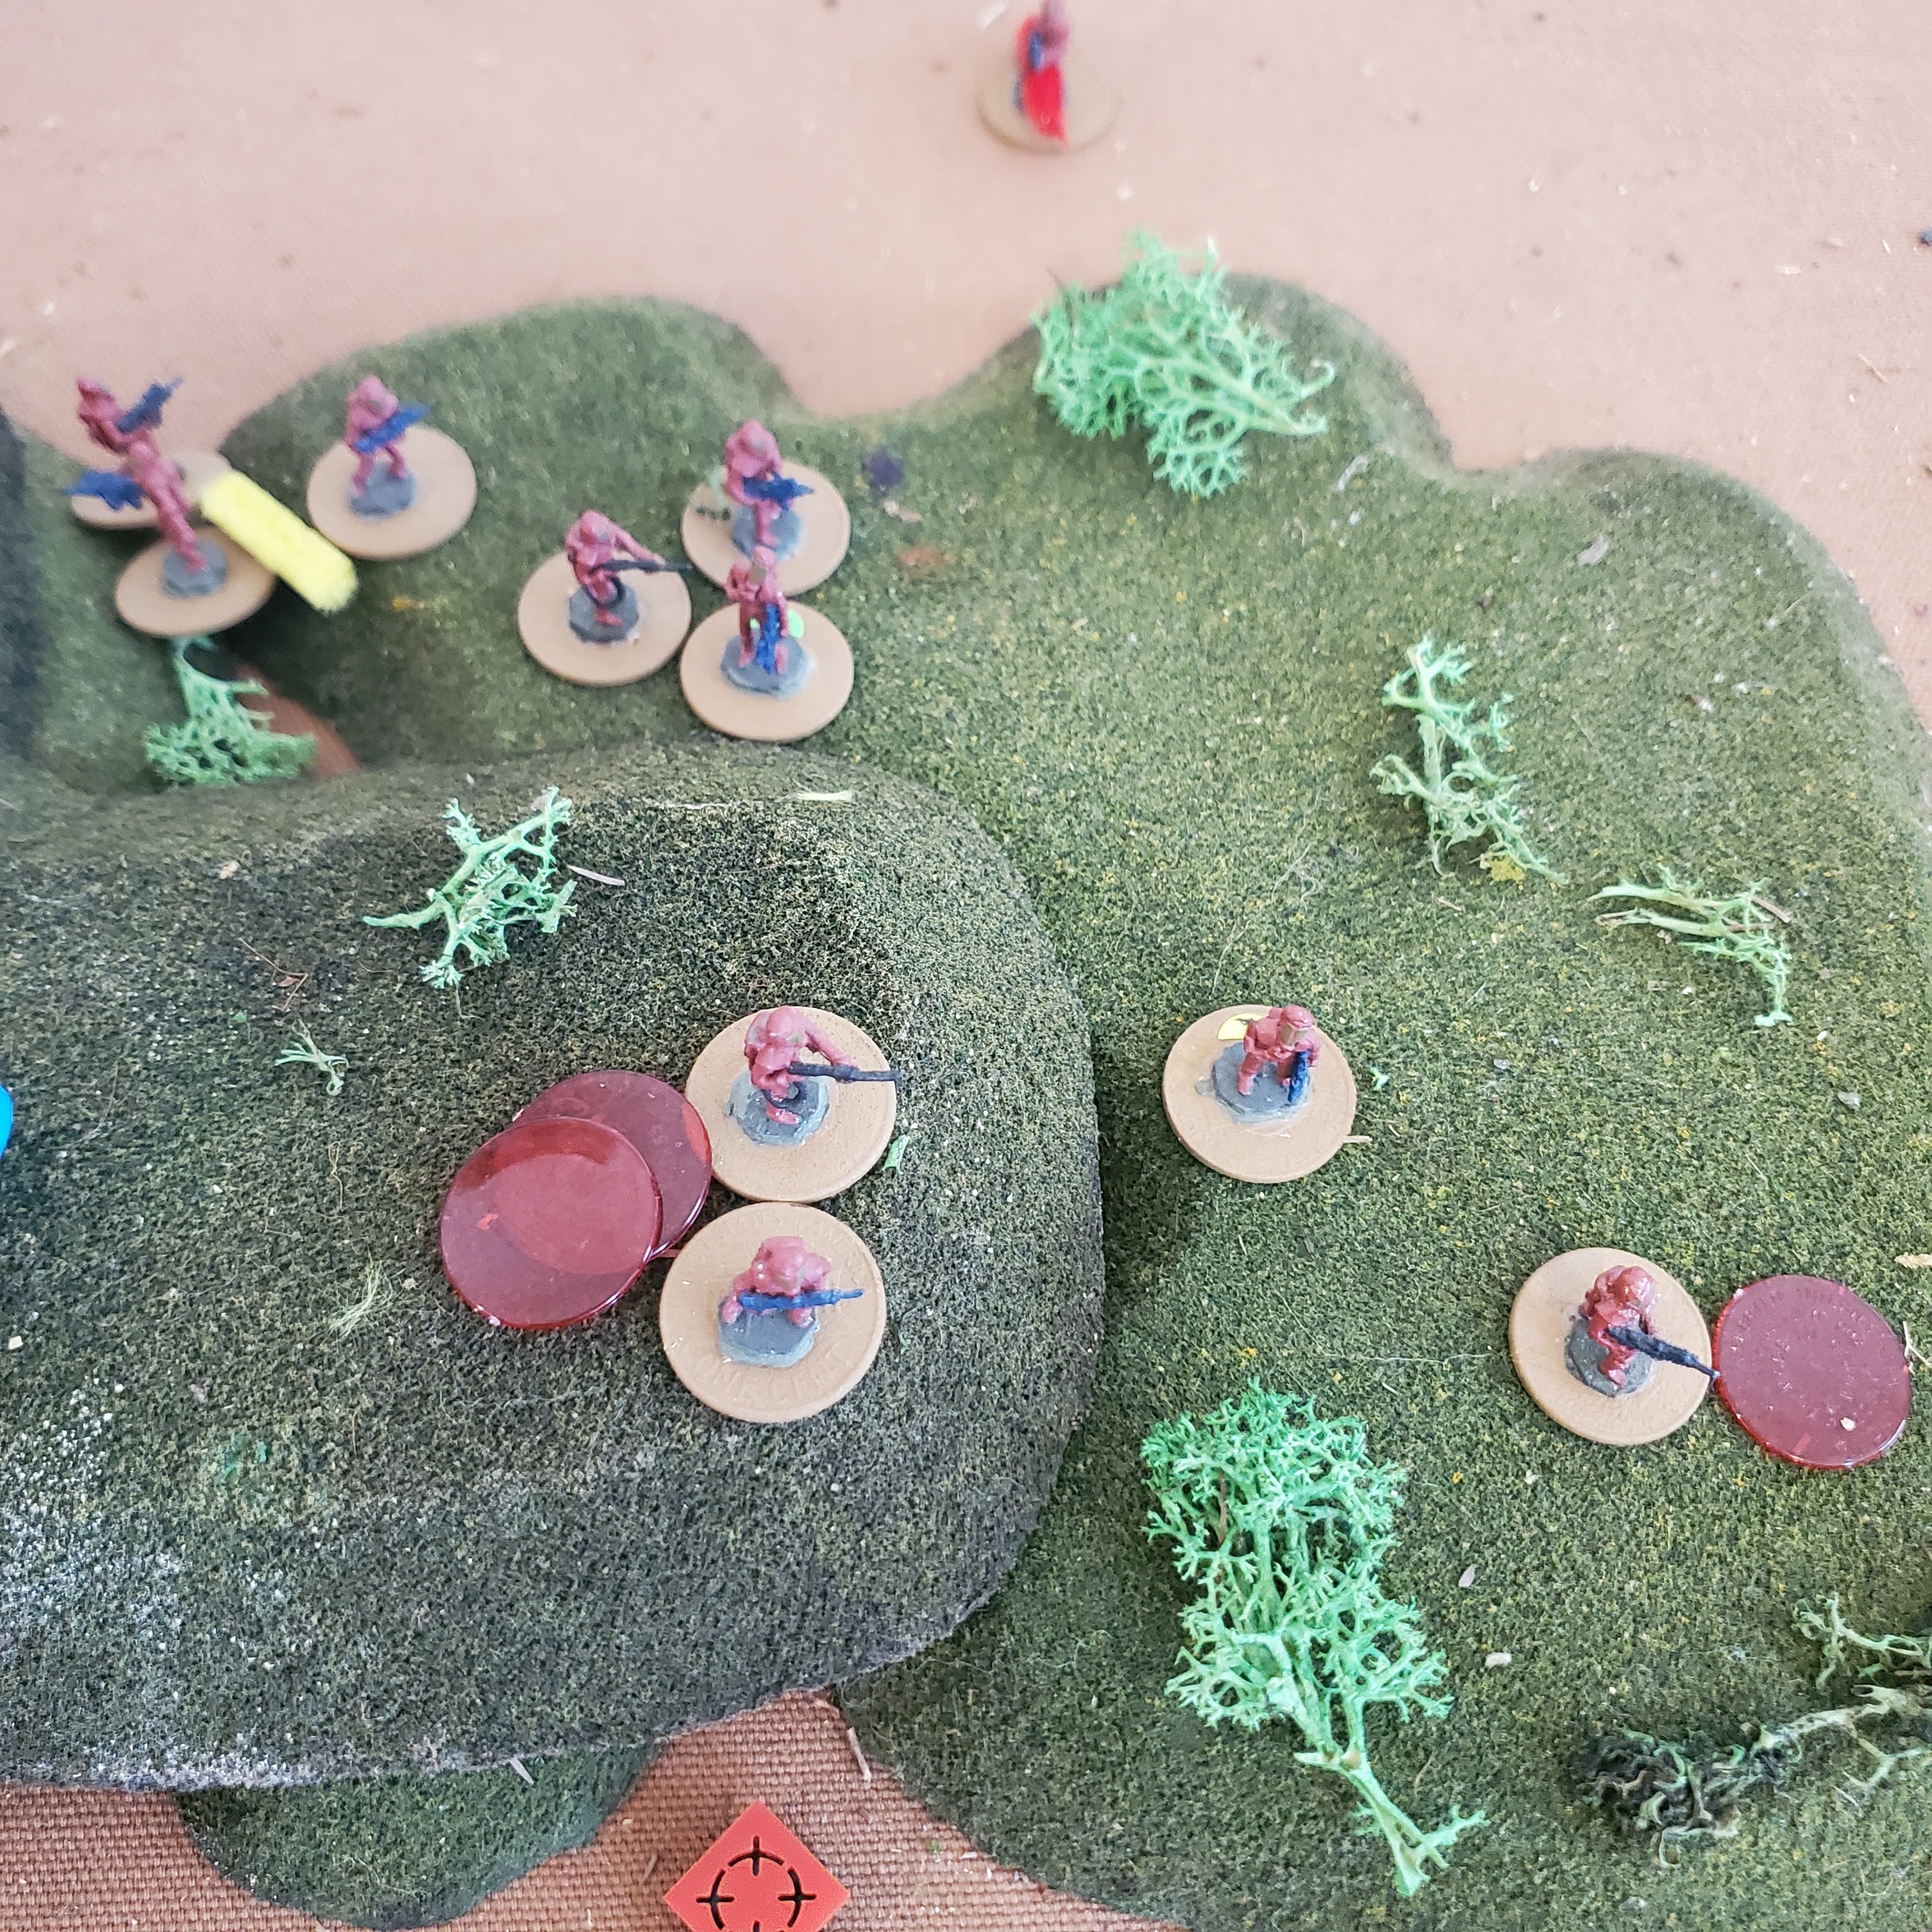
In Game Terms, S spotted two Teams [green squares], the corner one with the PL's Image-Enhancing Goggles. This Team is a priority to Spot as it can be fired upon by both squads. The two Zhodani Teams on the left flank are a priority to drive off, so that the PL's Squad can begin flanking the hill. 

Zs *almost* spotted a Team, so now believe there is enemy out there, and *could* use "Recon By Fire if they wanted - but the chances aren't good for a Hit.

Strikers start the firefight in the Enemy Fire Phase. 1Sq hammers the corner Team with rifle grenades, causing two casualties and a light wound - the Team Falls Back, Suppressed [red circle] away from the crest of the plateau. The other Spotted Team takes Hits then [barely] fails a -3 Morale Check, and are also Suppressed.
The Z Section Sergeant then fails Morale upon seeing his Team's casualties; now he is also Suppressed!

The hill's corner erupts in explosions, and bits of brush fly everywhere as bursts of automatic Fire and Rifle Grenades are accurately placed. No Z are in sight, now!
   "That's it, men, pour it on!" you shout into the Section Push. And just a bit farther back, barely visible but right where you expected them...another Team is Firing back at you.

In their Fire Phase, the Z open up with the one Flanking Team, which really needs to get some retaliatory Hits, but they roll bad and miss despite the fact that the Striker's are in Effective Range. At the end of the EFP, the PL *just* manages to Spot the other flank team with his IEGs, which bodes well for the Friendly Fire Phase.
However, the Z are also able to spot a three Striker Teams, and they will be able to lay down some effective Fire soon - right after the next Striker Fire Phase.

   "Tiger 1 to all Tigers. Enemy Teams Suppressed. There's more farther back on the hill. Keep on 'em, I want Fire dominance!"  You keep looking for more enemy - they must be along the hill line...or are they hiding in defilade?

The Flanking Squad hammers the newly-Spotted Team with another volley of Rifle Grenades, completely wiping it out. The squad's survivors Panic then Rout!

You keep pounding the hill, spreading Fire around, just in case there are more Zs near the spotted teams.  Suddenly, the entire hill line opens up - all the fire is focused on 2nd Squad, your base of fire. You hear the 2Sq TL:
   "Raikul's hit, bad!  We're pulling back behind the crest!" Out of the corner of your eye you see the SSG rise to a crouch, gesturing sharply.

The Z  spotted the Second Squad's Teams, and Severely Wound one Soldier. The rest of the Team unexpectedly head to the rear! [They rolled a '3' and are Forced Back].
Turn 2, more Fire is exchanged in the Enemy Fire Phase, but not much results. 

   You consider saying something, but the SSG knows his job. 1 Squad has already stopped firing, as there is no sign of the enemy teams.
   "1 Tigers, execute 'Hammer', repeat, execute 'Hammer'!" You take one last look at 2nd squad, then begin leading 1st Squad to their right, which will outflank the Z position. While you walk, you switch to 2nd Squad's push, to check on that situation. SSG Korleits is letting them have it.
   "...takes another step back will be shot, then I'll walk over and kick his *** from here to hell and back!  You get me!? Pull yourselves together and get back on the line, NOW!  Follow me!"

After some hot dice, the Z return Fire goes cold. Turn 3 the fleeing Team is rallied by the SSG while his other Teams lay down some Smoke Grenades. 1st Squad commences their flanking maneuver.  2nd Squad still has two Teams Firing, so they Fire Incendiary Smoke Grenades, building a Dense screen that blocks Line of Sight for the Z on the hill front.

Turn 3, there's some more Firing and Spotting all around. Nothing decisive happens, so C-Team advances towards the hill behind the Smoke screen.

   "1st Squad, let's go, angle in there!" You shout into the push. They continue advancing through the brush at the hill's edge. You can see some movement, but nothing clearly. You know the Z are there, but...where?

Turn 4 passes quickly, as both sides re-position. The Strikers are pushing against the flank and front. The Z order their reserve Team forward, and make a new line facing their left flank. All the leaders are busy Leading.

   As the smoke starts to thin, C-Team opens up and lays some heavy Fire on a Z-Team that was moving up into position, Suppressing it. 1st Squad advances and the hill is quiet, but it's not a good quiet - they're still out there!

The smoke screen thins a bit, so C-Team pops off Rifle Grenades - they are easily within range after their dash forwards. A series of explosions erupt, tight together, and at least one Z flies through the air and lays still at the crest. Another dashes to the rear.

Running forwards, the Striker Team crosses a range band for their RG, get three of four Hits, and takes out 3 of 4 in the Z Team which Routs [red pipe cleaner]. Another Team on the hill's front is Suppressed but takes no casualties.
Z return fire causes a -2 Morale Check on C-Team, but they easily pass. 
The SSG consolidate the two Teams. "All of you - on me!" he says forcefully. C-Team takes a bunch of Fire, but they clearly are giving better than they get. 
   You can all see 2nd Squad advancing to the hill. "Tiger 2, we're on the hill, but can't see any Z yet."
   "Tiger 1, we're still Suppressing the Z on our side - they gotta be feeling the heat at this point!" he says enthusiastically.

As the smoke screen dissipates, C-Team lays another volley of RGs on the last Z-Team facing them on the hill, causing a wound and Suppressing them.

   Right on front of you, 1st Squad creeps forward. You are looking thru the IEGs, and are *certain* the Z are just ahead, some slight movement, shadows... 
   "All First Tigers, volley some RGs just ahead of us, they're out there!" Dull thrumps are heard, followed by explosions. Some cries and red movement, you know you've caught some of the defense! More are ahead, so you quickly ready and fire off an RG, and a red body is flung through the air.
   "Gotcha." You say to yourself, with satisfaction.

In game terms, I split the -4 for Recon By Fire into a -2 for "suspected" enemy and left the -4 only for true RBF, when there's no reason to *believe* in game terms anyone is there. The below exchange has Teams so close that they can sense and catch little glimpses, and so are able to Fire with only a -2 instead of the -4 penalty [Book1 16.D]. In a real game, the Z would be Dummy Markers against the Striker players. Still, with the Z PL in the Team, they easily pass the Morale Check despite a -5 penalty [they have a +4 bonus!].

Anyway, altho the squad caused a light wound and a Morale Check, the High IN PL fired and caused a Serious Wound, removing a member of the Z command Team. Nice shootin' there, Tex!
I prefer how this evolved into a Spotting and Quality contest that takes a couple of Player Turns to "peel the onion", instead of the simple "move'em up and shoot" of most wargames.

SSG Korleits runs forward, with both Teams right with him. Grenades explode on the hill top, and a red body is goes down. But there's movement at the hill crest, and then Fire erupts - a merc to the right suddenly halts and flops on the ground. There's no time to stop, no time at all..."

After a Turn spent gathering them up, the 5 mercs advance with the SSG. Surprisingly, a lucky shot from a Z Team that moved up takes out a merc - nothing you can do about hot dice!

   "Give them another volley!" you shout into the 1st Squad push. A few seconds later, grenades explode all over the crest of the hill. Then you launch your own more on instinct than aim. A flash of red in the bush. Gotcha again, ya red bastard."

As Turn 5 continues, the Strikers got their say. The Team missed, but the PL again got a good Hit and a Serious Wound that was rolled onto the Z Platoon Leader! There's an ugly Morale Check, but the sole survivor rolls high, and only gets Forced Back instead of a Rout!

Counting up the casualties, the Zhodani are over 50%. Time for them to gather their wounded and retreat from the field!
And in their Move Phase, they do, with all their Teams Running except for one that is Suppressed.

   "Tiger 1, I'm seeing movement to my front - how about you?"
   "Nothing here, but we'll press forward" you say. Catching the eye of the two TLs, you point forwards and to the right. The Squad begins to cautiously advance. After a few meters, the IEGs show some forms crouching in the brush...
The remaining Z Team with a Section Sergeant [Veteran] are recovering from being Suppressed and can't move or fire. 1st Squad is closing in on them.

   Suddenly, the red figures dash away, into the brush!
   The Z Team fails its Proximity check, and Runs for the rear with the rest of the defenders. By Turn 7, the hill will be uncontested, plenty of time to call it a win.

As you press onwards, uncertain if this is a ruse or not, a break in the foliage gives you a good few beyond the hill. Dashing in and out of the brush are at least a dozen Z, with some slower moving groups behind, moving their wounded.
   "All Tigers, proceed with caution, but it looks like they bugged out."  You pull off your helmet, keeping the push near your ear, and feel the cool breeze of morning run over your nearly shaved head.  You glance at your chronometer - it's only been about three minutes since the attack began, and it's already over.  Another little hill, in another little war. You're elated!

Overall, I was very satisfied with how this played out. The balance of the key mechanics including the shooting and wound table seemed good. The Z force had four figures Run from the field, and 16 Wounds. About 8 of them were Serious Wounds, and 8 were Light Wounds.  Most of the Serious Wounds were from Contact Hits by Rifle Grenades.

The Strikers had 2 Serious Wounds. Three would have Run from the field if the PL hadn't dashed over and Rallied them.

In terms of Ammo, the Strikers used 2/3 of their Rifle Grenades, and the 2nd Squad - Base of Fire - used half their ammo.  The Z who stood and fought used up half their ammo and grenades.  

***   Alternative Outcomes   ***

If the Z had stronger Morale, I believe the fight would have ended differently, with both sides low on ammo and the Z holding a corner of the hill, which would have been a loss for the Strikers.

Had the scenario been different, say, in T1e terms, the Strikers had not achieved surprise, the engagement would have begun at longer range and the initial attack would have been less effective. The forward deployment on the hill for the Zs would have been more effective, as they could have fired upon the Strikers who would be on the move, without the benefit of a prepared, camouflaged attack position. This would likely have resulted in the Z driving off the Strikers, as they have more people to pull more triggers.

Another option for Team Z who are sitting on a win - the hill - would be to start and stay in defilade, and not dispute the advance of the Strikers. While I plan to try this tactic, I think that the use of grenades - including smoke - and better morale will see the Strikers closing in quickly and winning the close fight after carefully developing it.

***   Reality Assessment   ***
In terms of modern warfare, I think the game played 'realistically' with the options and modifications I chose as a Referee. Forget the space suits, change the figures out for 15mm 'Nam or any Cold War insurgency, and it would have played almost identically. With slightly updated gear, it would feel like modern US / ISAF in Afghanistan.

You have a mission with parameters, a situation you have to develop using Spotting and choosing when to open Fire and what type of Fire.  So... altho I've mostly been a gamer wargamer, now I'm leaning in to gaming the spotting and ammo - two things that a lot of gamers flat out refuse to do. 

Striker is granular enough that you have to be familiar with each phase of the fight, when you will Fire, when you will Maneuver, when you will lay your smoke screen, etc.  Once you've made decisions [A LOT of decisions!] about how to create, arm, armor etc a Force, you need to learn how they work together with their gear in game terms.  The good news is that you can largely re-use what you learn, especially in a campaign setting which is my ultimate goal.

I hope this inspires you S1e and T1e fans out there to dust off your stuff, get it on a table, and post some bat reps of your own - your ticket is waiting!

Tuesday, February 25, 2025

Traveller: Striker 1e Playtest #2!

"Roger, Tiger Leader. Do you need help, over?"
Yep, they likely do...!

Returning to Striker 1e, I set-up the same dust-up, a Platoon-level fight in moderately rough terrain. This mimics the narrative on p. 13-15 of the rules:

     "It's the sort of ticket you hate: a jerkwater tech 8 world where there hasn't 
     been a serious fight for forty years, a banana republic without enough 
     money for a standing army, and now a real shooting war. And you're in 
     the middle of it, as a mercenary cadre for the militia that's supposed to 
     track down and drive out the other side's mercenary strikers. It's the 
     sort of ticket that could get you killed."

This narrative is why I kept the Striker 1e rules all these years - it sounds so "real" and professional compared to Bullywood and the artistic license folks. Every time I considered purging this set of booklets, I'd read through the first several pages and this storyline and then keep them, thinking "someday...".  Did toss the box, after it got squashed, however. Anyway, it is now "someday..."!

A smaller but higher quality Striker force of Mercs is confronting a slightly higher Tech Level [TL] and slightly better armed opponent that is lower quality. I characterize them as "Striker v. Home Defense" forces. Their quality is "Long Service" verses "Conscript" for the red Zhodani figs. This results in the Conscript Teams having a Morale of 6+ on 2d6 [plus generous bonuses] and the Long Service Teams having a morale of 9+ on 2d6 [plus generous bonuses].

Once again, the Zhodani are defending a hill in One-Hour Wargames Scenario #7 "Flank Attack".  About a Platoon [37] of conscripts face a Section [20] of Strikers.  

Terrain is two hills with heavy brush [30m visibility] and military crests, i.e. Cover that reduces Hits by 50%. The woods don't count as Cover, but offers concealment and an Armor Value Bonus. Both sides start Concealed by the brush / woods, and count as Camouflaged due to positions that were carefully sited over night. They are also all on "overwatch" in that neither side has moved in the previous turn, so they are presently able to Fire at full effectiveness.

Tactical Situation: the strikers have managed a covered approach from two directions. Flanking the conscript "Tigers" on the right from a small wood with two Teams - a Squad, half the force - is the Section Sergeant. To pin their front, the other half - also a Squad - is on a lower rough hill with the Section Leader. 

Engagement Range.
Per original scenario, the attacking Strikers are *just* within range of their small arms, 9mm ACRs, about 300-350m. This is an important scenario issue as the defenders actually outrange the attackers thanks to their TL12 4mm Gauss Rifles. The ACRs are out-performed by the Gauss overall, and the mercs have to rely on Discarding Sabot ammunition for effective Fire at this range, along with TL10 Rifle Grenades. The Effective Range Bands are:

Mercs
TL10 ACR Slugs and HE = 300m, DS 450m
TL 10 Rifle Grenades 370m

Zhodani
TL12 4mm Gauss = 600m
TL 11 4cm RAM Grenade Launcher = 370m

The set-up distances are very important. 
- if the range is 475 to 600m, the defenders have a big advantage - more people and 25% better chance to Hit.
- If the Range is <450, the DS ammo gives the mercs near parity with shooting. If they don't have DS, then they would again be at a disadvantage.
- If the Range is <300m, then the ACR can hit well, but is still out performed by the Gauss. The mercs would have to rely on their Rifle Grenades for some punch to open up the firefight.

Both sides have the same Range with their Grenades whether RG or GL.

Another scenario tension is that the Flanking force is closer than the pinning force. This could allow the pinning force to engage the defense at a disadvantage, hoping for the closer range and high quality of the flanking force to beat up the defense.

Another scenario tension is that while the pinning Mercs could be farther forward, they would lose the benefit of Cover [50% Hit protection] from the military crest on which they straddle, and which the defense also has, and only have Concealment [which is a penalty to spotting and a small penalty to Hit].

I hope this explanation of Ranges and set up helps to show the tactical problem clearly: with a variety of weapons of variable effectiveness, the initial Range of the firefight are very important. 

Regarding dispositions, if this was a Traveller RPG game, then there would be a tactical roll-off between the two sides: if the defense won, the attacking mercs would be detected first, at a longer range [board edges] and while on the move - this would make for a tough day for the mercs! 

The assumption with my setup is that the mercs won [not unlikely] and were able to advance to the best range possible given the terrain, and then attack the defenders on their terms. In game terms, I am allowing the mercs to pick being Player 1 [Blue] or Player 2 [Red]. The main difference is that Red Fires, then Blue gets two Fires, then Red gets another Fire. In Turn sequence, both sides roll to Spot opposing teams, all needing a 10+ [I could also give one side no camouflage, which means they're spotted on an 8+, 25% easier]. Red would then get Overwatch Fire, then Blue would Fire, then Red would Move [if desired] then Blue would Fire again. This looks like:
Blue Move
Red Fire
Blue Fire
Red Move
Blue Fire
Red Fire
So the Strikers get to choose, and they choose Red to get the first fire. They then have to endure two Blue fires, then they will Fire again.

To cap off all the scenario variables obviously possible:
- could have a roll-off to determine starting positions [this changes the scenario from that of the OHW book].
- this would impact the starting range between the defender and each attacking force.
- could have either side or both in camouflaged positions
- could have either side or both ready in Overwatch
- could have either side start as Blue or Red side.
Each of these variables can give an advantage to a weaker side or weaker player. This is a great example of how complex it can be to set up what appears to be a simple scenario. It also shows the large number of possibilities that can be manipulated to change the story line in a Striker game. The game's heritage as an RPG tool is pretty obvious, when you think about it!

The defending Zhodani conscripts [dark red figs] deploy two squads forwards at the crest of the plateau and one on the left flank; the fourth in reserve. Another very small reserve team made up of the PL and a couple of trigger pullers is to the right rear. They could have deployed with fewer figures up front, and worked on spotting the enemy. This might have enabled the attackers to maneuver sooner, and faster, so I went with the assumption that they are playing cautiously and are also not concerned about artillery fire [like the book narrative].

The mercenary Strikers [grey figs] have three Teams to pin the Zhodani front, while two Teams outflank them from the right.

After Blue Move phase, spotting of all Units takes place. The mercs spot a couple of Teams and the Zhodani one merc Team. In true wargame fashion, both sides decide to 'unleash hell' and Fire everyone at the spotted Teams. End result, 1.5 Zhodani Teams are beat up [and one flees], but the mercs also have one Team get beat up.  
Their left flank is still holding on, however!


However, in subsequent Spotting and Fire phases, more of the Zhodani are spotted. They slowly lose the struggle for Fire Superiority. Two more Teams are shot up, and another flees. At this point, 50% of the Zhodani force is off the line. From the front, most of the damage is from the Discarding Sabot rounds of the ACRs, while from the flank a volley of Rifle Grenades took out most of a Team, pinning the survivor.
Altho the mercs have taken one loss and a few Light Wounds....
and the flanking force isn't looking too great, after some hot rolls by the Zhodani.

But in the Panic Morale Check Phase, some more of the Zhodani Fall Back or are Forced back.

The mercs get some hot shots in, also, which tears up most of the Zhodani in the front line.

Turn 2 ends with a couple of Routs by Zhodani Team remnants, and these carry off a few more personnel. With no one manning the front line, the mercs can now easily advance and start "alpha-striking" the last few Teams and panicking troops, so the Zhodani wisely decide to fall back, reporting that they have met then enemy and retreated in good order, carrying their wounded after a heroic defense.

This fight went down in a similar way to the previous, altho the mercs took more casualties this time. Three Seriously Wounded and three Lightly Wounded, largely due to good Spotting and Fire rolls by the Zhodani.

Again, nothing wrong with how this went down. As a campaign game, assuming the mercs were the Player Characters, this would be fine. As a wargame, I think the Zhodani need an advantage or two returned to them, perhaps taking Camouflage away from the mercs, or having them start out of Line of Sight and have to Move up [this gives the opponent a bonus to Spot figures in Concealment].

Substituting the entire scenario for, say Cold War 'Nam or Germany, or a bit further forward into the present era, could easily be done. Then [in our minds] the Strikers would be US forces and the Zhodani insurgents / guerillas. I'd then reduce the weapon and armor of the Zhodani, and give the US the grenade launchers.

The likable thing about Striker is that it is very easy to shift it into different historical time periods with nothing more than a change of figures and weapon categories. Or, into a future that hasn't occurred yet, or the distant future.

This is pretty significant, as learning and re-learning new games and rules is a drain of time and energy. Striker 1e provides plenty of nuance in a single game engine, and if you also have Traveller 1e [the free / cheap white book] you can easily add a narrative, or toss in Book 4 Mercenary for a lot more depth as well as a campaign.

Oddly, perhaps, the thing I want to do next is fight my British and my Italians in the desert using this rules set, and see if Striker feels good in an historical context that I've gamed a lot.

So... Stay tuned!