Hey, anyone seen a big cannister of military stuff laying around here...?

Was privileged to play in a truly lovely WWII skirmish game by dedicated and project-minded local veteran who shared with us the fruits of his Wuhan-flu confinement - would that we had all done so well! He chose TFL's "Chain of Command" [CoC] as his poison, and we were his first playtest group.
CoC uses teams of 2-8 guys as Units, and that is how the game mechanics fight. The independent leaders usually have a pistol or SMG and can contribute to the violence, but are more useful in the role of running things by giving orders and activations.
As the game is intended to be thrown at a 'con, presentation standards are quite high!
Below is the German platoon, three squads, each with a leader, an MG 34 team and a rifle team. The "HQ" has an officer and Sergeant, an Anti-tank Rifle team, and a Flamethrower team [uh-oh...]. This comes down to 8 teams and 2 independent leaders. As one can imagine, the Rifle teams can lay down some fire and provide bodies. The LMGs lay down a lot of fire. The ATR is OK against light tanks and the flamethrower is effective at scaring pretty much anything, and occasionally destroying stuff, also.

Below is the Commonwealth force. It is pretty formidable as well. It has squads of the same breakdown as the Germans, a rifle Team and an LMG team. The Bren LMG is not quite as good as the MG34, but it [of course] has a special rule, cuz basic rules just aren't enough for people... Anyway, the HQ has the same two leaders and a 2" mortar and a MkIV Vickers tank. Basically, it's a light tank with two MGs in the turret - not a great tank but better than none at all! Plus, it is pretty bullet-proof.

Below, close-up of the lovely figures. The Blue key-rings are for Senior Leaders, the red for Junior Leaders [the Jrs are stuck with their squad, basically]. The black key-rings are for the additional LMG guys, so they don't get confused with riflemen.

Below, the flank road coming in from game West [German perspective]. Rob made large area templates with fixed terrain, and numerous small ones of bushes, rocks, etc. The roads are made from canvas with silicone putty, and on the back is duct tape to prevent curl [and it gives some weight, also]. Many of the bushes are plastics, some for acquariums.

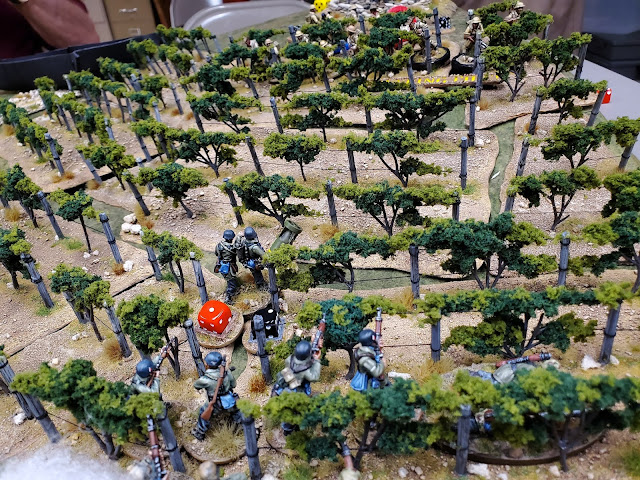
Below, a lovely orchard. The trees are affixed to the base. This is made of thin plastic, I believe model railroad plastics. With the ground covering, it is quite stiff. Note that they are atop a purchased game mat that has it's own pattern on it. Looking closely, you can see that they don't match up, but the overall effect is great.

Above and below... Rob _made_ all the buildings. Yep, hand made. They were cut from insulating foam and then the brick patterns were etched in with a pencil.

Above, my German squad "appears" on the table near its Jump Off Point [a sort of "blip" from which you can pop into view]. They have hard cover from the stone wall and buildings [a few are inside].
Below, my partner invading Crete from Above, Dave deploys his squad on the wrecked glider template [like...wow! just WOW!] which is giving him some light cover. They are advancing carefully, since we know there must be some Slimey Limey's ahead, hence the triangular marker at their front.

CoC concentrates on the effects of "hits" more than the details of damage, not to mention the details of technical armor v. weapon performance. A good choice.


Despite our masterful assault, we - barely - lost the game due to Chain of Command points. The Kiwis managed to collect enough of them due to delaying us long enough, and won the game if not exactly walking around with the sweet taste of victory in their mouths [perhaps the grapes they stole were the substitute, and they have to be better than the heinous "Victory" brand Indian cigarettes issued].

Below, Dave's squad has advanced to a stone wall. He also has a second squad and the FT team and a senior leader. he is engaged against the grape vines above, along which a Kiwi squad has deployed. The good news is we have hard and they have light cover. The bad news is there's another squad at the top of the hill! Outnumbered and attacking at 1:2, the Germans will have their work cut out for them!

Above, a great view of the customizing done with the glider model, showing a wrecked wing and battle damage. It is not affixed to the template.
Below, a "leader's-eye view" of the para squad the Germans are fighting from their stone wall. These walls are also hand-made by Host Rob, and have a great "stacked stone" sort of look one would find at a working farm. Note the camo smocks, blue helmets, and some helmet covers.

Below, the view up the hill to the objective at the top! The Bofers 40mm AA is an obvious target - the Fallschirmjager are way at the bottom. The first Kiwi squad is at the bottom edge of the grape vines, and the other is towards the top [you can see the red and a black key ring band below the yellow dice]. Above a foot between the bottom squads, another 18" to the top squad, and another 9" to the objective!

Below - terrain moment. The trees are glue to a hole in the base for additional stability. The telephone pole is on a plastic base with a washer under it for weight. You can see the duct tape under the road, and there's a nice close-up of the mat, which has a sort of rocky-arid Mediterranean look to it - very nice.

Below, nice close-ups of the buildings, plus the walls Rob made. Plastic sheet cut up with glued rocks and a great paint job. The markers are bought. The black magnet is for transportation purposes.

It took some doing, but by emphasizing Dave's squads with firepower actions at every opportunity, as well as maneuvering the stronger squad closer, and FT team within [long] range, we finally got the Kiwi squad whittled down and the FT engaged, giving the Kiwis a lot of "shock" points [basically, a disorder / pin point]. When shock gets to certain levels, the squad is Pinned and about 50% effective. When higher, the squad will run and be nearly impossible to stop without a huge amount of effort. Looks like the Fallschirm will be able to maneuver to the grapevines, finally!

Dave's stronger squad pushed ahead while the shot-up one provided suppressing and covering fire. He lost his senior leader, so I sent mine over as my squad was being beaten like a punchy-clown to almost no one [hot dice by house-host Rich]. Clearly, Dave was the Main Effort anyway! He assaulted across the gaps, and my leader also helped push the FT team a bit up the hill. We are staging the final advance and assault on the upper squad. You can see them at foto top. Before them is a yellow marker showing Covering Fire being laid upon them. Covering Fire reduces the effectiveness of enemy fire without damaging them. A pretty realistic and simple mechanic. It was criticized as being a bit "generous" however.

Below, atop the hill the first squad has fled to behind the second and will run off the table at turn end, more or less [however, we stayed in one "turn" the entire game]. One British Jr. leader is down and the Sr. leader is wounded, but aside from that the Kiwi squad is in good shape - this looks like an unlikely possibility!

Below, the final assault by Dave's Fallschirmjager. Despite losing the FT team, finally, we managed to get one shot in and that - with a lot of shooting - was enough to convince the Kiwis to fall back beyond the objective! Also, they took some casualties and lost the use of leader activations.

This was a lovely game, nicely run, that came down to the very last few rolls. While we initially thought the Germans were not going to be able to push hard enough in a 1:1 game and against a tank, no less, we were wrong. The FT team provided an edge to the Germans who were able to get local 2:1 odds against one squad, then again on the second squad. The British 2" Mortar ran out of ammo, and the tank simply did not get a lot of activations.
The game did a great job of simulating the "unreliability" of real life gear and maneuver plans. It also balanced small specialized teams well along with larger more common teams - rifles and LMGs. Leadership of the squad and platoon was essential. There was plenty of it, and we rarely had any issue with doing what we wanted. Also, when my squad was destroyed, it made the remaining leadership a bit more effective in that they were able to concentrate on the remaining teams.
Overall, I felt that Host Rob did a wonderful job streamlining and managing the game, as well as curbing the open-ended mechanics all too typical in a TFL game. For example, it is possible, if unlikely, for one side to hold the activations and play while the other side doesn't get to do much. Obviously, that would suck for the player who doesn't get to activate. TFL would no doubt shrug and say that's too bad and it is realistic. My answer is "if I want suck, I will go to my job in the real army and not worry about playing your game!"
The Chain of Command game gave me the strong impression that it is like most Too Fat Lardies games: it is over-engineered and allows extreme possibilities to happen than can easily make a game lop-sided. One has to plow through a lot of not always well playtested or explained rules and is constantly wondering how they apply to a situation or interact. For this reason, I can't recommend any TFL games, nor can I recommend CoC. In fact, I've sold off and given away all TFL games that I had, even the popular "I Ain't Been Shot, Mum!"
At the end of the day, TFL rules use difficult, complicated mechanics to bring about simple results. Sometimes there is enhanced "feel" and such, but overall, it isn't worth it. Also, any game that can allow you to get a butt-stomping without being able to respond much has sacrificed the "fair chance" rule of games.
So highly recommend you play this game at a con, but can't recommend the rules.
Stunning game! Figures and terrain are amazing. Great scenario too!
ReplyDeleteYep - Rob has spent the better part of a year on it, and it shows! I have some posts of his painting from early Wuhanflu time when I ran a painting competition:
Deletehttps://ecw40mmproject.blogspot.com/search/label/Painting%20Challenge%202020
so you can imagine how I've longed to participate in his playtest!
What a superb looking game, and great pics and narrative.
ReplyDeletecompletely agree on the tf rules, though. Hard to get into them, and a real problem for gameplay.
I love it when someone decides to put the effort into hitting that "top shelf" in the visual area of the hobby. Too often I am in the "it's good enough" area. Probably since I haven't been able to do a lot of hosting. That may change with my modern skirmish figs and rules...
ReplyDeleteIn an interesting moment, when I ran Dux Britannica at a group of experienced and very mechanically driven gamers, they said it was too much mechanics. I got rid of the rules at the flea market of Historicon, I think. Since then I tried Kings of War and my own rules [based on OHW] and those played just fine.
Lesson to me, is that a TFL set of rules might be worth stealing a few clever mechanics ideas from, but not to play the whole game.
What a lovely looking game... stunning... and I don't disagree re. the TfL rules.. never been able to get on with them...
ReplyDeleteHey Steve, thanks for dropping by.
ReplyDeleteYeah...I had high hopes for Dux Britaniarum and then when I ran the game it just didn't run smooth, very clunky. And those weren't "simple game gamers" so to speak. I've run complex naval games for them, which they keep asking for a re-run.
I started to look into Chain of Command, I tried Ain't Been Shot Mum, and a friend was interested in Charlie Don't Surf. We never got any of it to work right.
Also, their humor wears thin after a while.