I had left the AIP 54mm figures set up on the [rarely dined upon] formal dining room table from a playtest of A Gentleman's War [CLICK]. So, it was easy to bang out a playtest of OHSW with another era, one that is officially in the rules, albeit the book's example is Napoleonic.
I don't do a lot of black powder-era skirmish, but it has great potential; the tension between a relatively slow-loading weapon and movement to attack with hand weapons being just right. While it takes a calm head to reload a musket under pressure in the allotted 10-20 seconds, it also takes a lot of elan to close with and bayonet or tomahawk the enemy.
This post almost got switched to my black powder blog due to the era - which fits well within the blogs present modern limit of Franco-Prussian War. However, while the book example is Napoleonic, I really feel like the proper era with the RAW [Rules As Written] is more like 1870+ with the use of revolvers and lever-action rifles. Wonder why? Read on!
I took one of the classic One-Hour Wargame scenarios, Scenario #14 Static Defense, and made a couple of adjustments for a skirmish feel. It is an interesting scenario with the defender forced to defend two different objectives, a hill and a town, with three Units each. Two of each three can't leave the terrain they defend.
For this skirmish adaptation, I put a wall on the hill and made the town at left into an artillery bastion. To keep it simple, this terrain piece can rotate as if it was not behind a bastion. In the center, the woods becomes a grove of 10 trees, behind which two figs can shelter.
There are four small Union units - a gun w' four crew, one five fig infantry team in the woods, and a five-man team holding the hill. The five infantry in the woods may move around, the gun and hill teams must hold their objectives. There is also one leader who is free to move at will.
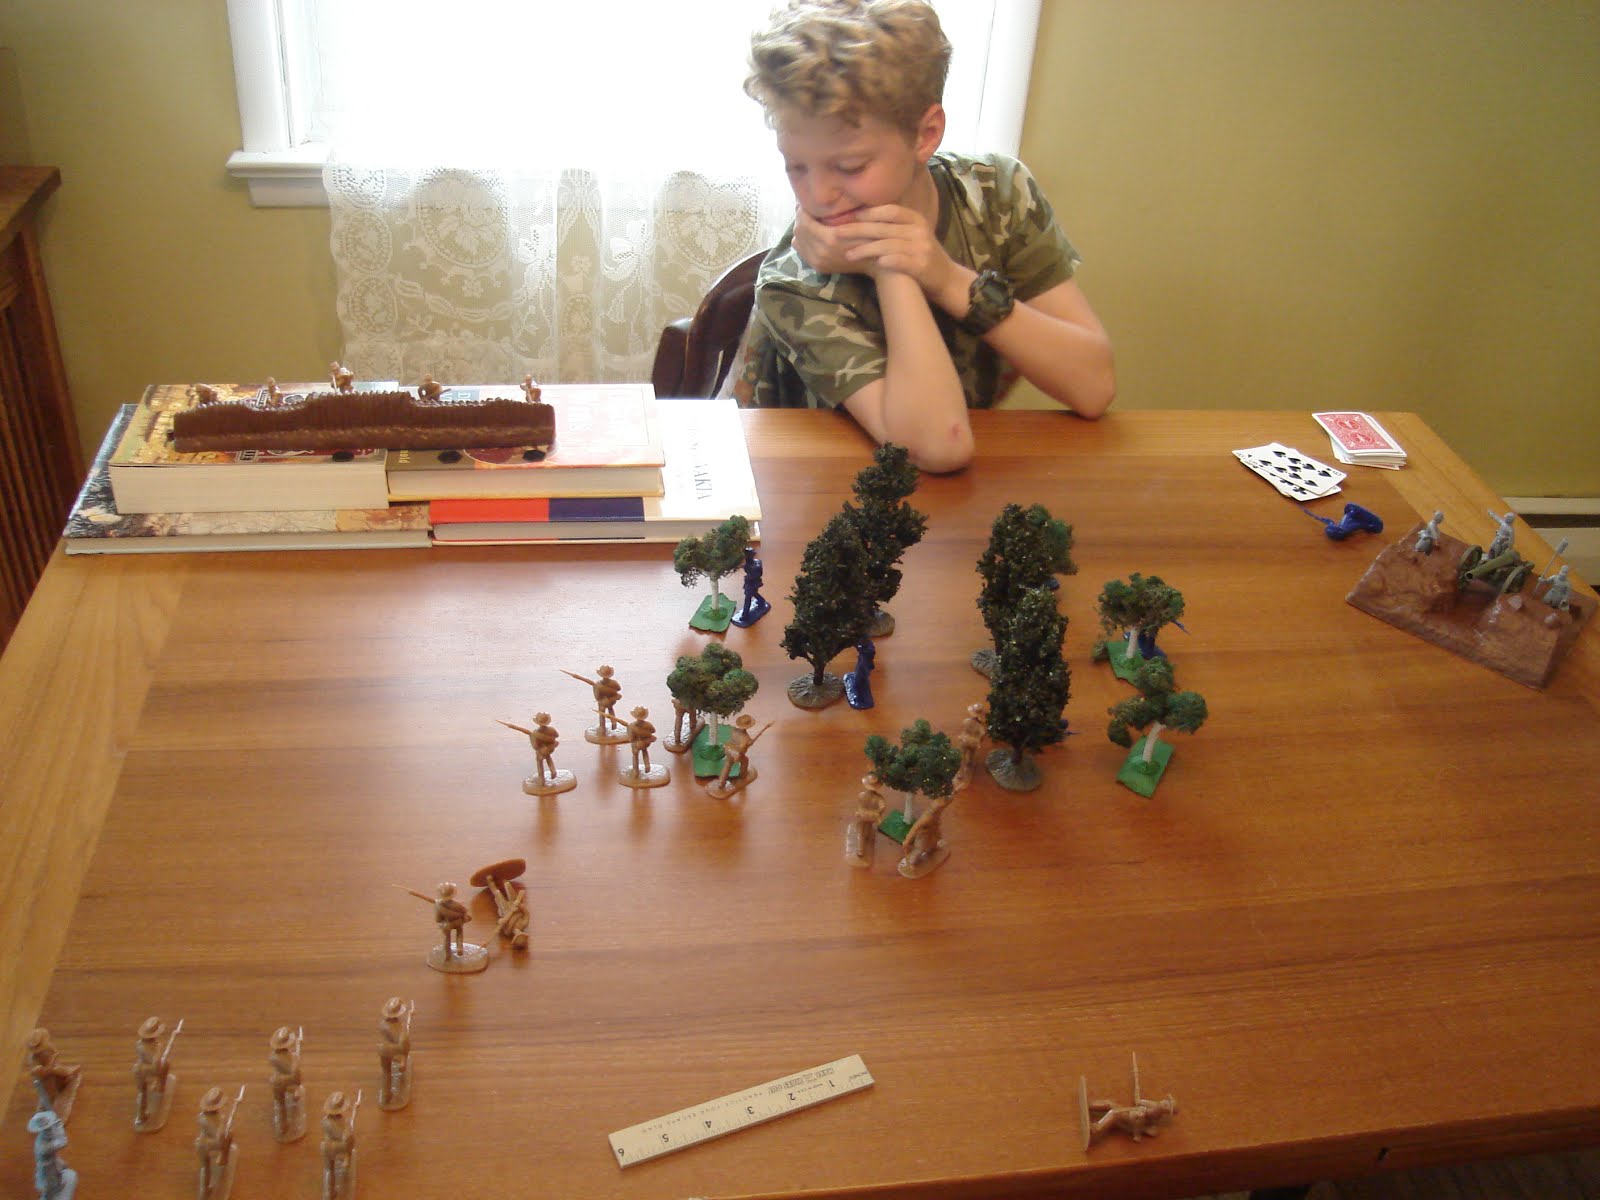
To attack this perimeter, the Rebels have 20 infantry in 4 teams of 5, with a leader. They are at the bottom in butternut, and of course the Union is in blue.
Captain Winkie considers his defense...the sun is in his eyes, perhaps?
First few card draws, and I push forward the Rebels in the center, hoping to occupy the woods, hide from the gun and use it as a base to take the hill. Sounds like a good plan! I take a few casualties because I'm on the move, not shooting, and the gun got in a boom before I could get out of its line of fire. Hoping that numbers will pay off against the woods.
The end of the first turn as Captain Winkie pulls a Joker. Two Union and three rebels are down.
So far the plan seems like it may be working, but I'm realizing that numbers make almost no difference as you activate Soldiers by your cards, which are the same as your opponent's cards. So you are pretty much fighting equal all the time according to the draw of cards which may even give a better draw of activation points to use for the smaller side.
In many games, this might not matter as if you outnumber your enemy 2-1, if you trade 1-1 you will win by attrition. However, morale is checked by absolute numbers, not by percent losses, so if you lose 5 guys, you have the same check as the other side that has lost 5 guys.
The only way I can see around it - using the RAW - is to automatically give the side with the numbers advantage more and better leaders. This should make them stick around longer. Of course, I could also just give them 5 free casualties or something, but I'm trying VERY hard to play the game RAW as I'm still learning it. Anyway, let the action continue...
Below, CPT Winkie has a great shot with his cannon. He draws a Queen, 10 and Jack [value 12, 10, 11] and beats all of my defensive cards. Three Rebels go down [with a yell...].

A bit later, I pull a Joker and end the turn. Rebels are behind 4 to 2 in casualties inflicted, but pass morale drawing a 10 and needing a 4 or higher. During the casualty resolution, I draw my second Joker [which is ignored], and lose one figure "Red and Dead". The other two return to action "Back with Black". The Rebels are going to press the attack!
A few actions later, CPT Winkie draws his second Joker, ending Turn 3. The Rebs easily pass morale with a Jack but lose one more Soldier in casualty resolution. The Union pull an Ace, failing morale, but their leadership allows them another card pull and they pass with a '5', needing a 4+.
I draw a King and commence a general movement onto the hill. It is clear that shooting from the open v. someone in cover is a losing proposition in this game [kudos for the realism] and that charging into melee is best since it favors the attacker [boo to the lack of realism!]. Rebs take two more figs Down from Union shooting.
What with plenty of action, there's re-shuffling and lots of cards being drawn, so CPT Winkie draws a Joker, ending turn 4 and passing morale easily with a King. I also pass easily with a Queen, but the casualties are 8-4 and I have to draw a 9+ while he has to draw a 5+ [so numbers don't help with morale resolution, as previously explained].
We work out that the Union gun has the Rebel hill attack in its 45 degree arc of fire. Uh-oh...a great shot takes out more Rebels. I then draw a Joker, ending Turn 5. I pass morale with a Queen, needing...a Queen! A 12+ was needed to beat the 11 casualties the Rebels have taken. Yee-haw!
The Rebels weren't able to take the woods. The Union infantry were easily able to attack and inflict casualties on the advancing Rebels, so I had to just try and quickly take the hill before another Joker was drawn. My chance of drawing a Queen or King for morale was pretty slim and I knew I was running out of time. Below, the envelopment is in progress.

In the process, I take another casualty. When the next turn after that rolls around, I draw a Jack for morale, and can't draw another card as my leader is dead, too. Rebels lose!

The final situation at end of battle. A valiant effort and with rebels contesting the hill, but the morale failure causes them to retire from the field.
Don't misunderstand me, this was a fun game with plenty of action and drama. However, I found it frustrating to be unable to move figures in groups, lead by leaders - one of the main purposes of a leader in this era was the "follow-me" aspect of leadership. I was rarely able to bring even superior firepower to bear since you can't fire as a group either - one of the main purposes of formations was to fire in groups in this era.
So while I could use the RAW to better equip the rebels to give them a better chance at fighting to a win, it didn't feel right. While I hate to tinker with the rules while still learning them, I do believe that for the blackpowder era, a leader must be able to move and fire figures in groups, even small ones.
That being said, such a tweak is not hard to make. My conclusion is that these rules play great for firepower heavy eras with small teams and squads. I think that the black powder weapons fire too quickly to have the right feel, and would add a "reload" action for them.
Still, after taking a lot of notes, I decided to try a few more times with the Rebels, using different tactics, etc. They lost nearly all the games, some were not even close! The Union force in cover has little risk from a 2-1 force attacking them, as they fight just as effectively and have the same morale constant.
This issue might be solved a few ways:
1) Divide the larger force into two commands, and allow that side's card drawn to be played by each command. So if there are 20 Union figs and 40 Rebel figs in two commands, and the Rebels are divided into two commands of 20, then their side's draw of a '7' for example gives each command 7 Action Points to spend.
2) By adding a third deck and have two decks of cards for the Rebels so they could act - in effect - in proportion to their numbers. I believe the rules mention this for multi-player games, but as a mechanic for additional players not additional numbers. While this would also have more Jokers in play, I think that affects everyone evenly. So the turn would be three-way Initiative draw, followed by the players Activating in draw sequence. This could have the added interesting problem of coordinating the larger side's forces!
3) Adding a special rule for a leader suitable to the period. So for British v. Zulus the Brits could play a face card on their main leader to have all Soldiers shoot, while the Zulus could play a face card on their leader to allow all their warriors to move.
I don't have the rules with me as I write this from Army training exercise at scenic Camp Dodge, but I will have to try this when I return. Also, will have to try a cowboy and indian game with my sons figures soon!
Until then, I still say "buy these rules!" They are fun and thought-provoking, and great for new and/or young gamers, as well as a breath of fresh air for grognards and disgruntled fusiliers alike. I still owe my followers a more detailed review of the rules, but I am still getting to know them, and I encourage you to do the same.
Captain Winkie considers his defense...the sun is in his eyes, perhaps?

First few card draws, and I push forward the Rebels in the center, hoping to occupy the woods, hide from the gun and use it as a base to take the hill. Sounds like a good plan! I take a few casualties because I'm on the move, not shooting, and the gun got in a boom before I could get out of its line of fire. Hoping that numbers will pay off against the woods.
The end of the first turn as Captain Winkie pulls a Joker. Two Union and three rebels are down.

So far the plan seems like it may be working, but I'm realizing that numbers make almost no difference as you activate Soldiers by your cards, which are the same as your opponent's cards. So you are pretty much fighting equal all the time according to the draw of cards which may even give a better draw of activation points to use for the smaller side.
In many games, this might not matter as if you outnumber your enemy 2-1, if you trade 1-1 you will win by attrition. However, morale is checked by absolute numbers, not by percent losses, so if you lose 5 guys, you have the same check as the other side that has lost 5 guys.
The only way I can see around it - using the RAW - is to automatically give the side with the numbers advantage more and better leaders. This should make them stick around longer. Of course, I could also just give them 5 free casualties or something, but I'm trying VERY hard to play the game RAW as I'm still learning it. Anyway, let the action continue...
Below, CPT Winkie has a great shot with his cannon. He draws a Queen, 10 and Jack [value 12, 10, 11] and beats all of my defensive cards. Three Rebels go down [with a yell...].

A bit later, I pull a Joker and end the turn. Rebels are behind 4 to 2 in casualties inflicted, but pass morale drawing a 10 and needing a 4 or higher. During the casualty resolution, I draw my second Joker [which is ignored], and lose one figure "Red and Dead". The other two return to action "Back with Black". The Rebels are going to press the attack!

A few actions later, CPT Winkie draws his second Joker, ending Turn 3. The Rebs easily pass morale with a Jack but lose one more Soldier in casualty resolution. The Union pull an Ace, failing morale, but their leadership allows them another card pull and they pass with a '5', needing a 4+.

I draw a King and commence a general movement onto the hill. It is clear that shooting from the open v. someone in cover is a losing proposition in this game [kudos for the realism] and that charging into melee is best since it favors the attacker [boo to the lack of realism!]. Rebs take two more figs Down from Union shooting.

What with plenty of action, there's re-shuffling and lots of cards being drawn, so CPT Winkie draws a Joker, ending turn 4 and passing morale easily with a King. I also pass easily with a Queen, but the casualties are 8-4 and I have to draw a 9+ while he has to draw a 5+ [so numbers don't help with morale resolution, as previously explained].

We work out that the Union gun has the Rebel hill attack in its 45 degree arc of fire. Uh-oh...a great shot takes out more Rebels. I then draw a Joker, ending Turn 5. I pass morale with a Queen, needing...a Queen! A 12+ was needed to beat the 11 casualties the Rebels have taken. Yee-haw!

The Rebels weren't able to take the woods. The Union infantry were easily able to attack and inflict casualties on the advancing Rebels, so I had to just try and quickly take the hill before another Joker was drawn. My chance of drawing a Queen or King for morale was pretty slim and I knew I was running out of time. Below, the envelopment is in progress.

In the process, I take another casualty. When the next turn after that rolls around, I draw a Jack for morale, and can't draw another card as my leader is dead, too. Rebels lose!

The final situation at end of battle. A valiant effort and with rebels contesting the hill, but the morale failure causes them to retire from the field.

Don't misunderstand me, this was a fun game with plenty of action and drama. However, I found it frustrating to be unable to move figures in groups, lead by leaders - one of the main purposes of a leader in this era was the "follow-me" aspect of leadership. I was rarely able to bring even superior firepower to bear since you can't fire as a group either - one of the main purposes of formations was to fire in groups in this era.
So while I could use the RAW to better equip the rebels to give them a better chance at fighting to a win, it didn't feel right. While I hate to tinker with the rules while still learning them, I do believe that for the blackpowder era, a leader must be able to move and fire figures in groups, even small ones.
That being said, such a tweak is not hard to make. My conclusion is that these rules play great for firepower heavy eras with small teams and squads. I think that the black powder weapons fire too quickly to have the right feel, and would add a "reload" action for them.
Still, after taking a lot of notes, I decided to try a few more times with the Rebels, using different tactics, etc. They lost nearly all the games, some were not even close! The Union force in cover has little risk from a 2-1 force attacking them, as they fight just as effectively and have the same morale constant.
This issue might be solved a few ways:
1) Divide the larger force into two commands, and allow that side's card drawn to be played by each command. So if there are 20 Union figs and 40 Rebel figs in two commands, and the Rebels are divided into two commands of 20, then their side's draw of a '7' for example gives each command 7 Action Points to spend.
2) By adding a third deck and have two decks of cards for the Rebels so they could act - in effect - in proportion to their numbers. I believe the rules mention this for multi-player games, but as a mechanic for additional players not additional numbers. While this would also have more Jokers in play, I think that affects everyone evenly. So the turn would be three-way Initiative draw, followed by the players Activating in draw sequence. This could have the added interesting problem of coordinating the larger side's forces!
3) Adding a special rule for a leader suitable to the period. So for British v. Zulus the Brits could play a face card on their main leader to have all Soldiers shoot, while the Zulus could play a face card on their leader to allow all their warriors to move.
I don't have the rules with me as I write this from Army training exercise at scenic Camp Dodge, but I will have to try this when I return. Also, will have to try a cowboy and indian game with my sons figures soon!
Until then, I still say "buy these rules!" They are fun and thought-provoking, and great for new and/or young gamers, as well as a breath of fresh air for grognards and disgruntled fusiliers alike. I still owe my followers a more detailed review of the rules, but I am still getting to know them, and I encourage you to do the same.
Excellent stuff sir.
ReplyDeleteI did pick this book up, and thought how appropriate it might be for scuffles between British Paras and Panzergrenadiers at Arnhem.
SO, I'm probably echoing your modern thoughts a bit.
That said, I tried to imagine it working for more modern skirmishes, along the lines of Force on Force. Not sure it would work there - with insurgents and operators, but some lovely ideas in there.
I think it works easily for "generic" modern armies, e.g. Storntroopers v. Rebels per my earlier posts. As for more modern, I'm working on that. I think it would be fine, and that the sides could be "shaped" using the leadership rules. I welcome your suggestions in that area. I'll be specifically playtesting that theme with Star Wars figs, altho to amuse myself the Stormtroopers will be the good guys.
ReplyDelete;)