After stealing some concepts on scenarios from Muskets and Tomahawks, and Victory Conditions the MP classic Starship Troopers, a clash of patrols took place "somewhere along the frontier" in a battle of "very little importance"; indeed, it would hardly be worth mentioning in a dispatch except for the casualties.
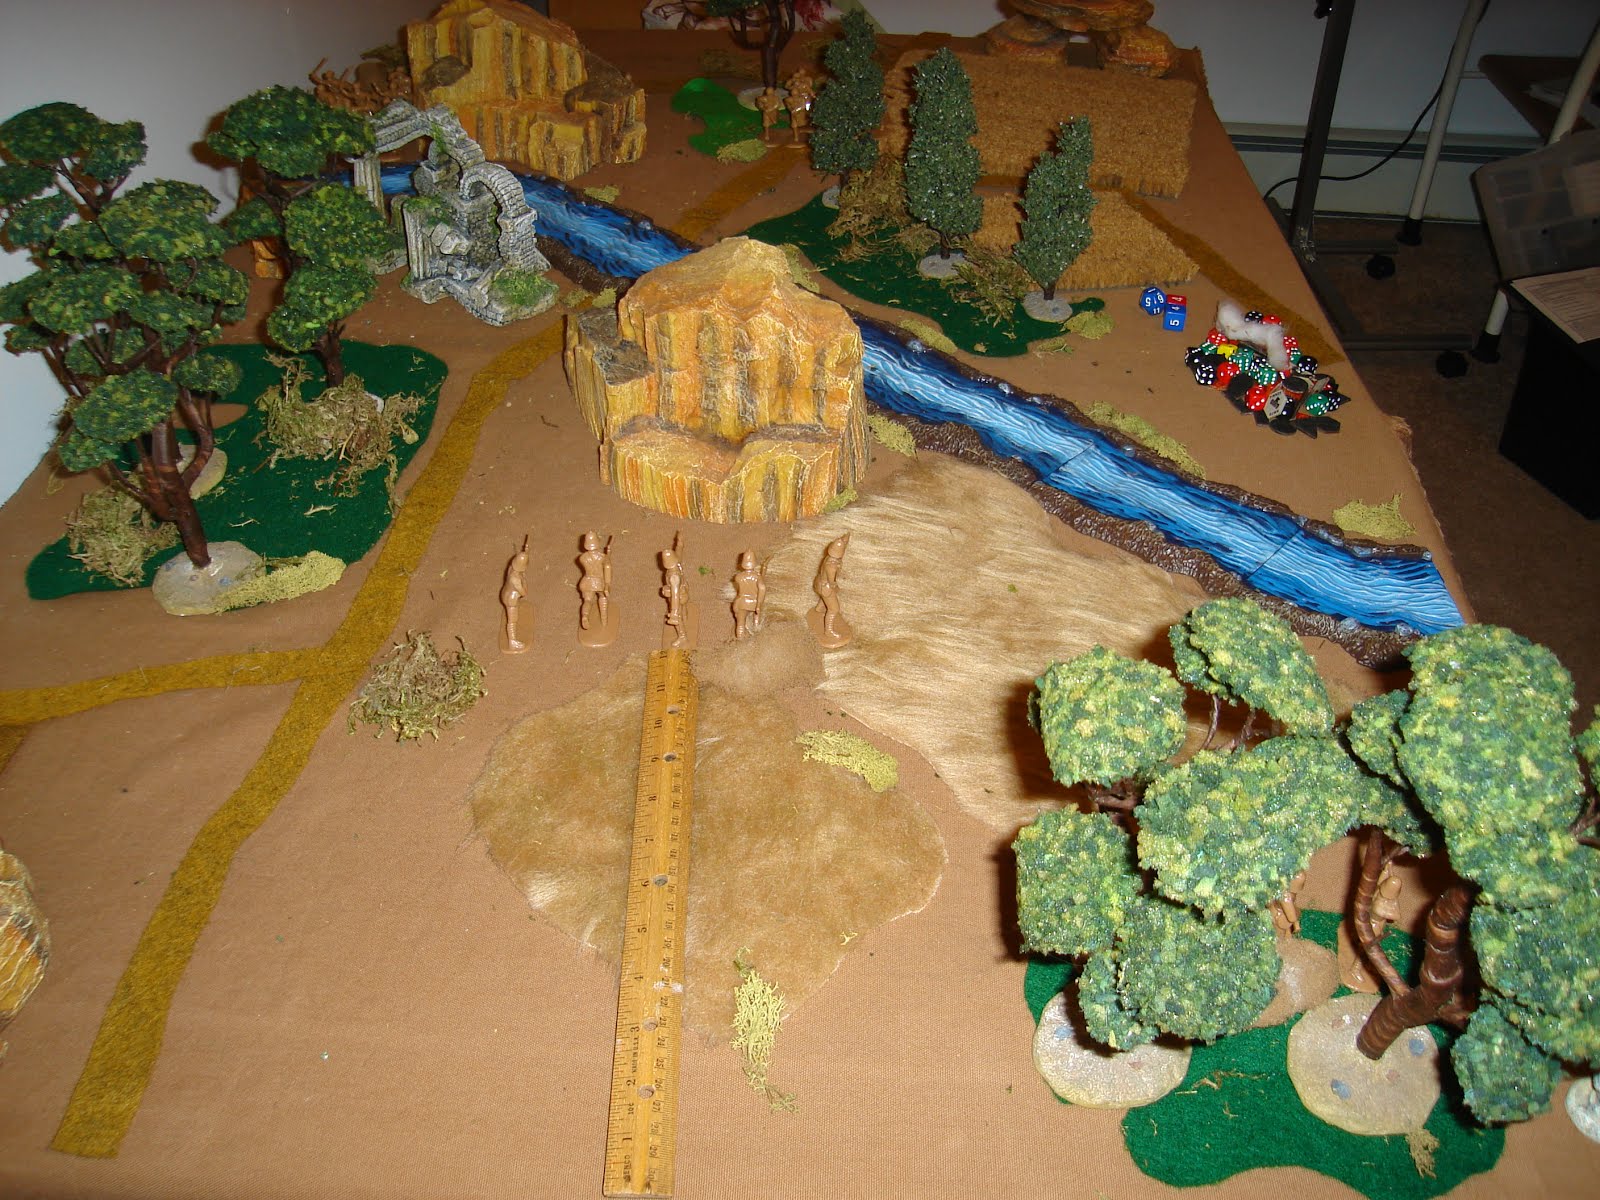
The Table. All terrain is conceptualized in the distances between being either less than 6" or more than 6", this being the base move for foot soldiers. As Figs only perform one Action a turn, they will be exposed if they move between terrain that is beyond their move distance - and what else matters, really?
As this is a skirmish game, simply touching the terrain grants a '2' Cover Save, or 5+ on a d6. Line of Sight [LoS] is actual, so altho one may get a Save being seen is figured separately. Altho the table has more terrain in the middle, it has some open sight lines along the small river, and in the bottom left and right quarters. For the game, I'm leaning into a more terrain is better way of thinking as I conceive the Pathans as being smart enough to know how to fight in the hills effectively after a few thousand years of doing so!
Scale, Ranges. Again, a small-scale skirmish game, shooting range is therefore generous and the ranges more dependent upon quality of sights, aiming, and clear LoS than theoretical effective range in testing. Therefore, weapons may fire out to double their Effective Range if a turn is spent aiming; this represents distance affecting rate of fire more than the chance to "get a Hit" as any of the soldiers / warriors in the game can easily place a bullet close enough to effect the target at all table ranges. So a true rifle like the Martini-Henry has an effective range of 36" BUT may fire out to double the range every other turn. This impacts the scenario in that ALL the table may be fired upon by all the firearms except the pistols.
Formations. This being a small-scale skirmish game, there isn't much in the way of formation rules. Figs are either close together [bases touching] or clearly apart. If touching, they support one another in melee, and if apart they get a 2 Save, or a 5+. If combined with the Cover Save above, the net Save is 3+. This puts forward another of my design goals, only providing rules for that which really matters, or is decisive. Could I have a formation or terrain that allowed a save of 1? Of course! But why bother? The warriors themselves are going to seek cover that really matters, or formations that are less vulnerable to shooting, from their training and experience. Why bother with in-betweens?
With these thoughts, on to the skirmish!
Victory for this scenario is based upon driving the opposition from the field by causing casualties [called Wounded or Killed but really representing out of the fight or incapacitated, respectively]. Casualties result in morale checks to the Force; if they fail, the Force will quickly retire from the field, possibly leaving wounded and dead behind. This results in loss of honor and more Victory Points for the other Force. These Forces are the scouts and patrols of larger forces, and if they are forced to retire intelligence and information cannot be effectively gathered, thus hampering the activities of the Main Force.
Turn Sequence, Initiative. As the scenario is a meeting engagement, the two sides dice for Initiative. The side that wins may take an Action with every Figure [Fig] in the Force, or hold off on Acting with any Figs desired until after the opposition. The Force that loses must take all its Actions, and cannot wait. Thus the Force with Initiative has both the opportunity - and risk - of acting first OR last with any Fig. Also, the side that wins Initiative dices for Initiative with a bonus of +2 until they either lose an Initiative roll or the enemy has Figs within 6" - at this point I judge it too unpredictable a situation for one side to have a clear-cut advantage, so resort to an even roll-off.
If the roll is a tie, then there is a break in the action I call a Respite - Figs catch their breath, hunker down, load, and prepare for the next bit of excitement.
The Forces. I've nine Elite British with one a leader - The Sergeant - all with breechloading Martini-Henry rifles and bayonets. Elite Figs have a Quality of 3+, so will Hit shooting and pass Morale on a 3 or better with a d6. A tenth Fig is a Hero - The Lieutenant - with a Webley Revolver and a sword. He is Quality 2+, so a tough opponent! I toyed with having the Sergeant be the Hero, but that'll be for a different story. They Brits will fight in two teams, one lead by each Leader, to give them some flexibility.
The Pathans have 18 Average warriors, Quality 4+. 11 have long weapons, 4 of which are Snider carbines, or breechloaders, the rest jezail muskets that need a turn to load between shots. 7 have sword and shield. The last 2 are Elite Leaders with a flintlock pistol, sword and binoculars [of all things]. They'll have two little bands of warriors, one swords and the other jezails, each led by a Leader. The four marskmen will shoot on their own without needing any Leader's help. Hopefully, they don't get Pinned!
Figs that do not have a Leader within 6" do not recover as easily from being Pinned, and may not want to move as fast or out of cover. So it is often important to stay together, altho one can leave a shooting or Elite force behind and get good service from it.
Pathans win the Initiative roll, so they decide to move last with all their Figs - therefore the Brits must all enter the table while the Pathans will enter the table last, after seeing the British choices.
Turn 1 Below. British view of the battlefield. There's open space in the middle, but a good wood to use as a base of fire on the right - it has a Line of Sight down the entire table. Getting into the woods or rocky hill near the river will provide a forward base with Cover.
Turn 1, Below. Pathan view of the battlefield. The open space to the left will have to be avoided - a change in Initiative could catch Figs in the open there and exposed. To center and right is denser terrain, providing an avenue of advance for the Pathan swordsmen, and a base of fire for the marksmen.

Turn 1, British Action. Brits Fast Move [marked with dust cloud] everyone on to the table, resulting in double move in the center by the Officer's team and a double move halved by the woods for the bottom team led by the Sergeant. The team in the woods now has a Line of Sight down the table, and a 3+ save from being spread out and in cover. The other has a 5+ save from being spread out, but are behind the rocky hill, anyway.

Turn 1, Pathan action. They also Fast Move everyone onto the table, and put the melee force at the river to right, four marksmen with breechloaders against the hill, the jezails and a leader along the road to the center woods. All have a Leader within 6". Their plan is to use the rocky hill as a fire base while the swordsmen advance through terrain to fight up close. The jezails will go in the center to offer some shooting support and possibly join in the charge of the swordsmen with weight of numbers, as seems appropriate.

Turn 2, below. Brits advance for positions, the right team to offer firepower, or close support as needed - I'm relying on the 5+ save as there's no real cover there!

Turn 2, Pathans. The jezails move into the wood, the sharpshooters onto the rocks - ready to fire next turn, and the swordsmen cross the river.

In Turn 2, no one Fast Moved as you can't do that two turns in a row. Fast Moving also results in no Cover Saves at all since you are by definition moving too fast to get any benefit from terrain - you could end move out of LoS, however, so a FM can really help.
Turn 3. Pathans have kept the Initiative [IN] easily, moving first or last as desired. The Brits take up positions at the river and in the rocks. The Pathans respond by Fast Moving the swordsmen into the ruined building, and the jezails into the woods but still out of LoS [the edge of area terrain is the LoS line, so they can't yet be seen, nor see out].

Turn 3. Pathan marksmen fire to no effect - they hit on a 4+ and the Brits have a 3+ save. Note dust clouds on jezails and swordsmen from Fast Move. I now regret moving the swordsmen so fast - they get no cover benefit!

Turn 4. Lots of shooting breaks out. Pathans keep IN, which they keep for rest of game. Pathans edge swordsmen forward a bit, losing the dust cloud and getting better Save.

Turn 4. Pathan marksmen take out a Tommy. Black dice show two Hits [4+] followed by one successful save with green dice, a 3+, then the Brit checks his Quality for the effect of the Hit [which I see as a shot close enough to matter]. If he ties his Quality, he's Pinned, if he misses by '1' he's Wounded, and if by two he's Killed. Alas, poor Tommy rolls a '1'! British shooting is ineffective.

Turn 5. Pathans charge in! They take a regular move to contact a couple of Figs. It results in lots of Pathans attacking one Brit. There's 2 melee dice for the officer, and two more for the two warriors, one each, [black dice]. The Elite Tommy gets two dice [red]. The Pathans win the roll-off, getting two Hits, one of which is not blocked by cover [the green '1'] and then this chap ALSO rolls a '1' on his Quality! Poor luck or just carelessness?? The Brits have lost two Killed and done very little. What will the General say about this??

Turn 5. Other British team responds by dashing across the river and threatening Pathan shooting support. Gave this careful thought - the second team had to either move closer to their fellows in the rocks, or do something threatening and offensive, and I chose the latter.

Turn 6 kicks off with the Pathans keeping the Initiative, yet again.

Turn 6. Pathan jezails move into LoS and shoot - black dice show 4 Hits, all Saved. There was only space for 7 Pathans at the wood's edge, as I wanted to keep the Save for not being together. I chose to leave the officer at the back. All Actions have a one base width free move at start, allowing small adjustments of position or facing for these alert individuals. This means you can pop into LoS and Shoot, but not hide again until next turn. This took care of needing any overwatch type rules and more needless complexity. Note that the jezails all need to spend a turn Reloading, now.

Turn 6. Pathan swordsmen keep up the pressure, and another Limey is Killed. Note the black dice winning a melee, getting two Hits [one from each Pathan actually in contact], one Save, the other not saved and a yellow dice for the quality check - another '1'!

OK, full disclosure here - I thought I was taking a risk with the British team led by the officer, but hey, I wanted to try out the melee rules...a tough training day for these Tommies!
Turn 6. British officer and Tommy shoot nearest Pathans for a kill. The red dice with black spots show two Hits with Revolver [Hooray for Mr. Webley, and well, the Beatles, I guess] and one with Martini-Henry, the red dice with white spots; two are saved and the one not resulting in a '1' and a Killed Pathan. First blood! The Sergeant's team kills one Pathan jezaileer in the woods, even as the team begins pulling back across the river to support their fellows - either shooting or retrieving fallen comrades as needed.

Turn 7 Pathans. The swordsmen fiercely charge in again! Leader challenging the British Hero. Cool, calm and collected, the officer kills him outright. This is seen with his red/black dice outrolling the two black, and the yellow '1' showing his Quality Test - miss by two from his 3+ is a Killed result. Less fortunately for Queen Vic, the officer's last team member is killed. Dice don't show it correctly, I must've used them for another roll, but you can see the poor fellow to the top left of the pic, above the green marker.

Turn 7, British. Hero officer fires his Webley to little effect. Sergeant's team is moving in at top left of the pic, just touching the fallen before them. Pathans at arm's length!

"Back, you savages! Take that <bang>! and That <bang>! The pop of a Webley in anger...
Turn 8. Pathans win Initiative yet again, and take the opportunity to make a surprise move - scarpering off! With the right moves, all the Killed and Wounded are retrieved, with all getting out of LoS or in cover. Amazingly, all the sharpshooters Hit the British officer standing tall atop the rocky hill, like some crazed bronze statue! Equally amazing, he saves every single one of them! He then fires the Webley at the Pathan dragging away the dead Leader, but his one unsaved Hit is shrugged off by the fierce warrior who is clearly determined not to leave his Leader behind. The Sergeant's team have to move over but are still threatening the retreating Pathans with some distant firepower.

Turn 9. Skirmish winds down. Pathans pull into cover, load weapons, and pull back under the guns of their sharpshooters in the rocks at top right. A lone shooter carries his dead comrade into the little gap below them. With 7-8 Pathans still shooting and all their dead and wounded secured, Queen Vic's men have no more opportunities for glory this day.

At bottom left, the Sgt's team secures cover from any final Pathan incursions, as the Officer carried away one dead redcoat. The other three will have to be carried by the team. It was a close haul all the way through, with some higher casualties than should've been expected, frankly.
Counting the cost - and the Victory Points! Pathans lost six dead and two wounded - the high number of dead has to do with bad rolling - seems like they always rolled a '1' instead of a 3 or 4 which would result in a Wound or Pin instead. Six of the casualties were from the swordsmen, unsurprisingly. Only two of their jezail-men died. As all the Pathans are worth the same, shooter or swordsmen, they gave up 20 points for the 5 dead, 4 for the 2 wounded [1/2 or 2 each] and 9 for the dead Leader, or 33 total. They also lost no honor for failing to take away their dead and wounded.

British lost four dead for 32 pts, 6.5 for the wounded officer [1/2 of 13 pts] for 38.5 total.

With the Pathans coming out ahead, 38.5 to 32, their margin of victory was 1.2-1, not quite enough for a win, which I'm presently saying is 1.25 to 1. A decisive win would be 1.5-1. So I'm giving the Pathans a marginal victory for being over 1.1-1.
Present Victory Point schedule is:
0.00 - 1.1 = tie
>1.1 - 1.25 = Marginal Victory
>1.25-1.5 = Victory
> 1.5 = Decisive Victory
Of course, it could be in margins of .20 instead of .25, but one has to start somewhere!
Thoughts. I am pleased with how the rules played out. Nitty gritty bits of mechanic went quite smooth. There are plenty of options for players with every Fig, but most choices are in the fire and maneuver vein, as is to be expected with a straight up patrol clash.
Some mechanics, like Fast Move, worked just right. You can do it every other turn, and it paces things nicely while giving players opportunities to seize terrain, suddenly threaten, etc. Yet, it isn't overwhelming or unrealistic. The strict IOGUGO sequence actually plays very smoothly, and one side has INitiative for a few turns usually, giving them opportunities to set the game's pace. While it is harder for the side without INitiative to do the same, it is not impossible and careful planning can also result in unexpected threats to the enemy.
I'm especially thrilled with the system of Saves. They are easy to remember, drive action and decisions, feel realistic and have significant impact that can still be thrown on its head by good or bad luck, which I'm OK with. One is always in the player's control - spreading out the Figs - and the other is driven by terrain and maneuvering - taking Covering terrain. On a table with less terrain, or with it spread out differently, the hills and woods will provoke totally different choices by the players, especially when combined with the mission's victory conditions.
A few things I want to work out is further differentiating shooting combat from melee combat. The former is mostly about Pinning and the latter about taking ground, IMHO. I'd also like to make shooting a little cleaner with a distinct difference between average and superior troops.
Overall, this was a great, fun game, filled with interesting choices but driven by core combat principles rather than loads of special rules. This made it feel very realistic but also play very simply. This core platform of rules can certainly withstand the occasional extra rule for a unit, such as cavalry or cannon, without becoming bogged down and tedious.
No comments:
Post a Comment
Thanks for your comment! t will be posted after it's moderated.