Yes, it was irresistable - an immediate playtest with the rules in hand! OK, OK, yes, there will be a more brainiac review of the rules in the near future, as time permits [and with the wife about to pop out child #2, that's dicey]. However, if you want a quick - very very quick - review...BUY THIS BOOK!
Hope that's helpful.
There were a few things I did not get right from Dale's tactful, respectful review of One-Hour Skirmish Wargames. Which is a credit to Dale for NOT revealing everything John Lambshead [hereafter referred to as JL...not b/c he's my BFF [[we're too old to know what the heck that is]] but for brevity's sake as this is a One Hour Wargaming AAR]. I MOSTLY got it correct so this AAR is more of a continuation than a total re-reviewing of the rules, which will happen soon.
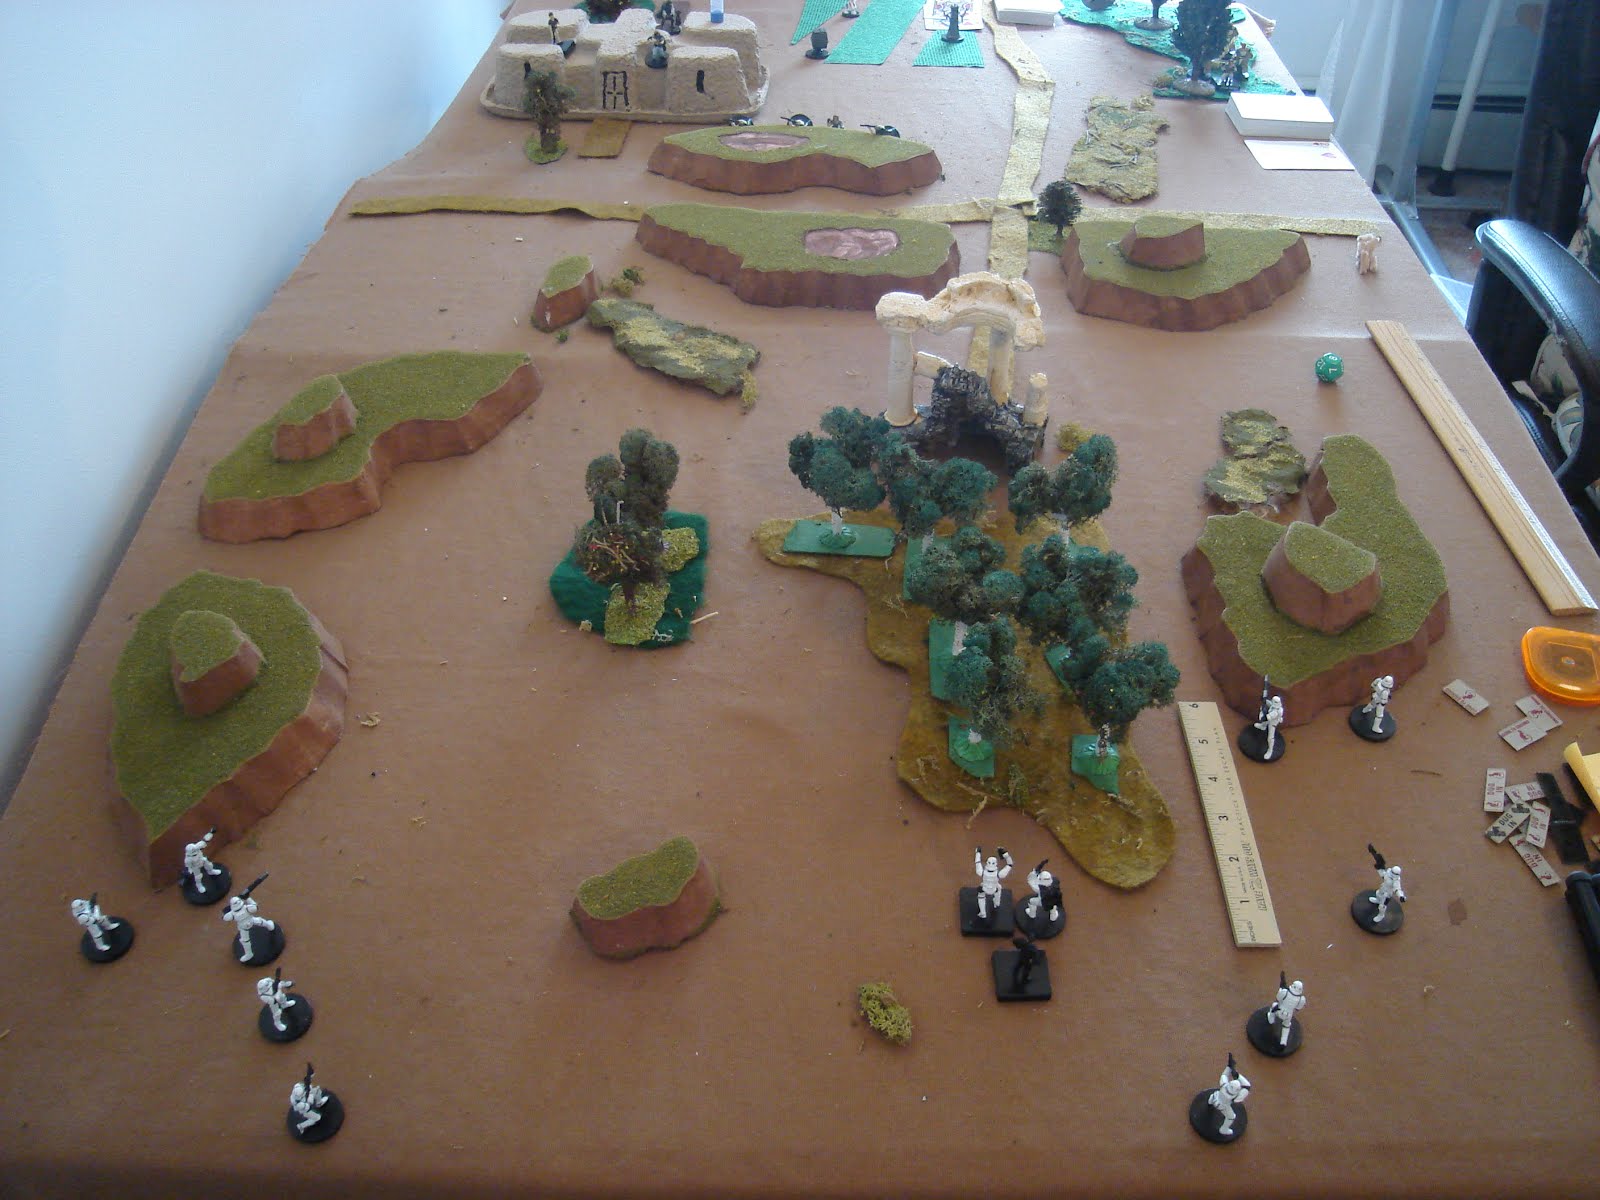
Below, the board as set up. The low rises are level 1 and the height of figs, so sort of like a wall but much thicker and far more immune to blaster than a mere stone wall would be, so +2 cards for Hard Cover. The trees mark cultivated areas and wild areas, but are all Card 1 concealment [give defender +1 card] while the low bushy areas are no cover or concealment, but 1/2 movement bogs. There's a ruin and a hab [house] which count as hard cover. To the right are cultivated fields which are bogs and a few local civilians/droids working them.
Below, the forces involved. Two Stormtrooper teams of 5, with one heavy blaster [ok, a SAW, basically] each with a team leader [zero leadership, he's just doing his job] and one real leader with coms trooper. Attached is a Cultural Liaison Officer [CLO] who probably hasn't got a CLU and is trying to meet with the Arcona locals.
 Opposing them are two Rebel Commando teams of 4, each led by a TL [no special abilities] and one Commando Leader [1] with a Sniper. The Sniper is just another grunt except that he draws an extra card attacking, same as the leaders [in retrospect, I think he should make the target draw one LESS cover card, more later]. They are matched to markers to give some randomness to their appearance and deployment, but I ended up not needing them as my son dropped by and wanted to play.
There are some Arconan locals who are armed with personal defense weapons, i.e. pistols, and who are trying to stay out of trouble of all kinds, but whose sympathies lie with the Rebels.
View from Imperial side of the table. Fuzzy-Wuzzy's are at the far end. You can see the ambushes on top of the Hab, behind the center hill, and to the right in the wood.
 Stormtroopers advancing in two wedge formations, with the SL and CLO going down the middle. Heavy blaster is next to the TL. On right, the TL has sent the HB and another forwards to set up a firing line at the hill.
Below, closeup of Rebel position. Sniper, SL and ASL are on the house roof. One team is hiding behind the rise. They will each have to spend an Action Point [AP] to stand up before they can move or shoot.

Rebel Winkie...asked to give the face of smug self-righteousness that characterizes the rebels, actually seems to have given a "Bruno face" from Starship Troopers, Roughnecks" CGI series. Hard to interpret. Then again, what does a 10yo know about "smug self assurance...??"

Fairly quickly, the left team's Heavy Blaster [HB] gets whacked. There really isn't any reason NOT to shoot at all the special characters and ignore grunts in this game. Hmm.
 So far, just a duel between the three on the roof and Left Team of Stormtroopers.
By Turn 4, the exchange of fire is pretty intense.

Rebel Winkie has his "War Face" on. Still, think it looks like Bruno, not a Star Wars character, but, hey, maybe a but like a gundar? Perhaps a wookie? Not a nerf, anyway. But his command team has forced the Left Team down completely.

By Turn 6, Team Left is pretty busted up, being half dead. Still, the Stormies draw a Queen and easily stay in the battle, beating their morale failure number of #3 easily.

Overall situation great for Rebel Scum. Left Stormies are on the ropes. Right are doing OK, but Dressalians sense blood and advance towards mound in front. This will turn out to be a mistake...the Dressalians advance, but in their eagerness to get a flank on the Troopers they are caught in the open and take three losses, which end up "ded".

Cool close-up of Stormies advancing on the right. Cultural office at top left obviously impatient with advance. Typical staff puke mentality... SL and coms Trooper advance.

Turn 7 ends with Joker draw...and Ace would fail the Stormies who are on a routine patrol. However, their leader allows another card to be drawn, and it easily beats a '3'.

By turn 11, Stormies start laying down the hurt. Moment of scrappy triumph that won't make it into history books...Stormy SL pops Rebel SL. He will end up "red=ded".
 Rebels lose SL and Sniper to Imp fire [and low cards...].

Imps gun down a few Rebels, but most importantly, a TL, the Sniper, and the SL are Down and out on Turn 13. Morale draw is a '3', which is only equal to the number of Ded or Fled figures, and they can't draw another card as their Leader [1] is a casualty. The Fuzzy's decide discretion is the better part of valor and depart the field.

Imps are just fine, altho final card draws for curiosity result in tragic losses for the Dressalians and one more trooper down. Overall, a 6-4 win for the Imps, so marginal victory.

Nasty little scrap. Ok, one thing to note, trainees...do NOT advance in the open by partials. Better to send fewer figs across faster than risk being shot. If you are in the open, you draw one card on defense, and in light cover 2, heavy cover 3. So only cross short open spaces or send fewer people across slower.
This played out just fine, with quite realistic events and chaos, all to JL's credit. Only thing I don't like? One can always target any superior defender. This allows you to pick on guys with better weapons, leaders, etc. I think only snipers should do this, since everyone else is probably laying suppressing fire. Solution would be to allow a swap for a nearby fig depending on the card that took him down. In a small trained team, I think this is pretty realistic.
The rules were quite smooth. I played the first half with Mr. Winkie and the second half alone, and it was easy-peasy. The tactics are quite simple... stay in cover and win fire superiority. With a mindless meeting engagement [meating?] I am fine with that.
I can see this working just fine with more complicated scenarios, but this is a test to see how it operates under quick and simple victory conditions.
So, yes, opinion still the same...buy this game/book!
Another month, another mission...
/pic4076015.jpg)
After a hiatus that has been longer than I thought, Mr. Winkie pushed me to get another game of "Terminator Genysis: Rise of the Resistance" set up. It was the right time, as we are getting behind - I bought our copy of "Fall of Skynet" recently as I found a great discount at Gamenerdz and I couldn't resist the new missions and the new figures [all the figs have been excellent, with no flash at all and great sculpting details]. Anyway, we played mission #2 of RotR but I didn't document it so we are on to Mission #3...and it's a doozy!
This one has the usual layout and terrain. Also as usual, it takes a while to set up the game; to figure out the scenario and get started I'd say takes at least 30 minutes. This scenario is a rescue mission - there are four cells at 1, 5, 7, and 11 o'clock with the red "?" markers. We are starting from the extended rectangular at 3 o'clock, and just behind us is the red "F" marker that shows the safe evac zone for both the prisoners and us. As a scenario, this has great fluff appeal and I am hoping that some of the prisoners will be able to fight, also!

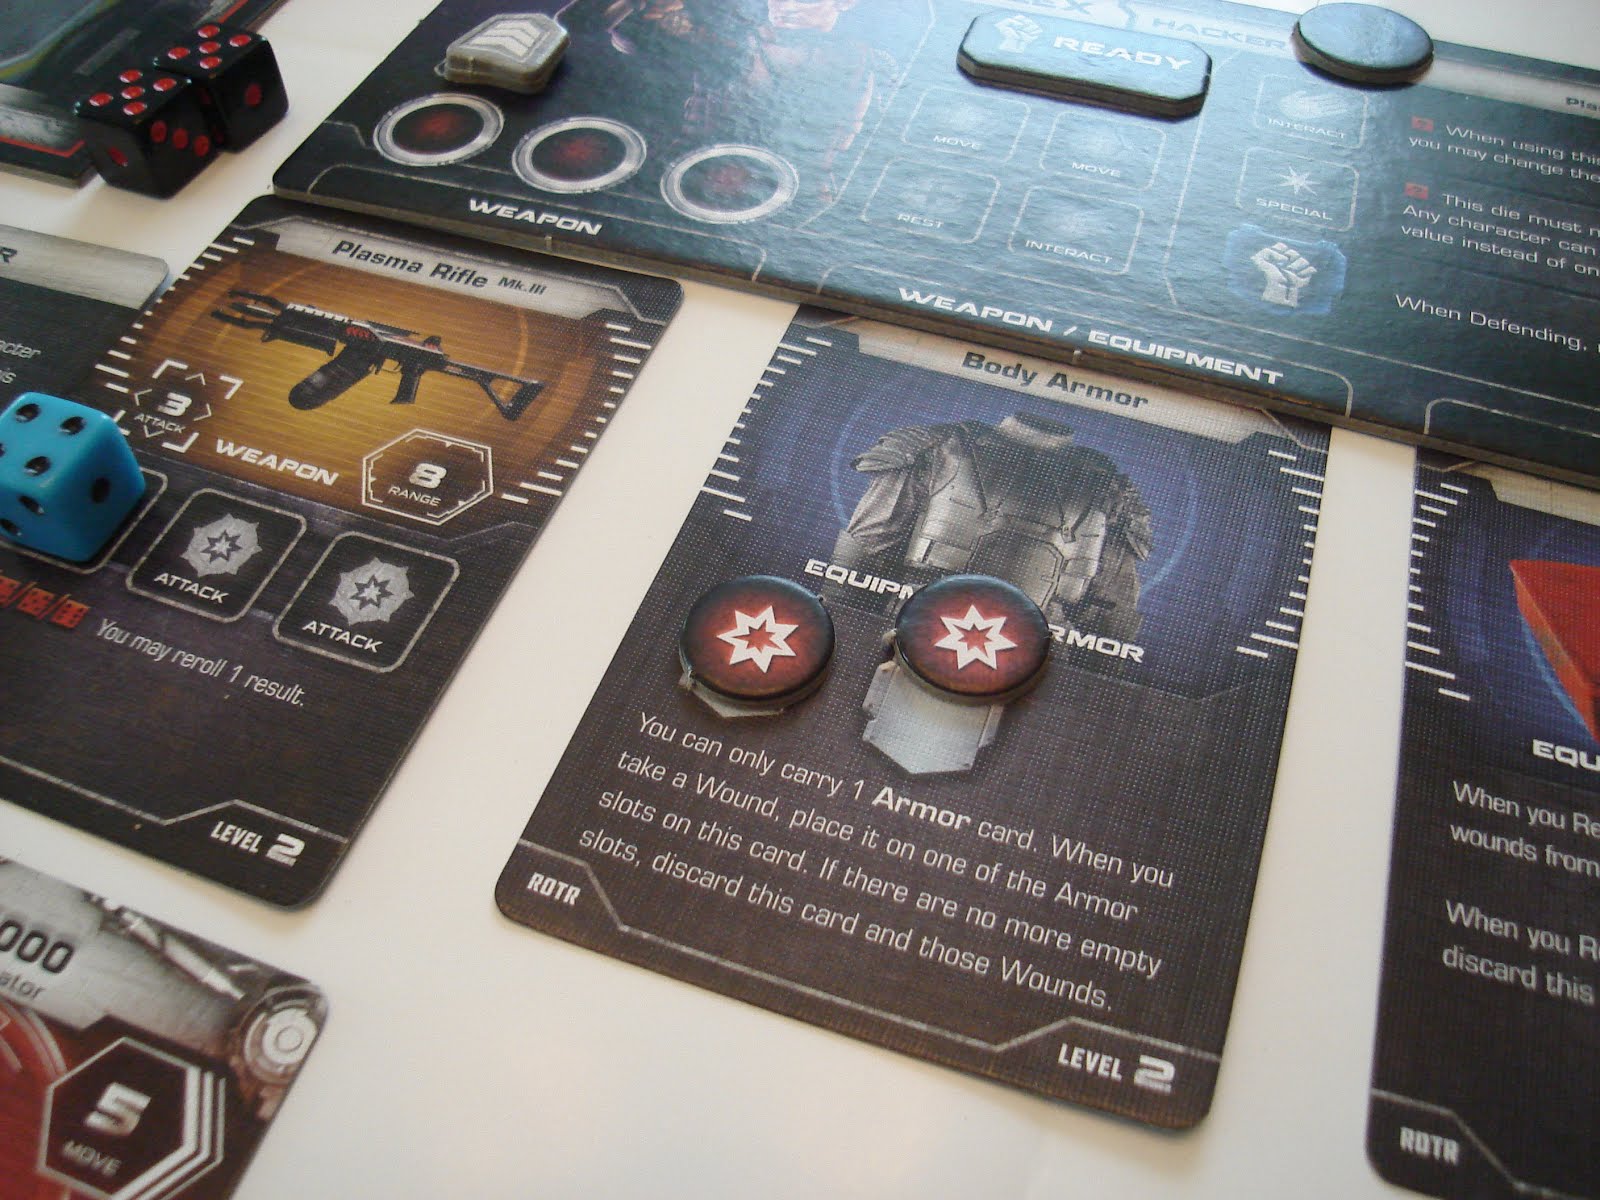
And this is my character...Alex the Hacker [who I believe is a minor character in TG film. His interesting abilities are that he can break into doors easily and also occasionally redirect Skynet reinforcements to other entrances - this may no kill them, but it can at times put them so far out of the action that it is as good.

He is armed with a Mk.iii Plasma Rifle [from previous mission] and has the Team Leader Class which gives him a more ability to interact with allies like prisoners and resistance fighters - likely to meet them here. He has some HE rounds and a medkit. The former gives a turn of whoop-ass shooting, and the latter heals all wounds for a character.
Going in on the rescue OP with me is "Ah-nold" in Guardian mode. He has a nasty hand to hand attack [3 dice applied to any two adjacent baddies] and is very resilient.

He is armed a sniper rifle and a grenade launcher, has HE rounds also, and is a munitions specialist which allows him to dig up some extra munitions when he has time.
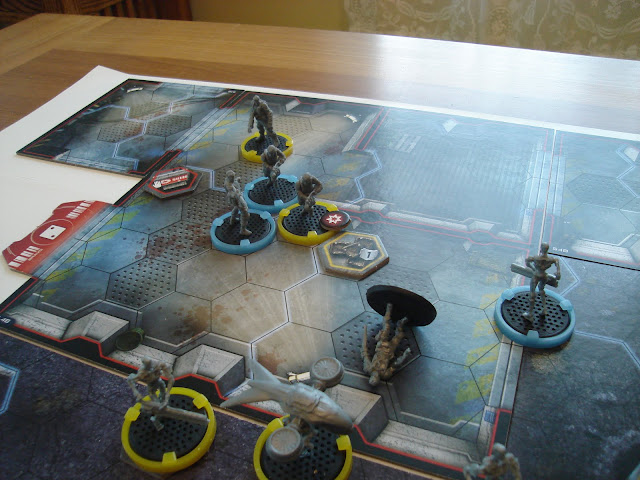
A few turns into the game the Guardian [gold base] has been dominating the center with his sniper rifle, playing whack-a-mole with 'bots who enter thru the red entrances at top left. Meanwhile, I [blue base] have liberated one resistance fighter from the bottom right cell, and he's ready to fight.

Next turn, Ah-nold shifts North to establish a fire base into the top two cells which I just hacked open. Altho he's attacked, he knocks two HKs together and takes'em out! I send the Resistance Fighter with him as we change direction.

I pop open the other cell door and the "C" Waypoint is revealed, and it is NOT a prisoner, instead it is...a T-1000!
Mr. Winkie reacts to the news of having a liquid steel monster stalking us. And we have no weapons that can destroy it, just slow it down or stun it.
 "I have been waiting to kill you, Alex" he says and rises up from his liquid metal disguise as a prisoner and morphs back into his usual shape...a beat cop! Worse, I have a T-800 pops in from the 5/6 entrance right by me - outflanked!
 The T-1000 is pretty nasty - it can't be destroyed, moves 5, 2 attacks, and has 6 hits which are tracked on a "Stagger Card". The more hits it has the slower it goes. The worst is -3 move and -1 attack, leaving it with a move of 2 and 1 attack. Next hit it becomes "Stunned" and loses its turn, at which you roll a d6 and he regains that many hits [stands back up] and you have to repeat the process again, and again, and again...unless you happen to have a big vat of molten steel nearby you can stagger it into!
I decide to destroy the T-800 and clear my escape route, but I miss. The T-1000 closes in and knife-hands me, literally.
 Fortunately, I got some armor from a stray storage bin we raided earlier. Also, the T-1000 rolled a "fist" which allows me to re-roll all hits against me. I end up with one getting thru...
 And it rips up my armor...
 destroying it, but I don't take the hit.

Ah-nold shifts South, blasts the T800 with his sniper rifle, and I run like heck, as we both put in some damage on the T-1000 resulting in it being slowed down somewhat.

As the fight shifts North, we end up with many 'bot reinforcements piling in after us, led by the T-1000. These include the usual T-800 endoskeletons [threat range 10, attack 3], HK-8 Drones [threat range 10, attack 2 but they fly and dodge], and the new T-72 weapon platform [threat range 16, attack 2] which Mr. Winkie names "Devil Dogs".
For the sake of victory conditions, we sent the Resistance Fighter East towards the exit, somewhat out of the action, and closer to retrieval point.

I hack the door controls and liberate the prisoners. We get one more Resistance Fighter and a civilian prisoner. Two HK's and the T-1000 are hot on our trail, so Ah-nold gives them a wrapped present in the form of a grenade in their midst. The two HK's are blasted...
 and the T-1000 goes down Stunned! Unfortunately, our Resistance Fighter takes a wound in the fighting, and we must get him out alive to win this game.
As another wave closes in, the T-1000 recovers all his damage and closes in - I get fortunate and waste him! I blast all 6 of his hits in one shot, putting him down, stunned. But there are many 'bots coming after us, and they are between us and the evac point - situation is critical!

So...the jam we are in is that we have to clear the exit of dangerous 'bots, push forward keeping ourselves closest to the enemy, and dash our rescued soldier and civilian out behind us, all with 4 dice each a turn. This is a very tricky balance to maintain, and it will take us about an hour in real time and several player turns to make progress.
Below, I made a tactical error in my eagerness to rescue the prisoners, and pushed them forwards. The 'bots always attack the closest, surviving opponent, so as they turn the corner and enter our area, they attacked the resistance Soldier first [who is down in the pic] then they're attacking me, then the civilian and finally Ah-nold.
 HK and Endo come after our team, along with the T-1000! Coming round the corner are two more Endos and a long-range crawler [not powerful, but 12-hex range hard to evade].
Below, I use the med kit to get the Soldier back on his feet, and interpose Alex, Hacker, between him and the four 'bots. I also use a jammer to send a blue HK that was entering right behind us down to the more distant entry point '5/6'.
 I end my actions by shooting up the T-1000 with 4 solid hits, slowing but not stopping it...
 The T-1000 responds by walking up and knife-handing me for two hits - ouch! At this point I am half dead with a wave of enemy still in front...I need Ah-nold!

Mr. Winkie swings Ah-nold into action. He dashes past us and adjacent to BOTH the yellow HK and the T-1000, then destroys the HK and stuns the T-1000! I guess he grabbed the HK and busted it over the T-1000's head or something.
 And the and of Ah-nold's turn, the T-1000 stands back up.
On my activation, I move up and make space for the prisoners to escape, but we really need to clear out the 'bots!
 In one clip from my plasma assault rifle, I stun the T-1000 again, knocking him back and down.
 I then turn and blast a blue Endo in front of us, and survive the fire of the remaining blue Endo
[remember, at the end of a character's turn, the matching color enemies act, not all of them, so the yellows only attack after Ah-nold's activation, while the blues attack after mine].
I then turn and blast a blue Endo in front of us, and survive the fire of the remaining blue Endo
[remember, at the end of a character's turn, the matching color enemies act, not all of them, so the yellows only attack after Ah-nold's activation, while the blues attack after mine].

Ahnold then hands me some HE rounds [which will cause an extra hit per target for the entire turn] to me, and walks up and tries to smash an HK and an Endo down, but misses.
 I then start blasting away with my Mkiii plastma AR with HE rounds, and take out a blue endo blocking our path to freedom, I drop the T-1000 again, and a blue Devil Dog that appears behind us!
End of my activation, the T-1000 only gets a '1' for its stun recovery so he'll be easy meat for us.

Ahnold then gets adjacent to the final HK and Endo blocking our route out and tries to punch them both down - unfortunately, he misses, so I use my Squad Leader Class card ability, and give him a re-roll, which results in 4 hits on both targets - they go down and the way is clear!! Ahnold then activates the Soldier who dashes into cover partway to the extract point. He can still fight, and may be useful.
The T-1000 is greatly slowed, so I activate the prisoner and he dashes to safety, also, moving twice with the '6' I assigned to the task. But there are a bunch of 'bots coming our way!

I then blast the T-1000 for 3 Hits, causing him to stagger away from me, then head to the exit and 5 bots...
 Ahnold activates and gets some distance. He shoots down an Endo and an HK with his sniper gun. The T-1000 stands up and comes after me, but misses its plasma gun shot. The HK's succeed in getting some hits and pushing me to the edge of going down, but not over!

I invest in lots of shooting actions, taking out an HK and staggering the T-1000 away from me, stunned. I also activate the Soldier and Prisoner who make it to the extract point!

Ahnold then takes down an HK and I dash to freedom.

Ahnold then makes it to safety and I knock down the T-1000 again, then blast the last 'bots and scamper.

Game end - we've all made it, and everything 'bot is down, even the T-1000. Of course, he'll stand up but we will drive away first.

Whew! That was a tough mission, the toughest yet, and took a long time to play - about 3 hours. Of course, running into the T-1000 at the start and having to rescue two more prisoners with it chasing us meant we were ALWAYS having to invest in shooting it, moving, moving prisoners, shooting reinforcing 'bots, and making a few tactical movements along the way also, which slowed our methodical progress.
The two rules I changed were the Area rules which I converted into hex ranges [they just seemed awkward if simple] and adding an overwatch rule: If a character saves a shoot or move dice, then they can do so whenever a 'bot finishes an Action [move, shoot, etc]. This made the game feel WAAAAY more realistic, and as players pay for it by not acting on their turn, it doesn't seem unfair, either.
We really like the game - my son asked to play it today. I can easily see using the system for any modern combat genre, and converting it into the open table with inches. Most modern gear is present, and abstract elements like Electronic Warfare can be used with abstract mechanics like turn sequencing, reinforcement arrival, etc.
The way it handles asymmetric warfare using limited components is just brilliant, if a bit unrealistic [only enemy matching your color activate after your turn]. Still, a similar effect is usually gained with a lot more complexity in many other games, especially miniature games. The only thing a bit hinky about it is that the color activations are predictable, which could be easily tweaked, but why bother??
This is a pretty straight up dungeon crawl, perhaps resembling Space Hulk more than D&D, and I strongly recommend the game to anyone interested in a balanced, exciting kill-team combat game that is mission focused, easy to handicap, and mixes well with beer and high-fives.
Interestingly, it succeeds in what John Lambshead wants for his One-Hour Skirmish Wargames rules, in that the action moves almost as quickly as in real life; so "video-game cinematic" in its pace, rather than an algebra test.
Still, compared to OHSW it takes a longer to set up and take down, there is more rule complexity [helped by great player aids] and the more complex missions take longer than mission #1. With experienced players, it will still be fast. With newbies or younger players, the tactical discussions and rule explanations can slow things down.
Since the players cooperate against the machines, it is easy to bring in younger players and intro them to the hobby, and easy to set them up for success on most turns so they get the thrill of victory. They'll learn the agony of defeat in good time, I figure [click].
As for the components, I think they are excellent and look forward to eventually painting all of the figures up, hopefully using them on an open table with a more "table-top gaming" approach, including longer ranges, bigger spaces, line of sight and terrain rules.