Wednesday, January 6, 2016

4,000 Views - Future plan...


http://www.scoop.it/t/funny-memes-and-pictures

Well, my plan may not be that cunning. Actually, it isn't cunning at all, but it's a great plan and I'm sticking with it! Anyway...in only four months, the visits have doubled from 2,000 on August 4th, 2015 when I posted the following goals:

  1. Finish draft of WWII Fast-play rules [inspired by Neil Thomas and his One-Hour Wargames].  Do a playtest, then post a batrep for a workable draft of the rules.  If ideas/concepts flop in execution, then just post what didn't work. 
  2. Finish my Crusader Company.  This includes about 20+ tanks since it is a full-strength 16 tank company plus substitutions to use it from 41 thru 42-3.
  3. Paint up a platoon of Brit 25 pdrs and Brit motor company.  Then they will have almost as many options as my Italians, and I can stop proxying Italians in for the Brits.
Nice to see that what interests me interests others. The NT Rules have certainly gotten a lot of attention, and the new detailed AARs of Chain Reaction 2015 have certainly proven very interesting to lots of people. Special thanks to all who enjoy and share this Blog! 

While Goal #1 has gone well, Goals #2-3 haven't been quite as fruitful. Hosting games and preparing for same competes with painting time, and it's a different sort of energy to sit down and paint altho I find it relaxing. Was also a bit discouraged at not finding info for British uniforms in the two Osprey books I bought. Finding "British Battle Insignia (2)" at Amazon for $5 got me moving though, and it arrived in the mail today! So I will be able to do a better job making my Motor Infantry a little bit colorful and interesting. 

The Crud Company I pretty much have all the info on, I just need to sit down and do them. But since they can be played with "as-is" the priority is the motor infantry and 25pdrs as I could really use them on the table. This is a 15mm project, which seems a nice balance of detail and character, but portable and fitting onto many different table sizes.

Looking forward to fielding two full forces of British and Italians in the Western Desert, 1941! Both will have an infantry force and an armor force, with plenty of switchouts and alternatives. And there's plenty more in the collection. I can easily field another force of Italian infantry and another two squadrons of British tanks [Honeys and Cruisers]. 

Meanwhile, expect to see more on 2HW skirmish.  Mainly 28mm Star Wars WoC ppp at first, but some WWII is on the way as I acquired 2HW "Nuts!". I'd love to have 25mm WWII but am afraid of what will happen if I head down that route! Best to try it with 15s first and see how it goes. Nuts! looks very promising for developing Star Wars since most of the fighting resembles WWII and earlier levels of technology [at least the ground fighting, that is]. I own 25mm Old Glory Pershing v. Pancho Villa, and have a few modern 28mm Brits and Taliban by Empress [lovely figs!], but haven't gotten moving on those projects yet.

Finally, I've added a labels bar to the top left, and hopefully that will make the site easier to navigate and find what interests you.

Stay tuned, and feel free to make requests and suggestions!

Chain Reaction 2015 playtest 2: Rebel Rescue Raid Redux!

Well, after the Rebels got bushwacked and beat up in the first go-around, I had to try and do better. In this second AAR, I won't review every detail of the system as in the first one, but get more indepth on certain aspects and skim others, so if you want to follow along from the beginning, or you're just new to 2HW system, then check out my first AAR here:

For this playtest, I chose to roll randomly for Imp squads on the militia / ganger / guerilla chart [disappointingly the same...I mean if you're going to have separate charts, at least make them different] which reduces the Reputation [Rep] of the group on average. You can still roll lots of 5s and 6s and end up with an all Rep4-5 group, but there's less chance. One recommendation to those who want specific match-ups, is to design each force. One can probably add up the Reps of the soldiers and Target values of the weapons and get a reasonably balanced opposition. Not that reasonable balance is the point of a 2HW game, necessarily!

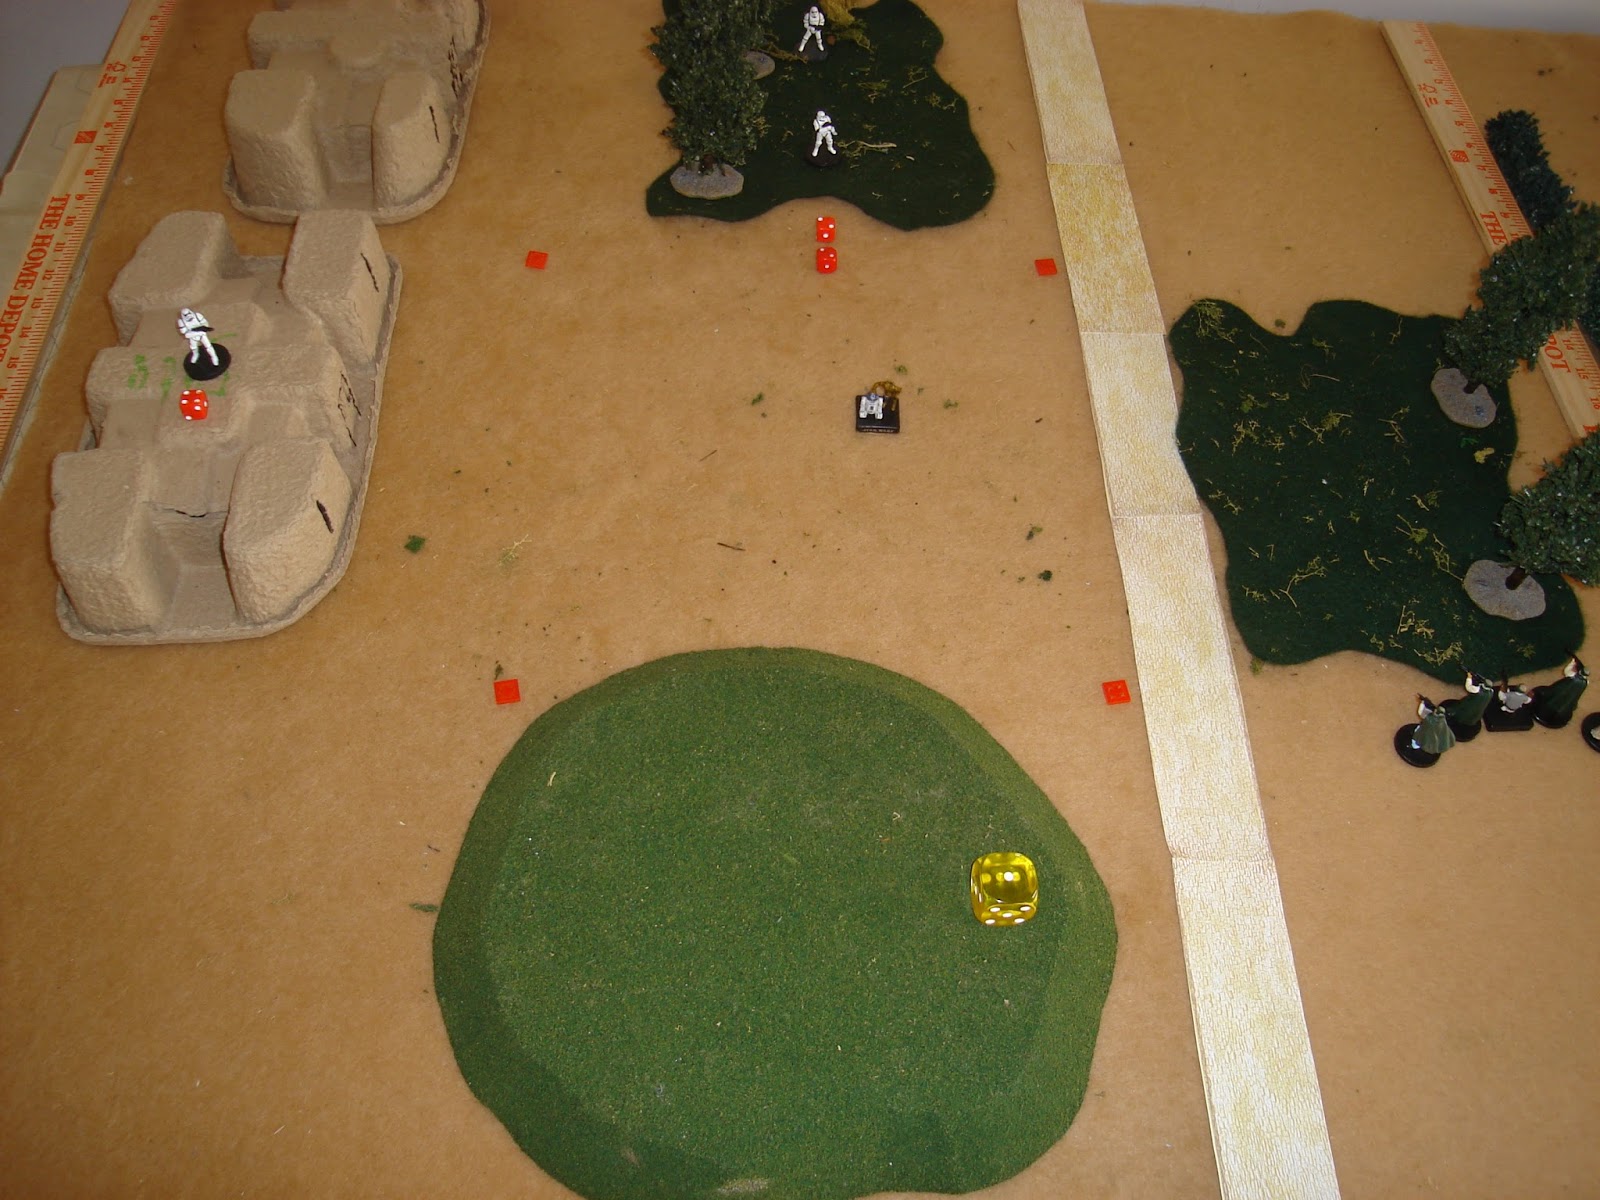
Scenario is same as last time, a Raid to rescue droids. Below, Turn 1 starts with initial entry of the Rebel team onto the board.  Apparently failing to pass any dice for Fast Movement [FM], so move 12" to the edge of the woods in Section 6. Heading to cover is a best bet - the Possible Enemy Forces [PEF] have not yet been rolled into the board. While it is possible for any or all of them to end up in Section 6, it is still a best bet to head towards the woods as buildings have a higher likelihood of an enemy PEF being an actual enemy Force. The Rebel force has a Rep5 leader [kneeling, square base], 3 Rep4 Grunts [2 w'SAR 1 w'SAW] and a Rep3 Alien scout [square base and strange head, Pistol].

Below, three enemy PEFs are rolled, with results of 2, 2, and 4 putting them into those Sections. The nine board sections can be seen by noting the red sighting markers that denote the intersections, 1-3 top, 4-6 middle, 7-9 bottom. This is a pretty good situation for the Rebel force, depending on how quickly the PEFs move towards them, especially the Section 2 PEFs. If they end up marching simultaneously, it'll be a tough fight if they both roll into real forces.

Below, Turn 2 gets moving with the Rebels rolling higher Activation, and Activating first. As 5 = Rep of their Leader, they move down the right flank, keeping the woods between them and the Imps. The farthest PEF in the building gets no passes and stays put. The far PEF in the Section 2 woods gets one pass [pass=lower than Rep, so 1=pass and 6=fail] and moves 4" to the edge of the woods, from which there is now mutual Line of Sight [LoS]. The near PEF in Section 2 passes twice and moves 8" towards the suspected Rebel force.

Below, Turn 3 Activation roll-off results in Rebels getting the ideal - Imps roll too high to activate, while any Rebel could activate on a 2 [since the lowest Rep in CR2015 is a 3]. The Rebels roll well and Fast Move into the woods to take up positions of Concealment [helps with In Sight Test] and Cover [if you aren't Active and are in a building or wood, you have Cover, making you harder to Hit]. They are then able to lurk in ambush for the Imperial patrols who will mindlessly move towards them next turn - hopefully. The line bends back towards the Alien who only got one pass, and therefore only 4" bonus movement, for 16" move for the squad except Alien with 12", all of which is halved in woods for 8"/6" move.

Turn 4 below, and the Farce, ehrm, "Force" is with the Rebels! While the Imps Activate first, the Rebels are ready in position, in both Cover and Concealment, so have an advantage. The farthest Imp PEF in the Section 4 building gets one pass and moves 4" to the building's edge. The next farthest PEF is in the woods and passes twice moving 8" into the open but not into LoS of the Rebels [you need to be within 1" of a woods edge to have mutual LoS in and out]. 

The last PEF passes once on a 6/4 roll, and moves 4" into the woods towards the Rebels, and into LoS [PEFs are not affected by terrain]. The PEF is resolved and passes twice on a 4/2 then rolls a 2 for the actual force so is "two less than" Rebel force. Ergo, a squad of 3 is put out. Rolling a 4/3/1 for them gives them Rep 4/4/3, with the Rep 3 having the square base. All have Semi-Auto Rifles [SAR] with Target 2 [two shooting dice - a Pistol is 1 and a Squad Automatic Weapon [[SAW]] is Target 4].

Turn 4 continues below, with the In Sight Test [IST] being taken. As they are Active, the Imps must beat the Rebel rolls for Successes [1-3 on d6, 4-6 being failures] starting with dice equal to the Rep of their Leaders, or 5 and 4. As both have Concealment in the woods, they should each lose 1 dice, but I forgot. In any event, the Imps tie the Rebels and therefore lose the IST. This means that the Rebels will act first, and must fire according to the activation priorities. Note, that's probably what they'd want to do anyway!

Turn 4 continues below, with the Rebel shooting dice laid out. This is a bit tricky, so hopefully I did it right. You have to put at least one dice on every Target before you can put two, and two dice before any get three. As the Rebel SAW Outguns every Imp SAR, I spread its four dice out - this will help force them to Duck Back later. The Alien P is the large red dice, the pairs of red dice are the other two Rebels and the Leader, who has black spots on his dice. 
The 1-4 on the dice show which is the first, second, etc Target for the weapon. As only the SAW is split up, it's the only one that matters, but this is to illustrate the rule that when you drop dice the highest roll goes against Target 1, next highest Target 2, etc. So you've a much better chance of getting the 5-6 you usually need on your first Target since it gets the highest dice roll.

Below, turn 4 Rebel IST reaction shooting is resolved. They need to get a 8+ with the total of their individual Reps and the dice rolled for their weapon's Target value, as the . So for a Rep 4 you'd hit on a 4-6, and the Rep 5 Leader on a 3-6, and the Rep 3 Alien scout on a 5-6. 
The Imps get Concealment, but it doesn't help when targeted by shooting. They do not get Cover because they were on the move in the woods, and didn't go prone at the end of their movement. This represents that they're the first Imp patrol to encounter the Rebels - from now on, hearing the shooting, all Imperial PEFs that resolve into real forces will be much more cautious, hitting the deck at the end of every movement. This raises the total needed to hit them from 8 to 9, halving the effect of shooting more or less.

Below, turn 4 continues as Rebel Hits are resolved. A '6' is an Obviously Dead result [, OD, self-explanatory] and all three Imps go down, blasted by blasters. A hit equal or higher than your Rep and you are Out of the Fight [OOF], lower than your Rep and you Duck Back [DB]. I remove OD figures, but leave OOFs on the table as they can be carried off.

Below, Turn 4 ends as Rebels chuckle to themselves. They are still in a good spot, with a second Imp PEF approaching they are in Cover and Concealment, so don't need to do anything. If they moved to the edge of the woods, into LoS of the PEF, they lose the edge on the In Sight Test [winning ties] so will await the curious Imperial patrol [doubtlessly being goaded on by some officious Imperial officer on the com-link, sporting a British accent and tight Nazi uniform].

Below, turn 5 begins with the Imps again rolling too high to activate, so the Rebels sit tight, patience and experience having taught them to play a waiting game...

On Turn 6, below [I forgot to turn the dice over, apparently], the Rebels beat out the Imperials but still don't want to change position and risk an encounter with the other PEF in the Section 2 building until the near PEF is resolved. It may be nothing, but you can't be too careful! 
During the Imp Activation, they roll two successes with the farthest PEF in the Building, so it moves 8" out of the building across the open ground of Section 5. The near PEF has one success with the 6/1 and move 4" towards the [now VERY strongly suspected!] Rebel force, entering the woods and LoS of the Rebel team.

Turn 6 continues below. Upon entering Line of Sight the PEF is resolved and with a 4/1 gets two successes and becomes an Imperial patrol. Unfortunately the Farce isn't with them, so they only roll a 2 resulting in being "two less" so they've 3 troopers going Prone in the woods to the Rebel 5. The black wheel marker notes that they're Prone, making them a 9 to hit instead of an 8 as previously explained. I modeled these are an Imperial Tech Team just to be different. They roll Rep 5, 3, 3, with the 6/2/1 so the square bases are the Rep 3 Techs, the round is a Rep 5 officer. I can't remember what the 4/2 roll is...

The PEF is resolved as Imp patrol of three, lead by a Rep 5 officer, so they now have to roll off an IST. Both start with the Leader's Rep 5, -1d6 for both being Concealed, so roll 4 dice each. They both roll three successes and the Rebels win the tie, shooting first. 
Note that if they'd moved to the woods edge and the PEF had resolved the same way, they'd have LOST the die and the Imperial patrol would've shot first. Granted, they would've been in the open, but it pays to be cautious in this game.

Setting down the dice as previously described, there is considerable firepower at the disposal of the Rebels. They lay down 11 dice, white for the SAW, red for each SAR and a brown for the Alien's P. 

They roll pretty well, getting some 6s that propel them into auto hit territory, 10+.

The surviving Imp Tech should bolt, but doesn't, passing two dice for his combo "Received Fire" and "Man Down" Reaction Test. He remains DB, and I laid him down facing the enemy Rebels to symbolize it.  The other Tech  is OOF, and the Officer is OD.

Below, turn 7 begins with the Rebels beating the Imperials in the Activation roll-off, 3-2. Seeing a bit of metal glimmering in the light, the Rebel team moves forward, easily winning a new IST by two dice...

...and gunning down the Imperial Tech trooper as they fire first! Yeah, he's ODODOD or something. 

They are now in LoS to the PEF in the open, which only passes one dice and resolves as nothing. That leaves the droids as having to be with the Tech team right in front of them [I may have messed this up, but it seems right, the only alternative was that they were in a building]. 
"It is such a relief to be rescued by the Rebellion - the Empire has such labored British accents compared to mine!" and "Beep-beep, whistle" say the droids.

Ok, this played a little cleaner than the last one, since I did it later the same day. I hopefully remembered all the important mechanics of reaction tests and shooting, which have been hard to get wrapped around my little brain. The Melee and Grenade mechanics I haven't tried yet, so will have to see how that does in a future AAR!

As always, these rules and the Swordplay 2015 ones are free from 2-Hour Wargames, here:
Free 2-Hour Wargames Rules!

Until we meet again...
may the Franchise be with you - always!

Tuesday, January 5, 2016

Chain Reaction 2015 playtest 1: Rebel Rescue Raid

These ARE the droids for which you are looking! 
In proper English, the language of the Empire
Vintage C3PO Rap Video Featuring R2-D2
http://dailynewsdig.com/vintage-c3po-rap-video-featuring-r2-d2/

Having read the rules three times, gotten questions answered thrice at the forum, and played wrong several times, I finally felt like I understood the rules well enough to playtest the game for real and post it.  The rules are free at this location:
Free 2-Hour Wargames.com
And as will be seen elsewhere on the site, it has applications - for sale - in a number of different genres. Obviously, that's why they want you to try the rules.  This is necessary since the rules are quite different from most rules where players intent is almost always met, and the main source of friction is player error or bad dice rolling.

The main problem is that while the rules are written reasonably clearly, what the rules actually mean in game play is not as well explained, and the included explanatory diagrams don't illustrate the full implications of the rules as written [an unfortunate lost opportunity]. With 34 years of gaming behind me, including several games designed, developed and a few published, I feel that says a lot for the challenge of a newbie to read and play the rules correctly. In short, I don't see how a newcomer to the hobby would reach the conclusions that one is supposed to upon reading the rules and translating them into game play. Hopefully, this post will help out, because I feel these rules are worth the effort.

One of the appeals of the design concept of all 2HW designs is that they can be played solo, all players against the game [you'd still have to move and roll for the enemy] or player - on - player.  This design concept results in a game system that is very accommodating to one of the chief limits of modern gaming culture, which is time / inclination to actually get together. With constant distraction and entertainment provided by smartfones, people's time, energy and interest is limited for live interaction and social connection. Also, let's face it, people's attention span is rapidly decreasing, so any attempt to create a continuing storyline in any game is a challenge!

With all that said, I enjoy the challenge of cultivating community as well as playing the occasional solo game.  I figured out how the rules play, which took several playtests and multiple close-reading of forum replies, and the first result is below using my Wizards of the Coast pre-painted plastics from their now-unsupported Star Wars collectible miniatures game. Overall, I think these figures are perfect, taken as a whole, providing durable miniatures that are quickly available, as well as one of the most famous backstories in the modern world. As tragically flawed as the world is philosophically, theologically and realistically, it is still a rich place to mine for stories, and that is an important part of gaming, IMHO.

Scenario: Rebel raid to rescue a droid from the evil hands of the Empire. 
In this case, a force of New Republic Commandos is seeking to liberate an astro-droid with information critical to the survival of the Rebellion against the Empire [stop me if you've heard this before...]. The Rebel commandos must enter the board, beat enemy forces and retrieve the droid.

Below, setup and start. In the center of the 3x3' board are the targets of the rescue.  They are not in that location, it just reminds me what the objective of the game is! The Rebel force has a Reputation [Rep] 5 Star with a semi-automatic rifle - SAR, three Grunts with Rep 4 [one Squad Auto Weapon - SAW, and two SAR] and an alien scout, local rebel agent of the planet Caina V, with Rep 3 and a Pistol - P. 

The force attempts a Fast Move [FM] onto the board, scoring a 6 and 2 for one Success, resulting in 4" of bonus movement to their regular move of 8", or 12" total [each success on a FM attempt results in 4" extra movement]. Given the mission parameters, and my past experiences, they move not to the buildings but towards the best cover they can find on an indirect approach path. They have to clear or confront one or two PEFs before tackling the buildings which are much more likely to have an actual enemy force in them.

Below, turn 1: the Imperial Force is not yet revealed.  Instead, three Possible Enemy Force tokens are placed onto the board rolling a d6.  The board has nine sections and three are at the entry point of the attacking Rebels.  The remaining six are numbered 1-6 and red sighting markers denote the cross-section points for sake of the viewer. So 1-3 are the top three left to right, and 4-6 are the middle three sections, left to right. 7-9 are the bottom three sections, and enemy PEFs do not start in them.

3d6 are rolled to place the PEFs.  With a 2, 2, and a 4, they go into the middle of the woods in area 2 and the building in area 4.  They do NOT have Line of Sight [LoS] outside the building or woods at this point. LoS is always mutual, by figure, and one needs to be within 1" of the woods edge or at a window/door of a building to see/be seen across the board.

Turn 1 below. Activation is rolled, with the Empire rolling a 6 and the Rebels rolling a 4. Thus, the Empire wins Activation but as they can only activate with Groups that have a Rep of 6 or higher, and all their PEFs are Rep 4, they cannot activate anyone.  Losing with a 4, the Rebels can activate their Group second since it is led by a Rep 5 leader. 

The Rebels fast move with two passes for the entire force. Fast Move is rolling two dice equal or lower than the individual Rep of each member of the group, in this case Reps of 5, 4, 4, 4 & 3.  Rolling a 1 & 2 on d6 means that the entire Group has passed with two dice, for 4" Fast Move more each, or 16" total.  

The Rebel force zips up the right flank 10", keeping the woods entirely between them and the enemy [out of LoS] until moving into the woods the last 3" of movement [woods costs double to move through] and taking up firing positions at the edge of the woods. As they are Active, and are not in LoS of any PEFs, there is no possibility of them provoking a Reaction Test, so they will also count as in Cover during the next round of activations.  If there was an enemy Group in LoS, then I would've had them go Prone at the end of their movement for free.

Turn 2 below, is a repeat of the last Turn of rolling, the Empire again rolls too high to activate anyone, a distinct possibility of rolling higher during the Activation roll-off. In essence, one wants to win the roll with a low roll, which allows more of your force to activate. If you lose, you want to lose on a natural '3' or less since that will let you activate everyone you have in your force. The lowest Rep in CR2015 is Rep3. 

The Rebels like their position: in Cover and controlling the open space between them and the PEFs with firepower. They sit tight and do nothing, awaiting the Imperials blundering up to them [not that that ever happens...right?]

Turn 3, below, the Imperials win Activation but also roll low enough to finally resolve their PEFs. The first, the farthest away in the building, fails 2 dice and does nothing - the possible enemy force is apparently sitting around talking about the latest landspeeder adverts. The second farthest is at the top of the woods. They get Two Passes, rolling 4's on the white dice, and move to the edge of the woods and into LoS of the Rebels in the other woods. They then roll Two Passes - a 4 & 1 - and become an actual enemy force. They then roll a '5' which makes them two larger than the Rebel force of five. 

Given the size of the force, and that they are military, I give them a Rep5 leader, four Rep4 Stormtroopers [1 with SAW] and two Rep3 techs in black, just barely visible on the ends. As the PEF has been resolved and actualized into a real enemy force that is in LoS, we will now roll-off the In Sight Test [IST]. Note that the Imperials have the option to move 2" after coming into LoS [and actually being a real force] but with a strong force and some firepower edge, plus usual Imperial aggressiveness in the face of "Rebel Scum" I go ahead with the roll-off. If the Imps get some damage, I feel they're reaction test will give them an opportunity hiding won't. Clearly, the player has to make some decisions based upon the scenario - losing an IST is pretty bad since the enemy will shoot first.

Turn 3, IST roll-off below. The Imperials are activating, so need to beat the Rebels for successes against the Rep of their leader, so 5 on Rep 5 for the Rebels. Note - I should've taken away 1 dice for each side due to the concealment they both had in the woods. As it was an even roll-off either way, not a big deal. The Imperials are well led! They win the roll-off with two successes to one. A success is rolling a 1-3, failure is a 4-6 on d6. This lets them act first, and they must Fire according to the rules. This will be bad - very bad - since they've a lot of firepower and the SAW has a higher Target value - 4 v, 2 on SAR and 1 on P - and will Outgun all the Grunts. Stars are never Outgunned.

Turn 3, In-Sight Reaction Fire by Imperials. First, one has to assign each weapon and it's dice to each enemy soldier. You must assign 1 dice to every Target before you can assign 2, and 2 dice before 3. Below, the SAW has four dice spread out on the squad - everyone but the Rep 3 alien who's not that good, anyway. The two Imperial Techs shoot their P's at the Rep 3 alien. The remaining three Stormtroopers put their two dice on each Rep 4 Grunt, while the Rep 5 Imp Group Leader shoots a P against the Star.

Turn 3 below, the dice are rolled and lined up. As the Rebels are in Cover, the total of the dice rolled and the Rep of the shooter must be >10  and anything less than 7 is always a miss.. 

Turn 3 below, the misses are removed. The Techs miss the Alien, rolling a total of 4 and 6. The SAW-trooper gets two clear hits with two 6's + Rep4, and two misses with an 8 and 7. 8-9 are misses when the Target is in Cover. The Group Leader hits rolling a 5 + Rep5, and the two Stormtroopers with SAR each get a hit on one target, rolling 6s.

Turn 3 below, the hit results are figured out. In CR2015, if you roll a natural 6, the target is "obviously dead" [OD] with head blown off, etc. If you roll the Target's Rep or higher, they are Out of the Fight [OoF] and cannot do anything except get dragged off the field by their friends. This is where you really find out who your friends are! If the roll is below the Rep of the figure, the figure gets a Duck Back [DB] and hides, in cover, out of LoS of the enemy. If in the open, they would Go Prone and still be in mutual LoS, but being prone results in misses up through 8. 

The results from L to R are DB, DB/OD [removed], DB, OD [removed]. The two OD figures are pulled back, laying down in the pic. The two DBs are pulled back an inch to signify they've DB'd. The Rebels have now lost two of their five, and have to take the Reaction Tests for Received Fire and Man Down [the two OD guys].

Turn 3, Reaction Tests for Received Fire and Man Down below. They roll 2d6 for the Group, and a bonus d6 because the Leader is with them. This results in three passes for everyone, which is limited to the max of two passes. Even the Rep 3 Alien passes on the '3', but you max at two passes. 

Looking at the chart, the results are applied to each figure's Rep individually, with the Leader and Rebel Commando having no effect - their Damage Result was "Duck Back, no Reaction Test taken. And even if the result did apply using the Man Down Reaction Test, it is only "Carry On" so they Carry On with their Ducking Back I guess! The Alien has two passes and applies them to BOTH Reaction Tests, getting a "Carry On" from the Man Down test and a "Return Fire" from the Received Fire test. Applying the worse result, means the Alien returns fire. This is actually worse than Carrying On since his fire will provoke a reaction test from the powerful Imperial squad and result in him getting blasted, most likely.

Turn 3 below, the Alien misses and the Imps react. In their reaction, the Imperial squad gets two passes, returns fire, and gets four 6s which is four Hits. These result in three OoF and one DB result. These don't add up, so he takes the worst result and is OoF.

Turn 3 Imperial Activation Concludes. The Imps go to their next farthest PEF and roll two failures v. the Rep4, so do nothing. The last PEF in the building rolls two passes - the 3 and 2 - but is not in LoS so will not be resolved. I accidentally rolled to resolve it but forgot to take the dice out of the pic. Also, I should've resolved the one in the building first as it is farthest at this point, THEN the second PEF in the woods.

Turn 3 Rebel Activation below. Remember, there is a Rebel activation in this turn! With two unresolved PEFs, and a large squad with overwhelming firepower already pasting their pitiful force, the two surviving Rebels gather up their wounded scout and run, leaving their dead for the Imps. The Star can automatically retrieve wounded, Grunts have to roll to do so.

Conclusions. Well, this was pretty much a RAW playtest. I had to make a couple of decisions in the forces, like choosing Military force for Imperials and the Rebels alike. As the potential to roll strong enemy forces in the RAW is about 50-50, if you want a squad to survive over several encounters, you had better balance that desire against the game's mechanics! 

Next time, I'm going with a more thematic approach, with the Rebel Commandos staying the same while the Imps roll randomly on the Ganger / Guerilla table, to represent the bias of screen writers against them, as well as the concept of the Rebel force being elite, hand-picked commandos. I guess what they really needed was a Jedi, eh?

I think that the Action-Reaction system works just fine, with pretty realistic results. The gamer has to make a few decisions like when to go prone, but common sense can prevail. My lessons for next time will be that anytime anyone activating can be fired upon, but is not in Cover, they will go prone, except when resolving a PEF. I feel that is the only advantage the attacker has, that patrol work tends to result in boredom and no amount of threats by superiors are going to force soldiers to walk around doing combat rushes on a routine patrol! However, once shooting begins, I will always allow PEFs to go prone since it is now proven that there IS an enemy out there!

One unrealistic aspect is knowing the Reps of the enemy, and placing your dice to the best effect. Obviously, not usually possible to quickly gauge the quality of an enemy squad in a visual encounter, but perhaps... The alternative would be to randomly place dice, but since one has to spread them around anyway it's not a big deal.

While I wish I had WWII or other "real" combatants, at the moment, I don't have anything painted up. The Star Wars stuff is fun and one doesn't have to take it seriously, since it is from cinema and not Afghanistan. I think the rules will work well for any generic setting, and provide a nice basis for hosting a game at home or the store without a lot of effort learning and teaching rules. And everyone knows the Star Wars 'verse, anyway. 

So, another playtest is coming up with the modifications to the Imperials and a second attempt to rescue that un-named astro-mech droid who has information critical to the survival of the Rebellion against the Empire!