Showing posts with label WWII. Show all posts

Sunday, July 27, 2025

Classic "Squad Leader"!!!

The iconic cover lives on...with a $10 price tag!
"Honey, I just don't know what happened... I went into the FLGS to buy a couple of paints, and for only $10 this game was sitting there, and... I just *bought it*.  I couldn't help myself.  Hey, at least it was only $10, right??"

Yeah, that's what happened, man.  But to go into fuller explanation...

I had a lovely romance with CSL in the 80s, when me and a buddy both had it and played it a bunch.  I also played it a lot solo, cuz it plays pretty darn well solo!  I played a bunch of the scenarios, some repeatedly, and I dug it.

I then got into COI and COD, but eventually the rules were too much and I got interested in other things [girls, sports, the usual boy things] and Classic SL sat around in my parents house until they moved and threated to throw all my [well, all the kids stuff - my sister's too] into a dumpster if we didn't come get it. It then  went with me and was eventually stored in my garage, where a leak developed, and [due to my negligence] a bunch of stuff was ruined.  Including nearly all my SL stuff. The last surviving materials I was too depressed to keep, and sold the last of it off.  Then, I just didn't have any interest for a long long time.

Well, I did discover this binder, much to my surprise, and was tempted to trash it, but then I thought "hey, these are classic rules, with much to be learned from, so hang on to it!"  So I did. It has 4e. CSL...
likely the same of COI....
...and even COD rules...
...much to my surprsie, it had GAV, which I never owned.  Clearly, I photocopied it.
...Well, the binder sat around on a shelf, partially out of mind.  At a couple of points, I considered playing CSL with my 15mm FoW miniatures, but it just seemed like too much work.  I was into simplifying my rules overhead, since life was pretty demanding.

Then I stumbled upon this $10 [TEN DOLLARS...!!! WTH!] and I just...bought it.

I brought it home, and found [as the store said] that it was barely used and in good shape, and immediately reviewed the rules for Scenario #1 "The Guards Counterattack" and set it up. Childishly enthralled...

I then proceeded to play it several times over the next few days.  It was AWESOME!

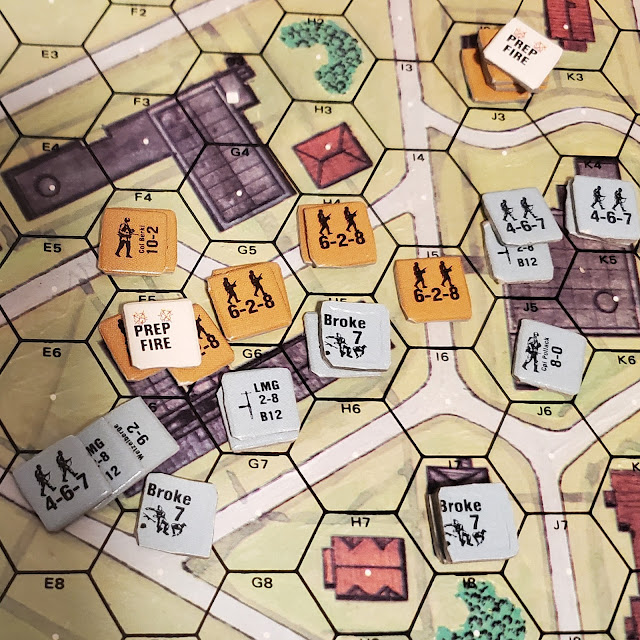
As a [much] older person, I was able to digest the rules quickly, and they really weren't as tough as I remembered them.  Of course, a lot of it came back to me quickly. My first game was a nail-biter - with some errors of course - but it was enthralling to figure out how to start sneaking the Guards across the road and take building F5!  Their firepower trashed several squads in G6 and H5, and I realized that it was HIGHLY unlikely that the Germans would hold this building.
Many of the Germans Routed out of the building to some safety, and I was hoping to rally them and counter-attack F5 building, but that was ridiculous, I realized.

As the Russian attack developed, they gained a foothold in the building and the Germans failed to push them out.
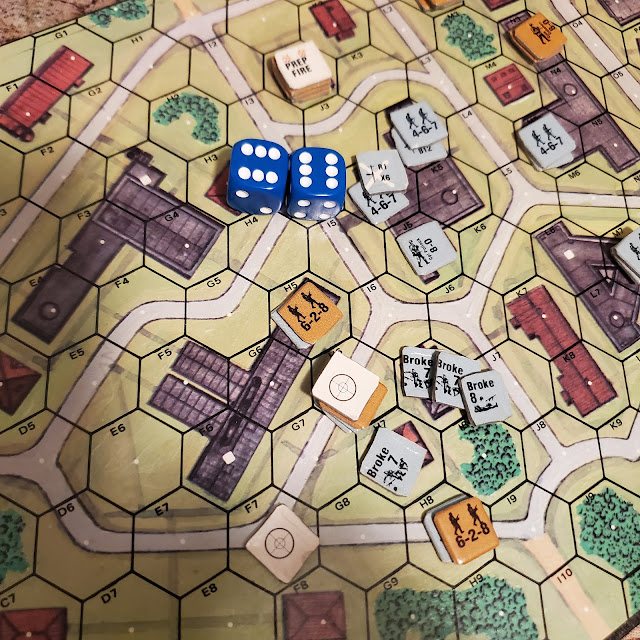
...With an "oorah!" the Russian Guards pushed across the street, unstoppable...
...but with a natural '3', the Germans wiped out some stacks!  There's hope, comrades!
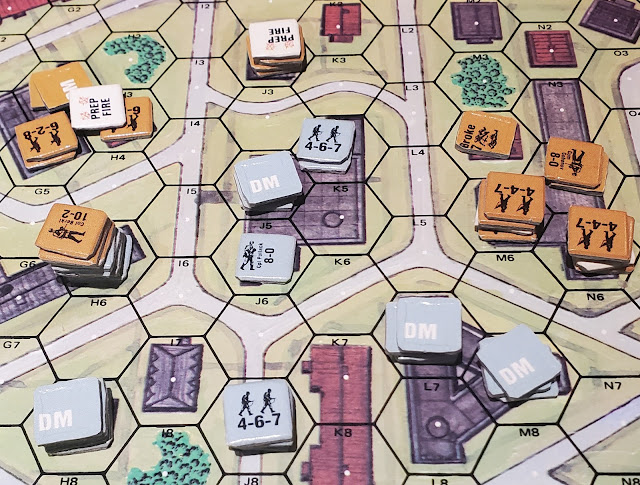
...but not for long.  The shattered remnants of elite German leaders and veteran squads retreated to other buildings across the deadly street.
The chewed-up Russkies were still able to deliver enough firepower to push the Germans, eliminating some of the better elements.
Eventually, all the Germans were broken!
The Russkies closed in to seal the deal and take the building at I7!  All the German squads were broken thru superior firepower and some great die rolls...
...and by Turn 5, the Russkies were sitting pretty on I7 with no effective counter from the Germans, who had actually made a play at building M5.

In a second game, I had the amazing misfortune to kill two German leaders by rallying them on a natural '12' - clearly, there are plenty of snipers around!
Unsurprisingly, game 2 ended with the Russkies again winning, despite a much stronger German attack on M5...
...which ended in disaster, as the Germans were wiped out in the assault, and ended up as "support weapon donators" to the Russkies.

Finally, the day for which I'd prepared came around - I had convinced a buddy [who had a battered, incomplete copy of CSL] to give them a go.  I think at some level he felt that they weren't that great, and were likely dated.  He also had the first ASL Start Kit which he had fiddled with, but not really gotten into.  But I was *determined* to play CSL for nostalgia purposes!
And above, here we go, with all set up!

As expected by me [having played 3-4 times at least] the Guards Counterattack was strong, and heavy losses were experienced by both sides. Unfortunately, the Russkies had a few squads go Berserk, and this gave them an edge on the assault.
With more attrition, there was was only one German squad left in the F5 building, and 7 Russkie Guard squads pressuring them - crossfire from J4 did help a bit.
...But eventually, the Guards took the building, which should have been renamed "Fritz's Used LMG Emporium" as they made out quite well on working support weapons.  Altho they didn't help a lot [there's only so many you can fire].
But as the game wrapped up, effective Russian firepower broke *a lot* of Germans and even with rallying some squads and saving building L6, there was no way the Germans would win.  The Russians almost won, but they didn't take a second building nor did they have enough intact squads to win at 3-1 [it was 12-5... so they needed one more German squad broken to win, but the Germans managed to rally a leader and a squad and "not lose"].

Well, after about 5-6 games, the last with a live opponent, I can say honestly, that CSL has aged very well indeed - pretty much it is better than I remembered it, which is more than you can say about a lot of things!  The game is a tense nail-biter, and easily manageable, at least as an adult.

Altho I haven't found any secret sauce for the Germans to win Scenario #1, it doesn't really matter - maybe they can win Scenario #2, The Tractor Works.

We'll see...more is definitely coming.  I'm tempted to commit to playing all original 12 scenarios, which I never actually did - I played most but not all of them.  But #2 and #3 are definitely happening!

Friday, January 24, 2025

"Up the Blue!" 3 Playtests

Somewhere on a Hill in 1940...
...the fate of France is being determined.

For the same reasons as ever - a playable set of WWII rules that easily accommodate my - and everyone else's - Flames of War armies, I'm now playtesting "Up the Blue!" WWII with an assortment of grognards I've accumulated over the years. Some I've known for 40+ years, some for less.  But all have one thing in common... they have the WWII armies, but they don't have a set of rules they want to play, so they collect dust in storage bins.

We quit FoW III when we realized that we were never going to get the rules down, even after lots of effort.  It was also exhausting to play, and took too long for a full game.  Also, there were plenty of things I disliked about them, especially the unrealistic micro-managing of Units two levels or more below the command level. There was also a lot of false differentiation, or unneeded differentiation, redundancy of factors [that often cancelled each other out], and over-engineering of, well, just about everything.  All of which caused the groups playing it to give up eventually. I don't know anyone who regularly plays v.4, and I refuse to buy more rules and all those cards for what they claim is a streamlined game.

Anyway, among the senior grognards, I found some willing playtesters. The incentive was one fellow discussing selling off his [FoW] WWII armies, as he just wasn't using them.  I said I was interested, BUT why not try my rules first?  If they suited, he'd have a set of rules that played painlessly enough to provide lots of enjoyment in small time spaces using "One-Hour Wargames" which he said he had [somewhere]. He agreed, and we conned another fellow into trying out "Up the Blue!" as well, since he has an even large collection that don't get used.

To get the ball rolling, I used an old favorite, Scenario #4 "Take the High Ground". Having played / run it at least 30 times, I appreciate the multitude of decisions it presents player with, using only one hill and one woods as key terrain. With the mechanics of UtB! as designed, a simple scenario becomes rich with possibilities, altho the enemy always gets a vote! Our host put down the small amount of terrain necessary, I marked out the board edges [the table was a lot bigger] and he chose French v. Germans from his extensive collection - so it was off to fall, 1940 we went!

Below, is around Turn 3. Attacking French are pushing hard against the objective, threatening both flanks. Dug-in Germans are outnumbered 3-2, which isn't really enough except that there are Mortars, ATGs and Tanks adding a few casualties here and there. ATGs are also on overwatch against the Road.
French have moved left platoon into Close Combat range, and the casualties will significantly increase.
View from the French Mortars [which are really 75s]. Their support will be essential to "Take That Hill!"  In the distance, German Infantry hasten to reinforce the objective - but will they make it in time to contest it?  The French must have "exclusive occupation of the hill" to win.

The battle develops. Turn 5, the German reinforcements are playing hide'n seek around the woods. The Tanks are clearly nervous in the service about the significant AT assets on the other side, the French Tank Unit and the ATG Unit. French Mortars and ATGs are supporting the objective with Fire while an Infantry platoon moves to reinforce it. French Spotter has a choice - call the Mortars on the objective, or against the reinforcing Infantry moving in the open?


This fight progressed nicely, with both sides feeling out the scenario and the rules. There were plenty of opportunities to discuss choices, like the Germans deployed on the back of the hill in defilade to reduce the amount of Direct Fire they took and reduce the effectiveness of the Indirect Fire.  But that's not the only way to do it.

As the game plays pretty quickly, and we had time, we played again, keeping the same sides as both wanted to try a different plan. This time, the Germans deployed in two layers, Dug-in, with both  Infantry platoons on the front side of the hill, with line of sight to the approaching French. This time, the French put their tanks up close to the action, on the left. The Mortars supported from the woods [you can see their template paper on the Germans] and the ATGs interdicted the road.

The Germans opted to similarly deploy their ATGs and Mortars, and sent both the reinforcing Infantry and Tanks to support the hill.  As the Germans have already lost the front Infantry platoon, this is a good idea! Being in defilade reduces your firepower forward, but preserves your troops - the opposing infantry can't engage you across the military crest until you are in Close Combat Range.

German Tanks take a loss from the supporting French Tanks [yellow marker]. French Infantry are executing their company attack with closely supported platoons on a narrow frontage. This is only possible because the German Mortars can't get effective IF raining down upon them. That would require re-positioning. It appears their Spotter was lost with the front Infantry platoon.

Playtests went well, both players were engaged with making decisions and not with looking things up on charts. They liked that. While there are plenty of decisions to be made, and it takes experience to know when and how to execute key parts of your plan, it never gets bogged down in minutiae - players feel like company commanders, and not like team leaders.

A week or two later, we met up again. This time the Italians defended against the British. Players had switched sides. Defender liked being in defilade, and started with an Infantry platoon and the ATGs on the hill - the Spotter appears to be with the ATGs. 

Attacker concentrated heavily on the left, out of Line of Sight of most of the Italians, and pressured them heavily with Close Combat on each side supported by Tanks, ATGs and the mortars.
The British Spotter is with the ATGs, so has limited vision of the battlefield. Italians are racing two Infantry platoons and the Tanks towards the hill. Their Mortars are behind them, getting set up for some IF support. 

After the Italian ATGs were taken out by an Infantry platoon in Close Combat, that platoon was lost to Italian supporting fire. The Tanks then engaged the Italians in Close Combat, driving them from the field [no pun intended].

Ultimately, this cost the British Tanks some losses, and the Italian Tanks also knocked out a few, it appears. The British were left with their weakened Tank platoon and ATG platoon facing a fresh Italian Tank platoon, Infantry Platoon, and a weakened platoon Dug-in on the hill, not enough to take it.

Below appears to be the end of the game, Italians are holding part of the hill.  Either that, or we played a second game, with both sides using a similar plan as first time around.

These playtests went well. Both sides picked up the rules quickly and enjoyed focusing on their plan and their decisions. While die-rolling is always a factor, neither player rolled particularly hot or cold, altho there were a few rolls that beat the average, both ways.

From these two runs, I got more confidence to clean and streamline a few more mechanics and explanations, as well as keep a few mechanics the same [that I was wondering about changing].  What to keep in and what to drop are always the most difficult final decisions with a game design, I find.  I console myself with putting some nifty mechanics [that complicate things a bit] into an "advanced or optional rule" section, while I try to stay focused on delivering the most important aspects of combined arms WWII tactics into the table.

A few weeks later, I was invited to throw a playtest with some pretty experienced gamers with whom I had never played. This is always an exciting opportunity, as one tends to get some unexpected input with a "cold" playtest.

The table was set up for Eastern Front WWII micro-armor, and the host had a nice snow cloth with the Germans defending a ridgeline against an advancing Russian horde, while the German Fire Brigade units raced to reinforce them. Below, the Russians are developing their attack. With little in the center, they essentially have two independent commands with limited ability to support each other, besides some long-range gun fire and the Mortars.
The Germans on the right are set up in the town and woods. The "X" marks the spot - the objective - the Russkies are trying to seize.

On the left, the Russians race forwards, and take some powerful hits from the defending Germans, who are Dug-in and Ready to receive them. They are still contesting the town, even though T-34s burn at the top of the pic.  But their Commissar is "encouraging" them to keep moving forwards.

On the right, the Russians establish a strong base of fire, and begin grinding down the German defenders. Things aren't looking good, so the Germans shift their Infantry from the woods to the town, but take some Mortar fire along the way, dashing down the road in the open between the woods and town.
Above, the Russians put a lot of pressure on the Germans, and destroyed an Infantry platoon. They closed in, but at just the decisive moment, a German tank platoon arrived and began knocking out their Tanks! The Germans and Russians were locked in a see-saw scrap that was uncertain when the game was called.

The 88 ATG that showed up did not do a lot in the center, and was knocked out by mortar fire. The Russians in the center contested that objective, but Germans were pressing them hard, and it was hard to tell what might happen.

On the left, the Germans are held their own. The Russians settled in, however, and laid a lot of fire down on them. Eventually, the casualties the Russians took racing forwards told against them, and when the German reinforcements arrive they are stalled outside the town, unable to contest the objective.

This was an interesting playtest to watch. I didn't have to explain a lot once they got going. A couple of the guys picked up the rules quickly and helped me explain mechanics periodically.  The scenario was similar to #4 and #8, but they were not identical. It's always hard to get play balance just right. However, the general concession was that the Russians could have won with a different plan, most likely the two forces fighting for the center and one flank objective.

I left it with the host that we could try again in the future if he wished, and offered to bring my 15mm desert forces.  Some more incentive to get the last of the British mounted and the tank decals on!

This all went very well.  I feel like there was substantial progress made with me understanding the strengths of "Up the Blue!" with new and experienced players alike. Generally, those who "get it" really like it, and that's good to see.

Now, to get some more figures done!

Sunday, October 6, 2024

"Up the Blue! WWII" Revisited & OHW #14 Static Defence

"Ciao! We are preparing to see off those pesky 'Limeys'...

...and then have a very fine dinner!"


Did a couple of playtests with the 2020 draft of these rules... the last time I seriously worked on them! I blame the CHI-FLU years entirely, as lots of things just got forgotten about, including all my WWII figures, projects and rule sets. 

D--n CHICOMs...!

Anyway, here we are today, with two playtest using One-Hour Wargames #14 "Static Defence" under the belt, and some work streamlining, simplifiying, clarifying all going well.  I can't really complain that I haven't had enough time to look at the rules with a fresh eye! The scenario has equal attacking and defending forces of six Units each. However, the Red defender has to keep two units on each objective, the town and the hill.  There are two Units that are free to move around. The attacking Blue player has the option to attack either objective. The main difference between the two objectives is that the Town acts as Cover for a defending Unit within it, while the hill is only helpful if the defender is a Tank Unit, as it can go Hull Down. In both cases the casualties are halved in the original rules.

Below, the British force. I'm almost ashamed to display them, but time is limited and I'm forced to use my partially painted Crusaders, aka "Cruds" and two units of Blackshirt Italians as the Motor Infantry. There's three platoons of regular old Cruds and one of Close Support Cruds, that function in the game as a Tank platoon in all respects except that it Fires as a Mortar.

Below, the Italian force, for which I should express some modest embarrassment at having to use gun platoons from my continental Italian company, as I still haven't finished the Bersaglieri gun platoons. But anyway, two tank platoons, two Infantry platoons, an ATG platoon and a Mortar platoon. A nice balanced force able to meet multiple threats.
I then did a first playtest and had a bunch of ideas for improvements, mostly subtle but still important. I didn't take any pics of that fight.

Below, the end of the second playtest, using a somewhat re-drafted 2020 set of rules. This was a debacle for the Italian defenders, largely due to bad die rolling and a couple of bad decisions. The British got a tank platoon on the hill for a win, AND contested the town with a platoon of Motor Infantry. 
The Italians contested it with a platoon of Tanks. Still, both Units had 6 Hits and the supporting Cruds 5 Hits, so anything may have happened on the next player turn with the town. Most likely, both Units would have been eliminated and the Cruds would have occupied the town and gotten their first bath in a few weeks!


A number of small but complicating mechanics were removed. I made the hard choices instead of splicing hairs, mostly by using one modifier with several single conditions, i.e. if you're firing on the move OR firing at long range, you are penalized once, instead of adding the two together. Also, I found easier ways to incorporate things that I feel *really* matter, and most of all I obeyed Neil Thomas' design goal to only stress the big things - most of the little things are adjusted by soldiers and largely cancel out based upon the relative Quality of the opponents.

I was very pleased with the changes, which after aggressive decisions and clean re-writes not only kept the basic rules at 5 pages, but I was able to go from 11 to 12-font Ariel, since I had cleared out a few things!

Finally it was time to unveil the rules in a full post. 

Below, the end of Turn 1.  
Italians have Mortars behind the crest of the hill with the command team spotting at the crest [can't be spotted themselves]. In front, an Infantry platoon is Dug-in, and also Ready [on overwatch]. Some ATGs are in the center rear, facing the likely avenue of approach to the left. below them are a Tank platoon with another behind the town; in the town the other Infantry platoon.
The British had an interesting deployment: altho halve of each force is on either side of center, most of their force on the right is already engaged - two Tank platoons and an Infantry platoon. The CS Cruds are center-left with Line of Sight [LoS] to both objectives, a powerful asset in either case. One Infantry platoon is racing forward to the heavy brush dead ahead, with the final Tank platoon moving rapidly up the left to prevent reinforcements from shifting towards the town. Altho they are fighting to the right, the British can still shift to the left quite quickly if needed, as they have trucks and tanks.  The Italians are playing the same game with their ATGs, which can Fire into the open spaces on either side of the center brush [it acts like a wood, basically].

Turn 1 ended with some solid hits on the right-most Italian and British Tanks, and the Italian Mortars thrashing the British Infantry by Ranging-in and dumping a well-placed barrage on the British moving in the open desert.
Above: the white 100m x 50m card is the sheaf for the Mortar barrage.

Turn 2 ended with the Italian Tanks behind the town almost being wiped out at 6 / 7 Hits, while the British Infantry on the right were forced to Rally as their fellows dashed up the middle to gain a fire position in the heavy brush at center.
The Italian Mortars only got a hit and the British rallied it off. The left Crusader platoon used a Tactical Move to approach the Dug-in Bersaglieri at the hill.

At the objective, the Bersaglieri are in good shape, while their Tank support has moved behind the town to Rally in future turns sheltered by the other Tank platoon and the ATG's. Those will prevent the British from dashing up the open space near the town, as there'd be some serious damage, most likely.

Turn 3 was a "Respite" as there was a net tie on the Initiative roll. Everyone benefited from having a chance to rally, and all the dust was removed.

Some good Rallying by the British has them ready for action again!

Turn 4, the Italians seized the Initiative and chose to keep it. 

Turn 4 saw the left Crusader platoon engage the Bersaglieri at the hill objective. They *just* managed to stay out of LoS of the ATGs, and they outrange the infantry a bit, altho the Fire isn't decisive as they are Dug-in.  At the town objective, the British advance everyone and put a lot of Fire on the Infantry in the town and the center Tank unit. 
For the Italians, their center Tanks fought back, along with the Infantry, and the Mortars provided some more Hits on the advancing British Infantry. The other Tank platoon rallied quite well and was almost in perfect shape after their near-brush with death early in the fight!

Below, the British Infantry are almost done with 5 / 7 Hits, while the Cruds next to them are at 4 / 7 Hits.  Fortunately, for Turn 5, the British seize the Initiative!

On the left, the Cruds advanced to attack the rear of the Italian Tanks, and scored three Hits on the move! They were met with weak Fire from the ATGs on overwatch.
The Bersaglieri missed, and the British continued to Fire upon the defenders to some effect while moving forward one Crud platoon.
Then, the second Crud platoon advanced and knocked out the Tanks huddled behind the heavy brush, eliminating that platoon! The British Infantry were able to advance out of the Mortar barrage, which failed to Range-in on their new position farther forwards. 

Thanks to the Mortars, the Tanks and the weakened Infantry, they were able to push the Bersaglieri in the town to 7 Hits, and they withdrew from the field in good order, leaving the Tanks to hold the town.
"Give'em hot lead Lads!" shouts the grizzled sergeant leading the Rifles. And they do, and the town is now empty!  But can they exploit this opportunity?

Turn 6, and the forward advance of the Motor Infantry is halted for them to Rally and reorganize a bit, and they are again Hit with Mortar Fire.  

The end of Turn 6 sees the British mostly in a cautious advance, while the Italian Tanks occupy the town, driving carefully down the road. While they are able to see the Brit Infantry and vice-versa, none of the Brit tanks can see them, not having a good view down the road. They will need to re-position and support the Infantry's drive into the town.

Turn 7 is another Respite. This mostly helps the British, who have a few Units with Hits, while the remaining Italians are in good shape altho outnumbered 6-4.

Turns 8-9 see the British dashing after the objective!  They speed Tank and Infantry platoons forwards [altho the Infantry roll a '1' and only advance a few inches]. 
The British keep the pressure up but tank some Hits along the way, and both the lead Crud and Motor platoons are nearly spent at 5 /7 and 6 / 7 Hits - can they seize the objective before they are destroyed? 

Turn 9, on the left, the Cruds put the pressure on the Bersaglieri by the hill, with the help of the CS Cruds - getting them to 5 / 7 Hits. If they can destroy that platoon, there is still time for the hill to be seized if the Town objective doesn't work out.
Turn 9, at the town, the Brit Motor Platoon finds it's speed and rolls a '6' to dash into the town!  They are now in Close Range of the Italian Tanks. This is a big help as the other two platoons failed their Quality Tests and had to Rally.

Turn 10, the Italians seize Initiative from the Brits!  They choose to retain it, as they will, overall, be able to give a better fight for the town.

On the left, the ATGs and the Bersaglieri manage to knock out the Crud platoon, mostly thanks to the ATGs rolling for perfect Hits and the Bersaglieri getting that last 7th Hit before the Cruds could rally in their Turn. Avanti Savoia!

In and around the town, a furious close fight ensues, with Mortars landing, tanks firing at Close Range, the infantry fighting from the buildings [not pictured].

British Turn 10, the Motor Platoon dashes forwards, passing their Quality Test to assault the Tanks. Both the other platoons have to Rally, so they're on their own!

End of British Turn 10, and the town is still up for grabs, with a single Italian Tank platoon holding off four British platoons, two of which are close to spent.
A series of Close Combats leave the Italian Tanks 1 Hit from departing the field, while the surrounding British are all battered.
The Mortars wipe out one Motor Platoon! But the Tanks are forced to Rally - not entirely a bad thing, as they were at 6 / 7 Hits, and are now at 4.
In the Close Combat Phase, the British go first [as the Reacting Side], and get no less than 4 for 4 Hits, wiping out the Tanks entirely [with a Hit to spare]!
The cheering Riflemen loot the Italian tanks for food and souvenirs, and catch a breather.  The supporting British platoons see the shattered remnants of the Italian carri platoon drive off in a cloud of dust.

Well, that was a dramatic finish!

My combat system, like that in OHW, does allow one to completely miss and has a similar attrition mechanic scaled down to 7 Hits from 15, using 3 dice per Unit [which can decrease to 2 or 1 depending on serious losses].  So altho it works differently, it has about the same elements of predictability with the math.  Occasionally, you get a spectacular miss or hit, but normally Units are inflicting 1-2 Hits, and it takes a few turns [or a lot of firepower] to destroy a Unit quickly.

In this case, the added danger of Close Combat that was initiated by the British Motor Rifles allowed them to up the intensity of the fight and drive the Italian Tanks from the town with just a little help from the nearby Cruds.

This playtest went very well, and I am very pleased with where the rules are. They are a lot more nuanced than the One-Hour Wargames rules that inspired them, but I have managed to stay focused on history, likely outcomes, and make the player's decisions in the scenario the most important factors.

Here, the British chose the closer town as the main objective, and used one Crud platoon very well to keep three platoons busy by posing a genuine threat to the hill objective. This effort was greatly aided by the Close Support Cruds, thanks to their long reach and real danger to ATGs and Infantry [Tanks...not so much].

With no armor to try and take the town back, the Italians faced a slow movement across the open ground North of the heavy brush with the Infantry, and the ATGs would almost certainly have been knocked out by the CS Cruds. The British would be able to sit in place and Rally off a few Hits, preparing for the Bersaglieri counter-attack, and it would not have gone well.  Ergo, the Italians had to concede.

One thing I might have done is put the Italian ATGs closer to the town, ready to fire down the open space between it and the brush. This would have put additional pressure on the advancing Brits, but may have resulted in the Bersaglieri at the hill objective being forced from the field.  Hard to say.

Next, some more blind playtesting is in the works.  LMK if you want to participate in the comments below, giving me an email to contact you.

Until then, I'll be looking for you, "Up the Blue!"!