Friday, October 23, 2015

One-Hour Wargames WWII AAR: #14 Static Defence


http://www.ww2incolor.com/britain/British+Crusader+tanks.html

While hanging out at the local game store - 7th Dimension in Jenkintown - I decided to play out Scenario #14 Static Defense, and pair the WWII game against my playtest of the same with the medieval rules.  It is an interesting scenario with the defender forced to defend two different objectives with three Units each, two of which can't leave the defenses. 

Kobold said that he interprets it to mean that there must be ANY two defending Units within 12" of each objective at any given time, but that didn't work for me - I don't think troops would rotate like that during the battle.  My interpretation, anyway!  As WWII has more shooting - all Units shoot, actually - the restriction doesn't matter as much, anyway especially as my WWII rules give Tank and ATG Units a long 24" range at -2/d6. 

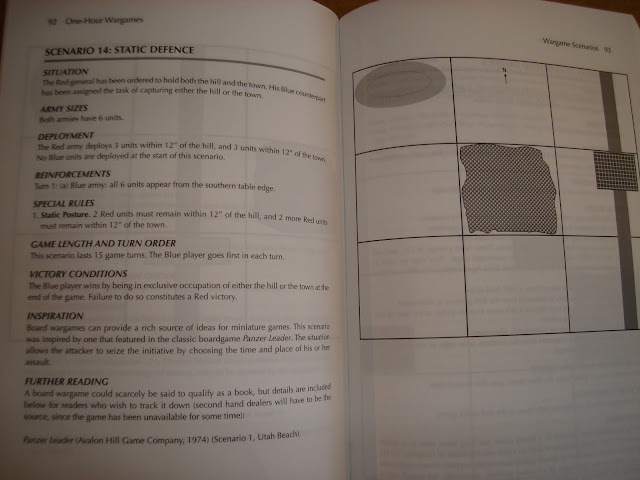
Below is the book's map, for your convenience:

Layout. Inverted below is my interpretation of it on the table - pretty close.  I couldn't get it to go right side up as I took the pic upside down with my phone.  Despite correcting it before saving it, BLOGGER insists on leaving it upside down.  Any help appreciated!

Italian Setup:
Italian defenders.  I put the ATGs in front of the hill objective dug in and Ready.  The Tanks are hull down on the hill.  To the front left is a Bersaglieri infantry platoon also Dug-in and Ready.  To their left defending the town [below] is another Bersaglieri Infantry platoon, with the Mortars behind and Tanks between.  Both the Infantry and Mortars are Dug-in and Ready. The scenario indicates a prepared defender, so I let them start Dug-in [half Hits] and Ready [can Fire in opposing Action Step, "overwatch" in essence].

Battle commences! 
British Turn 1.  Cruds race ahead.  Mortars at rear positioned to Fire upon town objective or ATGs. They cannot see anything else. Infantry in front getting trucked to the wood - Italians can't see them as there's a mutual 4" LoS between any two units through woods [or other terrain] so what they're doing isn't as suicidal as it looks!  Also, they are about 250m away [5"].  Four Crud platoons close rapidly upon the town.  They are just over 4" away so have no LoS to the Infantry who are within the town and vice-versa.  No shooting as all moved.  

Italian Turn 1 [below] has Mortars and Carri Tank platoon Firing to little effect as both are -2/d6 [Mortars v. Tanks, while Long Range for the Tanks].  Second Tank Platoon shifts over to help defend town.  Bersaglieri Infantry in wood realize they need to reposition to better defend the woods itself, turn around and angle themselves, losing both Dug-in and Ready status.  I felt it was worth it, however, not liking the possibility of the British Motor Infantry to sneak past out of LoS, then Dig-in on the other side of the woods in Fire support against the town.
 This pic is blurry - hard to stay still with my phone!

Turn 2-3.  British Cruds close into <4" of the Infantry garrison simultaneously, then Fire on Turn 3.  Not to much effect as altho Close Range is x2 Hits, Dug-in is 1/2 and being in the town is 1/2, for a net 1/2. Italian Infantry shoot at British in woods after both Dig-in for 1/4'd Hits [I forgot to 1/4 them, only did 1/2].  Brit Mortars fire upon Italian ATGs that are now on the move, repositioning.  I decided that they could at least dig in by the Mortars and remain within 12", and have a lot more effect on the battle.  Seemed reasonable, right? Unfortunately, with 1d6+2" move, which is -4" due to dug-in at start of move, they can't move out of LoS of Brit Mortars who hammer them for 4+2=6 Hits.  Meanwhile, Fire upon lead Cruds gets up to 8 Hits - at 10 they'll have a permanent 5 so I need to rally them. Got some good return Fire back on closest Italian Carri platoon that moved up, rolling a 5+2=7 Hits.

Turn 4.  Continuous Action and Fire exchanges.  Brits are slowly getting shot up, and Italians take a chance and Fire instead of Rally their closest Tank platoon.  This does result in the destruction of the lead Crud platoon, but leaves the Italians at 12 Hits, 5 Permanent [in red]. Overall, things look good for the Italians.  The Cruds aren't making much impact on the town, they've lost a platoon, and are taking Fire all around.  However, the ATGs get trashed by the Mortars again, putting them at 12 Hits, 5 Permanent [in red].  Position seems to favor Italians, but platoon damage has them almost losing two platoons while no surviving British platoons have high Hits.  British will need to eliminate these two Italian platoons to turn this around.

Turn 5.  Complete change of plan.  Yet another plan doesn't survive contact with the enemy!  I knocked out the Carri platoon that had 12 Hits in one shot.  With now only one Tank Unit, the vulnerable Mortars and a badly damaged ATG Unit standing in their way of the hill, I decide to use the Crusader's mobility to switch objectives as the Italian infantry in the town are too tough a nut to crack with nearby support Units.  Also, if the support Units are eliminated, both objectives are vulnerable. I also figured out how bad an idea it was to move the ATGs, who would still be a serious threat if they were alive and dug-in ON the hill, not in front of it.  

Accordingly, moved all three surviving Crud platoons northwest against the Mortars [who have no Close Range] and got out of LoS of the Infantry in the town [you need "two stands to two stands" LoS to be able to target a Unit].  The ruler shows that the second Italian Infantry stand cannot see the Crud platoon, limited to a 4" LoS by being within the town.  This may have been a deployment error on my part for the Italian infantry, but I don't think so.  

The proximity rule also showed itself to be robust - the British were able to "shield" the Cruds with six Hits with a fresh Unit that was closer to the Italian Tank Unit.  This did 5 Hits, which would've put the former at 11 with 5 permanent. Instead, both have an opportunity to rally off all their Hits in the future.

Turn 6.  British grind the Mortars and Carri down.  They also somehow took 5 Hits onto the Crud platoon with 5 - I may have forgotten the proximity rule when someone interrupted me to ask about the game.  With no targets, I repositioned the British Mortar Unit.  Return Fire was negligible and I may have needed to get more aggressive with the Italian Infantry in the town, but I doubt it'd have made a difference.  The Italian Infantry in the woods begins moving towards the hill to contest it.  A desperate measure for a desperate moment!

Turn 7.  Even with rolling well, the Italians weren't able to get to the hill and will now be shot up by the British force, and digging in would not bring victory since they aren't on the hill anyway.  British rallied off some of their Hits and are looking pretty solid.  With no Victory in sight and only two Infantry units left, I had to concede for the Italians.

Very interesting to me how just a couple of errors took the Italians from sitting pretty on Turn 4 to a total loss on Turn 7. I should have been more conservative with their armor but was worried that the mass of Cruds would take the town. This may have been a legit concern.  I should've dug-in the Italian ATGs ON the hill since it is an objective.  Maybe I should've dug-in the mortars on the Hill also, and left the two Tank Units in the center as the swing force.  Originally I was going to go for the Hill with the Brits since it is a softer target than the town, but the town was closer so I went for it despite the 1/4'ing of Hits against units dug-in inside the town.

Happy with how the rules played, which was the purpose of playing myself, anyway!  Didn't see any significant flaws with any particular rule, and the scenario is good - if different - from how it played out in my medieval rules here:


Sunday, October 18, 2015

2xAARs, One - Hour Wargames WWII: Scenario 8: Melee

Much thanks to gamer pal extraordinaire B-Ham who is always a pleasure to work with.  As a playtester, I can always rely on him to approach the game with focus and consider it on its merits, both scenario and mechanics, and worry less about how will the participants play or the results of the immediate game.  That's not always easy to find!  So I was happy that he got on board with a playtest of the WWII rules I've developed from Neil Thomas in "One-Hour Wargames".

The playtest session is here, along with good pics of the battle from his spiffy fone:

The thing that mattered most to me is that B-Ham was able to get into the tactics of the game quickly, worrying less about the mechanics.  By the second game he showed a clear grasp of what he needed to do and wasn't distracted with lots of rules.  As he noted, he was a bit rushed in the second game so tried something that would be quick - and it was, it just didn't bring victory.

My goal for the game design is to emphasize historical decisions and tactics for the gamer as company/battalion commander, while leaving how the sub-units execute them up to the dice except for movement [altho that is also diced, producing the temptation to rush forward with a plan or to delay a plan].  I think the next thing for me to try is scenarios with more infantry and more terrain.  This will let me get into the close combat rules design a bit more!

Friday, October 9, 2015

One - Hour Wargames WWII: Scenario #6 Batrep, p.2

Well, over halfway through to the 15-turn limit, and I doubt the Brits can win with two destroyed Tank Units, 1/3 their force.  However, the Italians have lost a Tank Unit and more critically the ATG Unit blocking the road.  Maybe there's some hope after all...

Turn 10.  Brits knock out second Italian Carri Unit.  Italians make valiant effort to knock out a third Crud Unit, which would probably end the game for the Brits, but they don't quite make it [11 Hits] due to bad rolls.  Must be a lot of dust and smoke from their angle... 

Turn 11.  Brits charge the Mortars, rally 5 Hits[!] off the key Crud Unit and keep fire upon the Italian blocking force, damaging the rear infantry unit.  With two solid Cruds and one recovering, there's a chance for a breakthrough after all... but best not to jinx it!

Turn 12.  Brits fire their Mortars at the Italian ones then charge with the Cruds, but Close Range shooting doesn't achieve as much as hoped. Italians fire everything at the lead Crud Unit on the road, but achieve little since both Infantry and Mortars are -2 against them, and they roll average.  Note that the Mortars have no close range shooting, so can't fire upon the Cruds that are poised to over-run them!

Turn 13.  Brit's effective ranged Fire destroys Italian reserve Infantry blocking road as Cruds destroy Italian Mortars at Close Range.  Italians are too limited in firepower now to do much, so try to beat up the opposing motor Infantry.  With space cleared around the blocking Italian Infantry Unit, it will come down to movement rolls for the British Tank Units to see if a few can get off the board.  Exciting turnaround after I thought all was lost for the Brits!

Top of Turn 14.  Cruds race into the breakthrough!  Half decent dice will get them off the board.  Infantry whiff their doubled Fire against the tanks b/c 2-2x2 = 0.

Turn 15.  Cruds rolling off the board.  Even with the -4" move for proximity to enemy, they easily diced high enough to exit. A few turns ago, I didn't think the Brits could win - then I thought they might get a Unit or two off, and now they've turned it around.  Quite the nail biter!

Game end.  Three Cruds off board, with a damaged infantry left behind that will slowly recover and gain some ground on Hits.  The one Crud unit has eleven hits, but could get several back with rallying.  So a surprising and hard-fought victory.

Overall, I thought I played both sides well.  I had to make some hard decisions about Fire and Movement, which is well and good.  Play was in about an hour and turns got faster and faster as I got more experienced with the rules and some Units got destroyed.  The second half of the game was less than half as long as the start.

The rules did very well, only a couple of clarifications and little changes which are included in the posted set.  Try them out and let me know what you think.

Until then, "Tally-Ho!" and "Avanti Savoia!"

Thursday, October 8, 2015

One - Hour Wargames WWII: Scenario #6 Batrep, p.1

So after much work, I finally felt like I have a set of rules worth posting about.  I thought up a lot of ideas that were interesting, but in the end only a dozen were worth keeping in a fast-play one-hour set!  That's a lesson worth learning...

The scenario played was #6, Flank Attack:
This features a Red defender with a blocking force hastily deployed to stop Blue enemy moving along a road as a Red flanking force closes in.  I therefore didn't allow the blocking force to deploy Dug-in or "Ready".  The Blue attacker Force must break through and exit three Units off the road, or half his Units.  Seems like a tall order - you have to both defeat the enemy force before you and survive with enough Units to achieve a breakthrough.  Not sure the Cruds are up to it!


Forces used for this were my WWII Desert Rats and Italians. I had 4 Crud Tank Units, 1 Crud Mortar Unit, and one motor Infantry for the Brits.  The Italians had two Bersaglieri Infantry, two Carri Tank, one Mortar and one ATG Unit. These were deployed as follows:

Overview of battlefield.  It is 3'x3' and the red markers show the grid intersection points.  Brits are on the road with motor infantry in front and mortar tanks in rear.  For the sake of the models, I decided that the Crusader CS tanks fired as mortars while moving / targeted as Tanks - simple.  The trucks are just for show - there's no mounting / dismounting rule.  The rulers and FoW objective markers mark the right edge of the board.  I play on a 36x56" Ikea folding table.

Blocking force of Bersaglieri and their ATGs on the road.  Brits are mounted up and discovering the enemy at 8" [400m by my understanding], which is set by the scenario and seems about right.  The Italians could be "Ready" - this would allow them a single Fire during the British Action Step [overwatch].  I chose not to let them assuming that they only just got settled in when the Brits showed up!  Note that there is one different base/vehicle per unit for game convenience - it is used as a measuring point for Range and such.

Italian flanking force.  Two Tank Units, one Infantry Unit, with a Mortar Unit behind.  None are Dug-in or "Ready" as they've been on the move and hastily deployed.

British column moving on / along the road.  Infantry in front, CS "Mortars" at the rear, with four Crud platoons between.  I tried to stay in the spirit of the scenario while giving both sides a realistic chance.  Previous playing revealed that it is very easy for the Italian tank units to get shot up quickly if they deploy too close to the British.  The present deployment represents several previous plays of the scenario.  It forces the Brits to select a frontal attack on the blocking force, a shift right to take on the flanking force, or dividing and doing both.  Decisions, decisions...what a good game is all about!

Turn 1.  The British drop mortar fire upon the ATGs, causing 5 Hits [they now shoot at -1, a good start].  During the Action Step, they shift two Crud platoons forward and left to take on the blocking force, Fire tanks at long range against the closest Carri platoon [2 Hits], and shift tanks right to take up hull-down positions on the low ridge.  The end by digging in their Motor Platoon front and center, allowing them to continually engage the blocking force with Mortar and Infantry Fire.  This and the ridge gives them protection to their right flank where the Italian Tank Units are.

The Italians Fire Mortars on the lead tank unit [1 Hit], both tank Units against the stationary Cruds at long range [6 Hits], advance their flank infantry to block the road and end the turn digging in their ATGs and Infantry already on the road [they didn't shoot or move].  I figured they had to dig-in or they'd be destroyed very quickly.

Turn 2.  More of the same.  Brits somehow miss that there's an Italian infantry unit NOT dug-in, and continue to bang up the ATGs.  Probably a mistake as the dug-in ATGs take half Hits.  Brit shooting inflicts 8 Hits on ATGs and 5 Hits on close Carri Unit, taking 8 on center Cruds from Italian return Fire. Certainly some progress but not a breakthrough! 

Turn 3 - 4.  Didn't see a reason to move anyone.  Did realize the Italian infantry was vulnerable and dumped 11 hits onto it. Unfortunately, it survived and Dug-in.  ATGs and tank units did some rallying off of Hits, representing ammo replenishment, organizing shirkers, fixing a tank, etc.

Turn 5.  Some back and forth of shooting and rallying results in no Units destroyed.  Hard to decide where to concentrate fire at times.  Still learning the game.  Obviously destroying Units is best since they cannot rally and make it back into the game. I like the effect of fire and rally, it gives the battle "sway" and character.

Turn 6-7.  Casualties mount on lead Crud Unit and it brews up.  Motor infantry, and closest Carri Unit also looking bad. Being a Move or Fire sequence makes it hard to decide when it is worth sacrificing Fire to re-position.  On the other hand, facing destruction makes it a bit easier to decide when to attempt a rally and hope you roll high!  Worried about the British advance with the loss of a Tank Unit, however.

Turn 8.  Brits say "Tally-Ho" and dash off the ridge against the flank force who have lost a Carri Unit.  Despite dangerous amounts of Hits along the road for both sides, I've decided that the Italian flank support must be destroyed if any breakthough is to succeed.  In this case, opportunity came about by good Fire rolls and poor rallying by the Italian Carri unit that left it just able to be finished off with 15 Hits. No brainer to advance off the ridge and get those Cruds into a flanking position against the other carri platoon!  The hard choice is now with the Italians - re-position their Tank unit or not...?

Turn 9.  Brits advance center Crud Unit forward to keep up the pressure along the road as another Crud unit crumbles.  I figure the breakthrough isn't possible, but I'm going to keep at it for the sake of playtesting.  There's a ray of hope in that the Italian ATG Unit which presented a large threat to the roadway finally was knocked out.  While it spent a lot of time not firing - surviving and rallying - this "suppression" of the Unit let it suck up a lot of Brit firepower.  Right flank cruds bang up carri unit with a 3 +2 for Tank v. Tank +2 for flank. Mortars and Infantry of both sides are plugging away all around with modest results unsurprisingly.

What happens next?  Tune in very soon to find out!

Fast-Play WWII Rules, EDIT: v.8 even better!


In my previous post reviewing and considering the rules, posted here:
NT WWII Rules Review
I came up with the below changes I was considering.
  1. ATGs and Mortars move < Infantry, can enter edge of terrain if not move thru.
  2. Long range for Infantry, ATGs, Tanks = 24" with a -2 Hit modifier.
  3. Infantry and Tanks in base contact with any other Unit, +2 Hit bonus.
  4. I think there should be some declining effectiveness with Hits taken, and
  5. ...an opportunity to rally them off somehow.
  6. Smoke!  A useful and fairly basic tactic, also simulating the dust and debris clouds of a barrage.  There are Barrage rules in the WWI 1HW rules...
I've now played a few times with the Rules As Written, or RAW, and am now revisiting these thoughts.  After no less than seven [7!] drafts and several playtests and much revision, I ended up with an hour-long game that I was satisfied with.  This, it should be emphasized, was especially important with visiting and re-visiting what NOT to put in!  In the end, these are the big things that are in this v.7 of my 1HW WII rules:

  1. wrote rules for using 2-3 bases FoW style.  That's what my stuff is based for!
  2. added Dug-in for Units.  If you don't move/fire, you can dig in, taking 1/2 Hits.  In effect it is like woods / town but you can do it anywhere.
  3. Unit Fire is -1 at 5 Hits, -2 at 10 Hits.
  4. diced movement rather than fixed move distances - lots of friction from simple change.
  5. Turn sequence is Mortar Fire, Actions [move or shoot], Routs/Rallies/End.
  6. added rallying - if you do nothing else, you roll off a dice worth of Hits at the turn end.
  7. I switched to average dice, "D5" or 2, 3, 3, 4, 4, 5 on a 6-sided dice, for all rolls.  Easy to switch back for less predictability!
  8. Units that do not take an action, rally or dig-in, may go "Ready" instead.  This allows them to shoot in the opposing Action phase after any phasing unit has acted.  In effect, it is an overwatch.
  9. I tweaked the shooting table a little.
  10. I added Front and Rear to all Units, and they're penalized shooting out of their front arc or being shot at out of their front arc.
  11. I did add long range fire at 24" for ATGs and Tanks, it is 1/2 effect.
  12. I added a Close Range of 2", where Fire is doubled.  Related note, I added a -4" penalty to any movement within 2" of any enemy Unit.  Sort of a ZoC that slows.
Below are the rules as I played them, plus a few more changes leading me to re-designate them v. 8 as of Nov 3, 2015.  Latest Edits:
10/10/15 = target priority rule, clarified flank shooting
10/11/15 = clarified mortar shooting, added +1/2/3 to movement dice.
11/03/15 = clarified cover bonus, changed all moves +2", ATGs enter woods edge.
As usual, the WORD formatting didn't carry over well.  Lengthier explanations - AKA Designer's Notes - may come later.  The Batrep is next post!  If you email me, I can send you the WORD doc.  There may be a way to download it if I load it, someone will have to tell me how!

ONE-HOUR WARGAMES: WWII

GAME CONVENTIONS
• Dice used are standard six-sided [less predictable] or average [more predictable].  Whichever is chosen is used for all dice rolls throughout the game and abbreviated D6 or D5 respectively.
• A Turn is about 10 minutes, but may represent 5 to 15 minutes of Actions. Or inaction!
• Groundscale is about 1”=50m [or yards].  This makes 12” about 600m.
Measuring distance, and LoS between Units, may be done at any time.
• Terrain represents significant features of military impact.  Flat table spaces without table terrain still have scattered terrain features soldiers use for limited cover and/or concealment.
Dug-in includes foxholes, shallow trenches and gun pits with camouflage to conceal a Unit.  It assumes efforts to site vehicles and guns effectively and to establish safe fire lanes with broad coverage.  Any Unit except a Tank may take advantage of cover and concealment and “Dig-in”.
• Concealed Units are in a position with a bonus against Fire, whether Dug-in or in a woods/town etc.
Hits.  Casualties, damage, ammo, and fatigue are expressed by Hits.  A Unit with 5 Hits is -1 to its Fire: at 10 Hits it is -2 and five Hits become permanent [mark them red]. At 15+ Hits a Unit is destroyed and removed.
• Units are a platoon of about 3 tanks or guns, or 40 infantry with attached LAW/HMG.  Unit types are: Infantry, Mortar, Anti-Tank Gun [ATG], and Tank.  All Units represent common ones of their type, with game characteristics that assume average training and some combat experience.
      i.    Tank Units are medium tanks: Sherman, Mk IV, Cromwell and T-34 with 2+ MGs. 
     ii.    Infantry Units have a proper mix of small arms, snipers MGs, and anti-tank weapons such as grenades, mines, rockets, and light ATGs [2pdr, 37mm, 47mm guns].  Therefore, the net fighting power is derived from about 40 infantry plus their crewed support weapons. 
    iii.    ATG Units represent specialized medium guns of 57mm, 6pdr, or 75mm with rates of fire and ammunition resulting in net equal performance against medium tanks over the course of several shots.  They also have some HE rounds and a crewed MG to fight infantry. 
   iv.    Mortar Units are 3”/75mm/82mm mortars or light field guns common to infantry battalions.  They have an MG to fight infantry, and some AT rounds or LAW to fight tanks.
Three Bases of guns, infantry [FoW style] or vehicles make a Unit.  All face the same direction showing the Unit’s Front and Rear.  A visibly unique base/vehicle, e.g. a command Tank, measures Range for the entire Unit.  The two other bases/vehicles must be parallel or behind the unique one.  Tanks keep 2” between bases, others 1”.  Aside from this, bases/vehicles are free to move in relation to each other – there are no formations.

Fire Types & Line of Sight
Direct Fire is used by all Units to Fire at Units they can see.  The LoS is traced from two Firing Unit Bases to two different Target Unit Bases, a full Base edge to a full Base edge.
Indirect Fire is used by Mortar Units to Fire at Target Units to which it has no LoS.  A friendly Unit observes for it, tracing a LoS from its Unique Base to any two Target Unit Bases, a full Base edge to two full Base Edges.
Line of Sight [LoS] is obstructed by intervening terrain of sufficient apparent height, such as hills, woods and towns, and friendly Units that are not Dug-in.
·         Area Terrain. Units may trace a LoS across one edge of an area terrain feature, such as a town, wood or cornfield, but the total LoS is limited to 4” or less.
·         Concealed Units may only have LoS traced to them at 12” or less if marked “Ready”.

PLAY SEQUENCE

A full Turn has two player Phases of three Steps, first Attacker [Player A] then Defender [Player D]:

Phase A, Attacking Player                          Phase D, Defending Player
1. Mortar Fire Step,                                         1. Mortar Fire Step,
2. Actions Step,                                               2. Actions Step
3. Routs, Rallies & End Step                          3. Routs, Rallies & End Step

Player A starts the game with his phase, followed by Player D.  The Players continue to alternate Phases until Victory has been achieved by the end of a complete Turn of both Player Phases.

1) MORTAR FIRE STEP
Summary. After ascertaining LoS to Target Units, Phasing Mortar Units may take a Fire Action; this is their only Fire opportunity.  If they do not Fire they may Move during the Action Step.  [see “Fire” below].

2) ACTIONS STEP
Summary. The Phasing Player sequentially selects Units to perform one Action, Fire or Move.  He resolves the Action, then selects another Unit until all desired Phasing Units have performed Actions. 
Ready Units.  The Non-phasing player performs Fire Actions during this Step with his Units marked “Ready” after any Phasing Unit has performed an Action. Remove the Ready marker as the Unit is no longer “Ready”.

A) FIRING ACTIONS are resolved by rolling a D5 to inflict Hits on a Target Unit.
·         Ranges. Measure Range between Unique Bases.  Infantry, ATGs & Tanks have a 12” range and a 4” Close Range. ATGs & Tanks have a 24” Long Range.  Mortars have a 48” range and no Close Range.
·         Friendly Units may only be Direct Fired through if both are Dug-in, or the Firing Unit is a Tank and the other is Dug-in.  Dug-in Units have safe fire lanes while Tanks are high and mobile.
·         Firing to Front or Flank. Units Fire 360°.  Their Front is measured 180° off the unique Base’s front side.  If the measured Range between Units is behind a Unit’s Front, a Unit is Firing to its Flank and is penalized or is taking fire upon its Flank and suffers additional Hits.
·         Target Priorities.  Generally, Units should prioritize Fire at the closest Target Units against which they have the best modifier and least penalized shot.  All factors being equal, closest is the highest priority.  So Tanks will fire against Tanks and ATGs first – even if Infantry are closer, for example.

Roll a d5 for Hits, subtracting -1 for 5 Hits or -2 for 10 Hits, then apply modifiers below:
  Target Unit
Firing unit
Infantry
Mortar
ATG
Tank
Firing on a Rear
Firing to the Rear
Close
Range
Long
Range
Infantry
-
-2
-
-2
+2
-2
x2
na
Mortar
+2
-
+2
-2
na
na
na
na
ATG
-2
-2
-2
+2
+2
-2
x2
1/2
Tank
-
-
-
+2
+2
-2
x2
1/2
Terrain and Range Modifiers. Apply the following benefits for the Target’s situation:
a.            Cover. Units halve Hits in towns, and/or Dug-in.
b.            Woods. Units in woods halve hits except from Mortars.
c.            Hilltops. Tank Units on a hill top halve hits except from Mortars.
d.            Range. Units Fired upon at Long Range halve hits, at Close Range double Hits.
e.            Maximum defensive benefit is quartered Hits. Round fractions down.
Remove the Target Unit if it has more than 15 Hits, otherwise mark the Hits on the Target Unit.
Mark the firing Unit with white cotton.


B) MOVEMENT ACTIONS
Summary. The Phasing player picks a Unit and rolls the dice, totals them and applies any bonus or penalty amount.  He then moves any portion of it and marks the Unit “Moved” [e.g. a dust cloud].  No Base/model may move farther than the total amount rolled but they may turn freely.  By rolling the dice, the Unit counts as moving even if no distance is moved [losing Ready or Dug-in status, etc]. 

Roll the d6 indicated below, add the bonus and move any portion.
Unit Type
Movement
Threatened, <2”
Dug-in
Road
ATG, Mortar
1d5+2
na
-4”
+4”
Infantry
2d5+2
-4”
-4”
+4“
Tank
3d5+2
-4”
-4”
+4”

Terrain. Units are affected by terrain as follows:
a.    Marshland and Lakes. Impassable.
b.    Woods. Only Infantry move through, but ATGs may enter the edge, subtracting 4” from the total rolled.
c.    Towns. Only Infantry may end its move within a town
d.    Rivers. These may only be crossed via bridges or fords.
e.    Roads. Units may use a road to enter prohibited terrain, ignore penalties, and trace a LoS.  If a Unit moves entirely by road and does not Assault it may increase its movement distance by 4”.
Turning. Moving Unit Bases may turn freely but must all face the same direction at move’s end.  
Interpenetration. A Unit may only pass through a friendly Unit.  They must clear it completely, having no part of any of its bases between the stationary friendly Unit’s Bases.
Dug-in Units subtract 4” from their movement and are no longer Dug-in after they roll Move dice.
Threatened Units have an enemy base within 2” of any of their bases.  ATGs and Mortars may not move when Threatened while Tank and Infantry Units lose 4” of movement.  Soldiers didn’t like to maneuver close to the enemy, and exercised a slowing cautiousness when they even suspected the enemy was nearby.

3) RALLY & READY STEP
Phasing Units that did not take an Action during their Turn may do any one of the following:
Rally. Hits reduce a Units Fire dice by -1 for 5 Hits and -2 for 10 Hits.  Units remove Hits by Rallying. Roll a D5 and remove that many Hits if Concealed or a Tank: remove D5-2 Hits if neither.  This represents a major effort to reorganize, resupply, repair and get shirkers back into the fight. OR,
Ready. Phasing Infantry, Tanks or ATGs may be marked “Ready”.  Ready Units may take a Fire Action during the opponent’s Actions Step after any Phasing Unit has acted.  Ready Units lose Ready status by Firing or Moving; they may Dig-in or Rally.  This represents a Unit lying in wait to ambush or open fire upon enemy who move into their sights; if no threat develops, they will continue to improve their position and prepare. OR,
Dug-in.  Phasing Units that do not Fire or Move may become “Dug-in”.  This means they halve Hits against incoming Fire and count as Concealed Units for Rallying.  It also means they can shoot through friendly Dug-in Units or be fired through by Tanks.  They spent time getting cover and/or concealment, making them harder to detect and Hit.  They also coordinate their positions with friendly Units to minimize the chance of fratricide.