 So how did this come about?
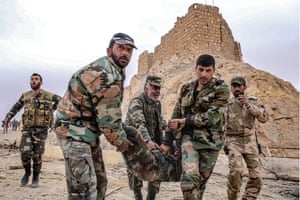
I want a look that will be different from the US new camo, OCP. The below pattern should be discernibly different at a distance, and seems common with Syrian government forces now, and has been used by Iraq and others [probably from US stocks, whether aid or sales].

Another image below - I want the effect of the middle guy with the large brown splotches. i want distinct patterns even if they are similar. But with 6mm or 1/285, I may need to color code the bases, also.

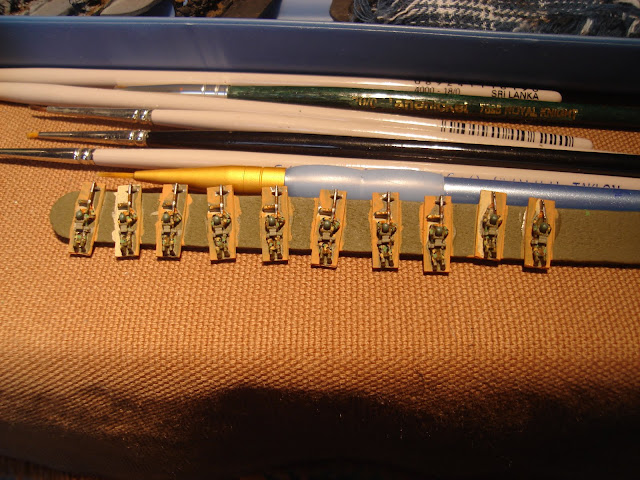
First attempt. Going for something that looks good at about 1-2 feet. So farther away than this. Two on the right have the full test, the rest have the green and the brown / rust.

Bit closer - again the two on the right. I think the black splotches are a bit large.

It has to be remembered that all scaled down painting has to be brighter than the original color. So even if one obtained the exact shade of paint for a ship, tank, whatever, it would still need to be brightened.
That doesn't even go into the lighting conditions of the typical - indoor - wargaming event, which are either poor or mostly white / neon light in large venues like a convention. A very few wargamers have good natural indirect lighting, but they are few and far between.
Bit farther along, below, with the tan splotches. Overall, I'm just using small 3/0 and 5/0 brushes to paint little dots on them. I spread them out a bit, and if the area is a little too dark or bright I hit it accordingly. If a splotch looks too big, the next color is an opportunity to put a spot on the part that's too big. By partially covering previous "dots" of color, you can make it smaller while still progressing with the camo coverage. One should never need to go back and redo a color using this system!

This is the whole line of them with the green, brown and buff painted on. Black is next, using the Micron Pen 1.0 but will wait for them to dry overnight.

Below the finish test run for the figures, with the guns painted also.
To get a better feel, I also painted some brown and sand onto the bases as they'll need to blend in with the basing approach eventually. The dark green spray is a little smooth on the metal, and coverage isn't great, but I got enough on to let me see what the figs will look like.
They still need the black boots, and a few other touches, but don't consider that to be part of testing the camo! The black is a micron pen - remember to let them dry for a day or so before using the pen, it'll work better.

Overall, very pleased with them.
Brushes - these look a bit worn, but when wet they are OK. Just to show the relationship between fig size and brush size. 3/0, 5/0, 10/0, 0 range are all useful.

Paint choices - note how bright the colors are!

At left, Model Master rust and GW Bestial Brown for the brown. Armory Sniper Green and Dun/Buckskin for the green and tan splotches. Polly-S "USSR Topside Green" for the web gear and backpack - sort of a light olive color. The gun metal is GW Boltgun Metal, and the ammo belt is GW Shining Gold.
Below, two Vallejo colors: Orange Brown and Dark Sand look useful for flesh and the bases.

These figures are pretty quick and the effect is cool. I can easily see that it won't be too long to do the whole batch of a 125.
No comments:
Post a Comment
Thanks for your comment! t will be posted after it's moderated.